
New iPhone 8 Restore from iCloud Stuck on Time Remaining Estimating | Stellar
New iPhone 14 Restore from iCloud Stuck on Time Remaining Estimating
Summary: The joy of using iPhone 14 comes to a halt if your newly purchased iOS device remains stuck at “iCloud backup remaining estimating time” loop. You’ll Google how to restart an iPhone but end up being confused about what to do or what not to do. We understand your angst. So, in this blog, we offer you lucrative options to restore new iPhone 14 from iCloud backup. Also, we have taken the liberty to recommend a reliable iPhone data recovery software to use in case of accidental data loss. Use the given buttons to free download and try it yourself.


Every time you buy a new iPhone, restoring backup becomes a vital necessity to finish the setup. Long wait to restore a new iPhone 14 is killing the joy of using the most awaited Apple product. You can restore iTunes or Finder backup using laptop or MacBook, but as soon as you perform iCloud backup on iPhone 14, the device gets stuck at estimated time remaining. It’s a prominent issue, pointed by many iPhone 14 users recently.
The problem arises at setting up a new iPhone with existing iCloud backup. Possibility of getting stuck on Restore in Progress: An estimated storage (XXGB) required to finish restoring your apps and data.

Why is my new iPhone 14 stuck at restore from iCloud?
Before finding your options to overcome the problem and learn how to restore an iPhone, get familiar with the root cause of the problem:
- Perhaps additional data storage space is required.
- Apple server is preventing iCloud data restoration.
- iCloud system status is not working for iCloud backup and iCloud Account login.

- Slow or unstable WiFi connection.
- Numerous unwanted backup files stored on iCloud.
Generally, restoring in progress doesn’t take more than 20 to 60 minutes for an iPhone to restart. Nonetheless, if restoring is stuck beyond that time, then be wary that it might take hours to finish. Anyhow, iPhone offers you ample options to get around a stuck iCloud backup.
How to restart an iPhone stuck at “Restore from iCloud- Time Remaining: Estimating”
Read the below methods to identify a perfect route to finish restoring iPhone 14 from iCloud backup. You can also stop restoring your iPhone and experiment with other alternatives:
Cancel the iCloud Restore in Progress
Stop the ‘Restore from iCloud’ process and start afresh after giving rest to your iPhone for a while. The move allows iOS device to optimize operations after turning off all the activities. To do so, you need to interrupt the ongoing restore from iCloud backup, which is already stuck at a specified time remaining. Rebooting your iPhone will fix all the minor glitches liable for creating such. Follow these steps:
- Press and hold the side button (on the right hand side of your iPhone) along with volume up/ down button till the power-off slider appears on your iPhone 14 screen.

- Drag the slider to your right and wait for 30-seconds to turn off the device.

- To turn the iPhone back on, press and hold the side button until the Apple logo appears on screen.
![]()
Restart Restoring iCloud Backup
Once your iPhone 14 restarts, follow these steps to restore iCloud backup:
- Go to Settings > General > Transfer or Reset iPhone > Reset > Reset All Settings.

- Set up your iPhone and select Restore from iCloud Backup on the Apps & Data screen.
- You can also choose another restoration option- Transfer Directly from iPhone.
- Follow the instruction available on-screen to restore your iOS device.
If your new iPhone 14 continues getting stuck at iCloud restore progress, then you need to check your internet connection. Also, make sure the iOS device has adequate space to handle large volume of data you are trying to copy in it.
Check the iCloud System Status
At rare occasions, even Apple server prevents the iCloud data restoration. The first thing you can do in such situations is to ascertain whether the restore process was stalled because of an internet issue or iCloud System Status. To do so, go to Apple system status page and check if iCloud Backup, Apple ID, and iCloud Account and Sign In, are working. If not, then you can’t do much but wait for Apple support to fix the issue at their end.
iCloud backup restore stuck while setting up a new iPhone 14 is not stressful until you lose a significant amount of data in the process. It is possible that in the search and trial of different options to restore iCloud backup on new iPhone 14, you might lose a significant amount of data. Use a reliable iPhone data recovery software like Stellar Data Recovery for iPhone to restore all the lost or deleted iPhone data from different variants of iPhone, iPad, and iPod touch.

Note that the software also supports recovery from iCloud backup and iTunes backup. The advanced software allows you to select and restore only a selected few or the desired files lost from iCloud. Moreover, the iOS recovery software executes recovery in the least possible time and could manage every bit of data stored in your iCloud backup. Refer to our KB to learn how to recover deleted iCloud data .
Conclusion:
This blog encapsulates various methods to swiftly get out of the trouble of new iPhone 14 stuck at restore from iCloud. As you try these methods, eventually, you will find the most suitable option to resolve the iPhone 14 stuck at restore from iCloud error. At times, the process of data restore remains slow for reasons beyond your control. Perhaps the files you wish to restore to the newly purchased iOS device are way too large or the process is taking longer because of a weak Wi-Fi network or the Apple Server is undergoing maintenance. Either of the reasons may further enhance the risk of data loss on the iPhone. Therefore, you need an infallible solution like Stellar Data Recovery for iPhone to retrieve lost contacts, photos, videos, apps, games, chats, and more.
How to Recover FaceTime Call History on iPhone
Summary: Have you deleted or lost FaceTime calls from your iPhone? Once deleted from the call history, the Facetime calls are removed from the app’s history and vice versa. This post shares quick methods to restore FaceTime call history from any series of iPhone 15, 14, 13, 12, X, XS Max, XR, X, 8, 8 Plus, 7, and below versions and iPads’.
‘Just noticed, that the FaceTime call history suddenly disappeared. Cellular calls history is fine. I am using iOS 16.2, iPhone 14. I don’t have iTunes backup and don’t want to try iCloud backup as it will remove my current data. Is there any other way to get back FaceTime call history?’
‘I deleted the call history on my iPhone and without realizing that FaceTime calls will also be erased. How can I recover deleted FaceTime history?’
You love using FaceTime — Apple’s popular calling app, on your iOS device. It’s a free and easy way to connect with family and friends anywhere in the world through audio and video calls.
But what if ever you accidentally delete or lose FaceTime calls from your iPhone or iPad. They may be important calls you wanted to keep.
Since FaceTime calls are integrated into your recent calls list on iPhone, once deleted from the call history, the calls are removed from the app’s history as well and vice versa.
Here we share various methods to restore FaceTime call history on iPhone 14, 13, 12, 11, XS, XS Max, XR, X, 8, 8 Plus, 7, 7 Plus, 6 and below versions and iPad.
How to recover the lost or deleted FaceTime call history?
1. Restore FaceTime call history without iTunes/ iCloud backup
Deleted FaceTime history can be recovered by using Stellar Data Recovery for iPhone software. The software can restore lost FaceTime call history after accidental deletion, factory reset, app crash, jailbreak, and other issues.
The DIY software thoroughly scans your iPhone or iPad to recover the lost FaceTime call history.
In contrast to iTunes and iCloud backup, Stellar iPhone data recovery software lets you select and restore specific iPhone deleted call history along with the details like name, date, call duration, source country. This saves you from restoring other unnecessary data.
Step-by-step: Recover deleted/ lost FaceTime calls from iPhone
- Connect your iPhone to the computer
- Launch Stellar Data Recovery for iPhone
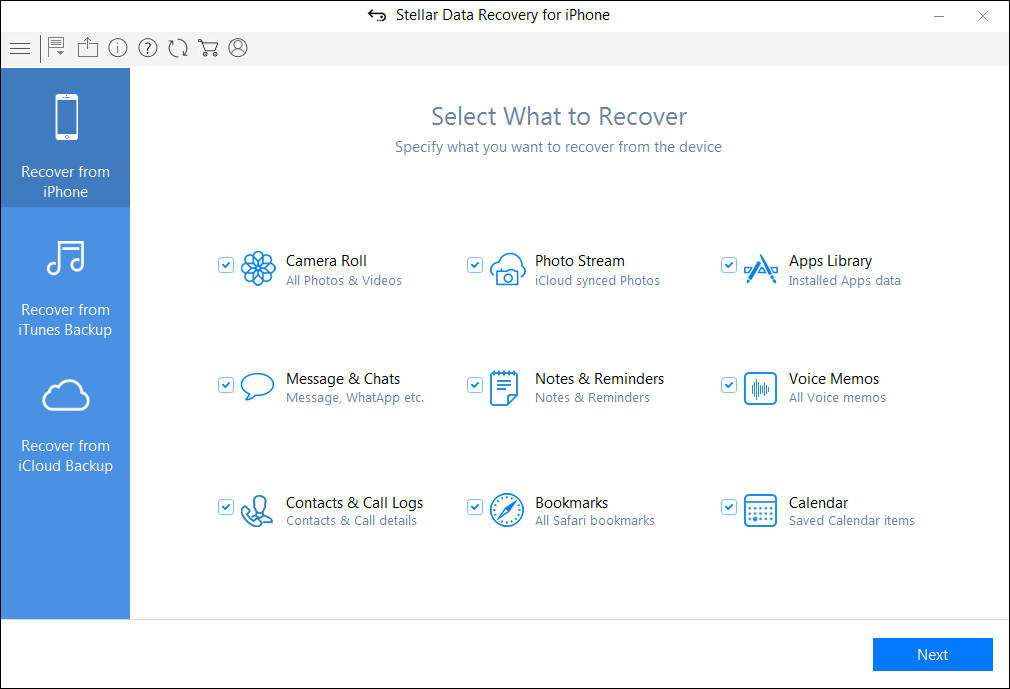
- Select Recover from iPhone on the left
- Select Contacts & Call Logs under What to Recover

- Click Next
- Preview and choose the FaceTime calls you want to restore from the list. Note: All the calls marked in red color are the deleted calls

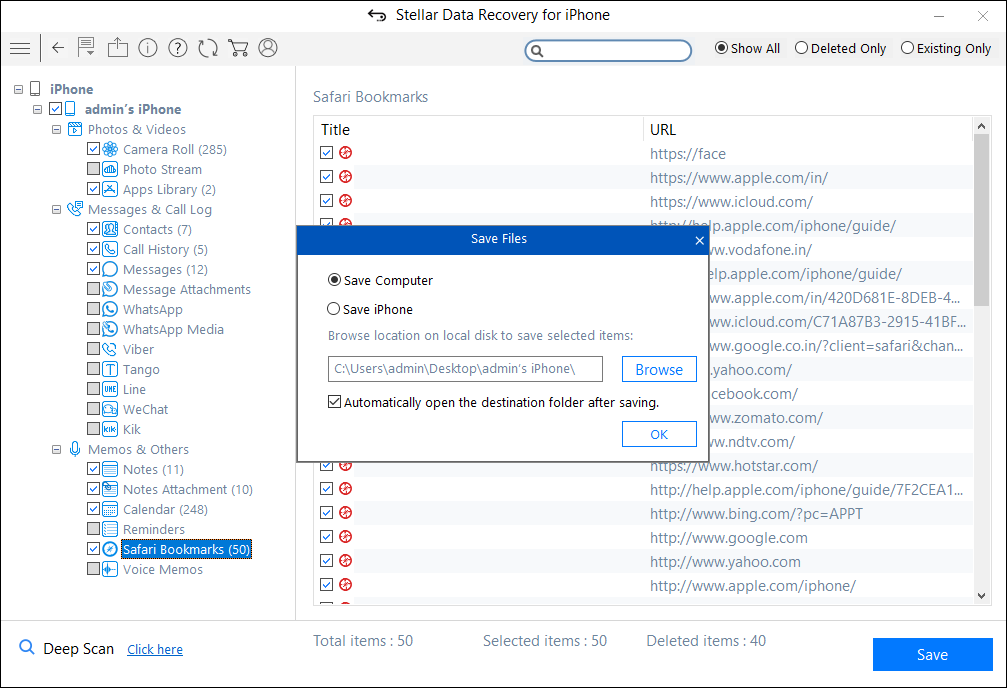
- Click You can save the call history either on your computer or iPhone.
2. Recover FaceTime call history with iCloud
Stellar Data Recovery for iPhone can also restore FaceTime calls from iCloud backup on your iPhone or iPad. This method allows you to select and recover only the lost FaceTime call history from iCloud instead of restoring complete backup data.
Two methods to restore FaceTime log from iCloud:
- Restore lost/deleted FaceTime calls from iCloud without losing existing iPhone data
- Restore FaceTime call history from iCloud backup for free, deleting the current iPhone data
Method 1: Restore lost/deleted FaceTime calls from iCloud without losing existing iPhone data:
- Download Stellar Data Recovery for iPhone on your PC/ Mac
- Select Recover from iCloud Backup on main screen of software

- Select Contacts & Call Logs and click Next
- Enter the Apple ID and password. List of all available iCloud backup files appears. Select the relevant backup of your iPhone
- Click Scan

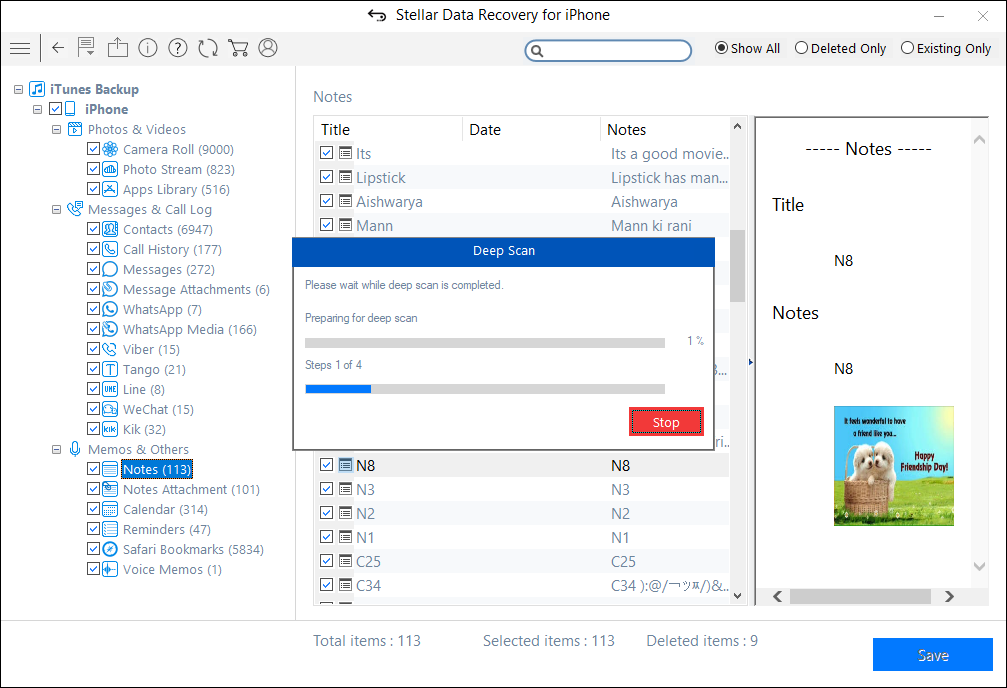
- Click Call History on the left window. Preview the existing and deleted FaceTime calls. Click Deep Scan, if you don’t find your required calls.

- Click Save to save the recovered call history either on iPhone or computer
Method 2: Restore FaceTime from iCloud backup for free (this deletes the current iPhone data)
- Go to Settings > General > Reset> Erase all Contents and Settings

- On Apps & Data screen, tap Restore from iCloud Backup

- Sign in to your iCloud account

- Choose the last backup and Restore
Note – The drawback of this method is that it deletes all your existing data from the iPhone.
Recover FaceTime calls from iTunes Backup
3. Recover FaceTime calls from iTunes Backup
FaceTime recovery from iTunes backup is also possible if you have enabled the backup in iTunes.
Restore FaceTime call log from iTunes either with the help of Stellar Data Recovery for iPhone or directly from your system without the help of software.
However, if you don’t want to part ways with your iPhone’s existing data and lose all the current photos, videos, etc. with the old backup file, take the help of Stellar Data Recovery for iPhone.
The software protects your current data on iPhone and recovers only the call history as required.
Two methods to restore FaceTime call history from iTunes
- Restore FaceTime call history from iTunes without losing existing iPhone data
- Restore FaceTime call history from iTunes backup, deleting the current iPhone data
Method 1: Restore FaceTime call history from iTunes without losing existing iPhone data
- Download Stellar Data Recovery for iPhone software on your PC/ Mac. Note: Connect your iPhone to a computer, if want to save the recovered FaceTime call history on iPhone.
- Select Recover from iTunes Backup on the main screen of the application.

- Select Contacts & Call Logs
- Click Next. From the list of the iTunes backup files, select the relevant iTunes backup

- Click Scan
- Click Call History. Preview the existing and deleted FaceTime calls. Click Deep Scan, if you don’t find your required calls.
- Click Save. You can save on your computer or iPhone
Method 2: Restore FaceTime call history from iTunes for free (this method deletes the current iPhone data)
- Connect iPhone to PC/ Mac
- Launch iTunes on your computer
- Select your iPhone under the Device list and choose the recent backup entry date

- Click Restore Backup
Apple uses end-to-end encryption in FaceTime calls. It will not decrypt the content of your conversations. Apple may record and store information, such as to whom you had called and your iPhone/ iPad network configurations. It stores this information for up to 30 days. You don’t get the details like the content of the conversation or whether your call was answered or not.
Nevertheless, you can contact Apple requesting for FaceTime call logs by clicking on this link and submitting the request – Read More
Apple will get back to you.
Conclusion
iCloud and iTunes backup are the natural way for Apple users to recover FaceTime deleted call history. However, Apple’s solution though workable is not efficient when it comes to the recovery of specific types of data. The iTunes or iCloud backup recovery methods replace every existing data on your iPhone with an old/recent backup. You lose your current photos, videos, call history, messages, chats, etc.
Whereas Stellar Data Recovery for iPhone tackles this recovery issue more effectively. It recovers lost FaceTime calls and also keeps your current data intact on the iPhone.
The software works in all data loss situations due to deletion, jailbreak, water damage, factory reset, etc. You can restore FaceTime call history from any iPhone including series of iPhone 15, 14, 13, 12, 11, X, XS, XR, iPhone 8, iPhone 7, iPhone 6 and older versions. It is available for both Windows and macOS computers.
## 7 Ways to Fix iTunes Error 9Summary: The iTunes error 9 appears when iPhone update through iTunes gets failed. It’s annoying as the error doesn’t let you use your device further. Learn 7 quick methods to fix iTunes error 9 and update the device without any issue.
Trying to get the new iOS on your iPhone but facing iTunes Error 9?

The iTunes error 9 usually occurs while updating your iPhone via iTunes. The error annoyingly neither lets you update the iPhone nor do any activity on your device. Thus, it urgently requires a fix so that you can work on your iPhone and also update the device.
In this post, we will share with you 7 best possible ways to fix iTunes Error 9. But before that let’s know what is causing the iTunes error on trying to update your iPhone.
Why does iTunes Error 9 occur?
It is difficult to determine the exact reason of your iTunes Error 9. But it may be due to any of the reasons given below :
- USB port or cable is damaged
- You have jailbroken your iPhone
- Corrupt network settings
- Security software prevents access to Apple server
How to fix iTunes error 9?
Since it is usually, regarded as a hardware issue, you should begin with hardware-related workarounds and later move to other software troubleshooting methods.
Going by the order, try below methods to fix iTunes Error 9
- Check USB cable & port
- Restore iPhone with iTunes on another computer
- Force your device to restart
- Check Anti-Virus & Firewall on your computer
- Update iTunes to the latest version
- Use Recovery Mode to Fix iTunes Error 9
- Choose to update iPhone wirelessly
Solution 1: Check USB cable and port
Make sure your iPhone USB cable and port are properly connected and working fine. Do the below checks and fix:
- USB cable is not loosely connected to the computer
- You are using the USB cable that you got with your iPhone or another certified cable
- The USB port is not damaged. Try by shifting to another USB port
Solution 2: Restore iPhone with iTunes on another computer
iTunes error 9 is generally regarded as a hardware-related problem. Sometimes it is difficult to detect the issue. The easier way out is to restore iPhone using iTunes on another computer or laptop. If still the error persists, move on to the other workarounds.
Solution 3: Force restart your device
Apple suggests trying once force a restart of iPhone to fix iTunes error 9.
iPhone X, iPhone 8, & iPhone 8 Plus users: Press and quickly release the Volume Up button. Press and quickly release the Volume Down button. Then, press and hold the Side button until you see the Apple logo.
iPhone 7 & iPhone 7 Plus users: Press and hold both the Side and Volume Down buttons for at least 10 seconds, until you see the Apple logo.
Solution 4: Check Anti-Virus & Firewall on your computer
Antivirus or Firewalls in your computer may prevent iTunes to connect with Apple server. Check the security software settings, and tweak them if required to allow iTunes to access the network servers.
Solution 5: Update iTunes to the latest version
Updates usually bring in new features, fix existing bugs and make the application smarter. If the iTunes error 9 is due to outdated iTunes, installing the latest version may help to fix the error.
How to update iTunes to the latest version?
For Windows users: Launch iTunes on PC. On the menu bar, click Help > Check for Updates and follow the given instructions
For Mac users: Launch iTunes on Mac. On Menu bar go to iTunes > Check for Updates and follow the on-screen instructions.
After updating iTunes, reboot your computer and check if the iTunes error 9 is fixed.
Solution 6: Use Recovery Mode to fix iTunes Error 9

iPhone in Recovery Mode
All the above methods fail to fix iTunes error 9? As last resort choose Recovery Mode to restore iPhone in iTunes. Choosing this option means you will lose all your iPhone data. Thus, first take backup in iCloud or iTunes before applying this fix.
How to put your iPhone into Recovery Mode? (For iPhone 8, 8 Plus, & X users)
- Update your iTunes
- Press and release the Volume Up button and then the Volume Down button
- Press and hold the Side button till connect to iTunes screen appears
- Once the iPhone is in Recovery Mode, connect your computer with iPhone via USB cable. You will see the white Apple logo screen.
- When iTunes asks you to update or restore, click Update to reinstall iOS
Lost iPhone data after restoring iPhone in iTunes via Recovery Mode?
Losing iPhone data after update through Recovery mode is a panicky situation. It gets even more serious if you are unable to restore from iCloud or iTunes backup. In such situation, Stellar Data Recovery for iPhone comes as big relief**.** The software restores complete iPhone information from iPhone, iCloud and iTunes.
Stellar iPhone data recovery software quickly and safely restores all iPhone data including photos, videos, music, contacts, messages, Safari bookmarks, etc. It also recovers the lost WhatsApp, WeChat, Line, Viber, Tango, and Kik messages. The software is extremely easy to use. Simply launch it on your Mac or PC, connect your iPhone to the computer and follow the on-screen instructions.
Solution 7: Choose to update iPhone wirelessly

Select Software Update in Settings on iPhone
Alternatively update iPhone wirelessly, without using iTunes. Make sure you have a continuous Internet connection. Go to Settings > General > Software Update. If an update is available, tap on Download and Install.
Conclusion
Although iTunes Error 9 rarely occurs but is a frustrating situation as you are unable to do any other activity on your device.
You can sometimes easily fix the Error 9 by doing a simple check if your USB cable, port connection, and firewall settings are appropriate. Restarting the device and updating iTunes to the latest version can also resolve Error 9. As a last resort, update iOS in iTunes through Recovery Mode. Nevertheless, you can also choose to bypass iTunes and update your device wirelessly.
One of the above methods is surely going to help you out. Also do not forget to share with us in the comment box below, which of these methods helped you to fix iTunes Error 9.
How to find lost iPhone Backup files on Windows PC?
Summary: You have to restore iPhone data. But you cannot find backup files saved on your Windows PC or the backup files are unreadable. This post guides you to find iPhone backup on Windows PC and methods to restore it on your device.
You may get into a terrible iPhone data loss situation after a factory reset, stolen iPhone, jailbreak or physical damage to your device, etc. Backup is your only resort. But another shocker is waiting for you. You cannot find iPhone backup files once saved on your Windows PC.
Your backup files are not readable, and you have no clue how to access them.
In such a situation, keep calm and do not worry. If you have ever saved your iPhone backup on a Windows computer and are now unable to locate or access it, this post guides you to find an iPhone backup on a PC and how to restore it on your device.
Where are iPhone backups stored on Windows PC?
iPhone backups are safe copies of your complete device information. iTunes saves iPhone backup in the Users folder on a Windows computer. These backup files are not in a readable format. You can copy them but should never try to move files to a different drive, edit, rename or extract content. All such activities can ruin the backup files. However, you can make copies of your backup or delete backup that you do not require anymore.
Steps to find iPhone backup files on Windows PC:
- In the Search bar, enter %appdata% or %USERPROFILE% (if you downloaded iTunes from the Microsoft Store)
- Press Return
- Double-click these folders: Apple Computer > MobileSync > Backup
You can also locate iPhone backup in Windows 7, 8, 10 or 11 by following Users > (username) > AppData > Roaming > Apple Computer > MobileSync > Backup.
Cannot locate iPhone backup on Windows PC? Find and Restore data with iPhone data recovery software.
If you cannot find your iPhone backup data on your PC or cannot access the backup files, take refuge in third-party software – Stellar Data Recovery for iPhone.
How can Stellar Data Recovery for iPhone help you?
You can find, access, and restore lost iPhone backup files with Stellar Data Recovery for iPhone. It is a secure tool that efficiently scans the computer to find your iPhone backup. The recovered iPhone backup files are in readable form, and you can either save them on your PC or iPhone.
When you can use the Stellar iPhone data recovery solution
- You are unable to locate your iPhone backup files
- Your backup files are either lost or deleted.
- You cannot access iPhone backup files on Windows PC
- Not able to restore backup on your old/new iPhone
How can Stellar Data Recovery for iPhone recover lost backup files from PC?
The iPhone Data Recovery Tool by Stellar is a do-it-yourself software that quickly recovers complete iPhone data in a readable form from your Windows PC.
You can recover all your lost photos, videos, contacts, messages, Safari bookmarks, Call history, Reminders, Voice memos, Notes, WhatsApp, Kik, WeChat, Viber messages, etc.
It also offers a Deep Scan if your desired iPhone information is not recovered after the first scan. A deep scan does a comprehensive scan of the selected device or backup to recover every bit of lost or deleted backup information.
Benefits of Stellar iPhone Data Recovery
- Recovery of deleted or lost backup files
- Recovers data in a readable format
- Option to restore only that data from backup which you want to be in your iPhone
- Allows to save recovered backup on computer or iPhone
Step-by-step recovery of lost iPhone backup on Windows PC with Stellar Data Recovery for iPhone
Step 1: Connect your iPhone to your computer and launch the software.
Step 2: On the home screen, select Recover from iPhone. The scanning process begins.
Step 3: After scanning, all the files on your iPhone are listed.

If you do not see the required files in the list, choose Deep Scan. It will scan for the backup stored on your computer system.
Step 4: Select and save the recovered iPhone data at your desired location. You can save it on your iPhone if you want to restore backup data on your device or save it on your computer.
Wrapping Up
Losing iPhone data after factory reset, jailbreak, being stuck in a boot loop or physical damage, etc., can get messier when you cannot find or retrieve information from iPhone backup files saved on your computer. Stellar Data Recovery for iPhone significantly relieves such data loss situations.
This iPhone utility not only finds the lost iPhone backup files on Windows PC, but it also makes them readable and allows you to save/restore them to your iPhone or computer. Moreover, it lets you selectively transfer iPhone data on your iPhone rather than complete a backup.
You can download the free trial version to evaluate its performance. It is undoubtedly not going to disappoint you.
- Title: New iPhone 8 Restore from iCloud Stuck on Time Remaining Estimating | Stellar
- Author: Vivienne
- Created at : 2024-07-17 04:03:32
- Updated at : 2024-07-18 04:03:32
- Link: https://review-topics.techidaily.com/new-iphone-8-restore-from-icloud-stuck-on-time-remaining-estimating-stellar-by-stellar-data-recovery-ios-iphone-data-recovery/
- License: This work is licensed under CC BY-NC-SA 4.0.