
:max_bytes(150000):strip_icc():format(webp)/GettyImages-626970032-497800518dac4d6cafa0dc19b953f1ff.jpg)
New iPhone 8 Plus Restore from iCloud Stuck on Time Remaining Estimating | Stellar
New iPhone 14 Restore from iCloud Stuck on Time Remaining Estimating
Summary: The joy of using iPhone 14 comes to a halt if your newly purchased iOS device remains stuck at “iCloud backup remaining estimating time” loop. You’ll Google how to restart an iPhone but end up being confused about what to do or what not to do. We understand your angst. So, in this blog, we offer you lucrative options to restore new iPhone 14 from iCloud backup. Also, we have taken the liberty to recommend a reliable iPhone data recovery software to use in case of accidental data loss. Use the given buttons to free download and try it yourself.


Every time you buy a new iPhone, restoring backup becomes a vital necessity to finish the setup. Long wait to restore a new iPhone 14 is killing the joy of using the most awaited Apple product. You can restore iTunes or Finder backup using laptop or MacBook, but as soon as you perform iCloud backup on iPhone 14, the device gets stuck at estimated time remaining. It’s a prominent issue, pointed by many iPhone 14 users recently.
The problem arises at setting up a new iPhone with existing iCloud backup. Possibility of getting stuck on Restore in Progress: An estimated storage (XXGB) required to finish restoring your apps and data.
Why is my new iPhone 14 stuck at restore from iCloud?
Before finding your options to overcome the problem and learn how to restore an iPhone, get familiar with the root cause of the problem:
- Perhaps additional data storage space is required.
- Apple server is preventing iCloud data restoration.
- iCloud system status is not working for iCloud backup and iCloud Account login.

- Slow or unstable WiFi connection.
- Numerous unwanted backup files stored on iCloud.
Generally, restoring in progress doesn’t take more than 20 to 60 minutes for an iPhone to restart. Nonetheless, if restoring is stuck beyond that time, then be wary that it might take hours to finish. Anyhow, iPhone offers you ample options to get around a stuck iCloud backup.
How to restart an iPhone stuck at “Restore from iCloud- Time Remaining: Estimating”
Read the below methods to identify a perfect route to finish restoring iPhone 14 from iCloud backup. You can also stop restoring your iPhone and experiment with other alternatives:
Cancel the iCloud Restore in Progress
Stop the ‘Restore from iCloud’ process and start afresh after giving rest to your iPhone for a while. The move allows iOS device to optimize operations after turning off all the activities. To do so, you need to interrupt the ongoing restore from iCloud backup, which is already stuck at a specified time remaining. Rebooting your iPhone will fix all the minor glitches liable for creating such. Follow these steps:
- Press and hold the side button (on the right hand side of your iPhone) along with volume up/ down button till the power-off slider appears on your iPhone 14 screen.

- Drag the slider to your right and wait for 30-seconds to turn off the device.

- To turn the iPhone back on, press and hold the side button until the Apple logo appears on screen.
![]()
Restart Restoring iCloud Backup
Once your iPhone 14 restarts, follow these steps to restore iCloud backup:
- Go to Settings > General > Transfer or Reset iPhone > Reset > Reset All Settings.

- Set up your iPhone and select Restore from iCloud Backup on the Apps & Data screen.
- You can also choose another restoration option- Transfer Directly from iPhone.
- Follow the instruction available on-screen to restore your iOS device.
If your new iPhone 14 continues getting stuck at iCloud restore progress, then you need to check your internet connection. Also, make sure the iOS device has adequate space to handle large volume of data you are trying to copy in it.
Check the iCloud System Status
At rare occasions, even Apple server prevents the iCloud data restoration. The first thing you can do in such situations is to ascertain whether the restore process was stalled because of an internet issue or iCloud System Status. To do so, go to Apple system status page and check if iCloud Backup, Apple ID, and iCloud Account and Sign In, are working. If not, then you can’t do much but wait for Apple support to fix the issue at their end.
iCloud backup restore stuck while setting up a new iPhone 14 is not stressful until you lose a significant amount of data in the process. It is possible that in the search and trial of different options to restore iCloud backup on new iPhone 14, you might lose a significant amount of data. Use a reliable iPhone data recovery software like Stellar Data Recovery for iPhone to restore all the lost or deleted iPhone data from different variants of iPhone, iPad, and iPod touch.

Note that the software also supports recovery from iCloud backup and iTunes backup. The advanced software allows you to select and restore only a selected few or the desired files lost from iCloud. Moreover, the iOS recovery software executes recovery in the least possible time and could manage every bit of data stored in your iCloud backup. Refer to our KB to learn how to recover deleted iCloud data .
Conclusion:
This blog encapsulates various methods to swiftly get out of the trouble of new iPhone 14 stuck at restore from iCloud. As you try these methods, eventually, you will find the most suitable option to resolve the iPhone 14 stuck at restore from iCloud error. At times, the process of data restore remains slow for reasons beyond your control. Perhaps the files you wish to restore to the newly purchased iOS device are way too large or the process is taking longer because of a weak Wi-Fi network or the Apple Server is undergoing maintenance. Either of the reasons may further enhance the risk of data loss on the iPhone. Therefore, you need an infallible solution like Stellar Data Recovery for iPhone to retrieve lost contacts, photos, videos, apps, games, chats, and more.
6 Things We Can Do To Save A Water Damaged iPhone
“Hey there! I accidentally spilled water on my iPhone 14 Pro yesterday and it won`t turn on anymore. I was pretty sure I retrieved the phone within 10 seconds, yet it’s not working! Is there a way to save and fix water-damaged iPhone?”
If you’ve ever accidentally dropped your phone in water or drenched it in rain, then you’re not alone. From a split cup of coffee or water to dropping it in pools, bathtubs or toilets, your iPhone can be water-damaged due to various reasons.
With new-generation Apple devices, water exposure isn’t an immediate death sentence for your iPhone as it used to be. But it can still create issues in your iPhone, such as:
- Liquid droplets flowing inside the iPhone screen
- Issues in the charging port or the iPhone won’t charge.
- No audio or ruffled audio.
- Blurry images due to moisture in the camera lens.
- The internal part of the device gets corroded.
While the new iPhones have good water resistant capabilities, this doesn’t mean they are totally immune to water. Being electronic devices, water can seriously damage them.
This article shares several best practices that can help you save a water-damaged iPhone. But first, let’s understand how water resistant your iPhone is.
Is my iPhone water resistant?
The water resistance of the smartphones is rated by the “ingress protection” code, also called IP rating.
This rating includes two number: the first number indicates protection against solids, such as dust, whereas the second demonstrate resistance to liquid, mainly water. For example, the iPhone 12 has a rating of IP68, which means it provides six levels of protection from solid and eight levels of protection from liquid.
There are multiple types of IP ratings, but IP67 and IP68 are mainly applied to iPhones.
- IP67 – A device with this rating can withstand being submerged in up to 1 meter of water for a maximum of 30 minutes
- IP68 – iPhone with an IP68 rating can survive submersion in water up to 2 meters for a maximum of 30 minutes
Here’s the list of last few generation iPhone with their IP rating
- iPhone 15/15 Plus/ 15 Pro/ 15 Pro Max – IP68
- iPhone 14/14 Plus/ 14 Pro/ 14 Pro Max – IP68
- iPhone13/ 13 Mini/ 13 Pro / 13 Pro Max – IP68
- iPhone12/ 12 Mini/ 12 Pro / 12 Pro Max – IP68
- iPhone 11/ 11 Pro / 11 Pro Max – IP68
- iPhone XS/ XS Max – IP68
- iPhone X/XR /8/8 Plus /7 /7 Plus/ SE (2nd generation) – IP67
What Not to Do?
Most iPhones offer certain level of water resistance, but it doesn’t mean an iPhone dropped in swimming pool or a bucket full of water is immune to any damage. Moreover, not every repair step will help you fix water-damaged iPhone; and some can complicate things further. Before, we start on potential steps to save your water-damaged iPhone, let’s first look at some absolute things that worsen the cause and should be avoided at all costs.
1. Don’t turn on your iPhone
Your iPhone will turn off automatically after being dropped in water. However, you should manually turn it off if it doesn’t turn off. Turn your phone on only if you are sure water or moisture content from the exterior and interior is completely dry. Turning on the water-damaged iPhone might cause water to reach inside the device, causing it to malfunction.
2. Plug it in or Use the Charging Port in Any Way
Moreover, don’t charge your iPhone battery as it can result in an electrical short circuit or even combustion, resulting in a fire. No matter how water resistant the iPhone is, it’s better to not plug it in when wet or water-damaged.
3. Don’t use hot air to blow dry your iPhone
Blow-drying your iPhone with hot air can damage your device further. Hot air may heat your iPhone to an unbearable degree, making it unsuitable for device hardware. Also, avoid using a space heater or furnace sidewall exhaust to dry your iPhone.
Steps You Can Take to Potentially Save Your Water-Damaged iPhone
If you drop your iPhone in water, the following methods can save your iPhone from potential damage.
1. Take it out and turn it off immediately
Remove your iPhone from the water right away. Once retrieved, turn it off immediately. If there is any iPhone cover and screen guard to protect your phone, remove them as they might hold moisture. Use a paper towel or cotton cloth to wipe the iPhone’s exterior.
2. Evacuate the SIM card
After drying the iPhone’s exterior, remove the SIM card tray, if not using an e-SIM. Although SIM cards have a watertight seal, getting them out helps. Use a paper towel to dry the SIM card and the tray.
3. Dry your iPhone
While Apple recommends simply wiping the iPhone dry or tapping excess water out of the ports, we recommend the below-mentioned ways to ensure your iPhone is as dry as possible.
- Place it in a dry place
You need to place the iPhone in a warm and dry place so the water inside the phone can evaporate. Place it in a nearby window with proper sunlight, but do not expose the device to harsh sunlight.
- Place it in uncooked rice
The uncooked rice trick used to be the go-to method to dry any visible liquid in iPhone, as rice absorbs moisture quickly. Place the iPhone in a bag or bowl of rice for a day or two to ensure the water traces inside the phone are absorbed entirely. However, this method is slightly risky, as uncooked rice can push grains and dust in the charging port of your device.
- Dry it with silica gel packets
If the water has seeped into the internal parts of the iPhone, try burying it in a heap of silica gel bags in an airtight container. This helps in absorbing the moisture from the inside of your iPhone. Using silica gel packets is a safer alternative to the uncooked rice method for drying a wet iPhone, as nothing will get clogged in the ports.
- Use a hairdryer (if it has a cool wind setting)
If your hair dryer has a cool wind setting, you can use it to dry wet iPhone. While drying the iPhone, keep the hair dryer in low mode and keep your iPhone at a distance so that air blowing doesn’t cause any damage.
Or, you can keep your iPhone under a cool air fan to dry it.
4. Disassemble the phone and let it air dry
If drying the iPhone via uncooked rice method or silica gel packet doesn’t work, consider dismantling it as your last resort. You can use DIY repair tips to open the device to dry it out or go to any trusted tech expert.
Caution: We wouldn’t recommend dismantling the iPhone using DIY tips as it may worsen the problem.
Dismantle your iPhone carefully, air dry its interior, and assemble it back after a few hours. Also, if the Liquid Contact Indicators inside the iPhone have already detected water damage, opening the phone invalidates your warranty coverage.
5. Check if your warranty is still valid
If all the above efforts fail to fix the iPhone from water damage, you must check if the device’s warranty is still valid. If it is, call your manufacturer and request a repair or replacement. If it is invalid, visit an Apple Genius bar to repair your cell phone.
6. Take the phone to an approved repair shop
The longer you wait to take your iPhone to an Apple Genius bar, the more damage it incurs. If you cannot dry the wet iPhone by following the manual methods mentioned above, rush to an Apple Genius bar to get it repaired and minimize the chances of further damage.
How To Find Out If Your iPhone Has Water Damage?
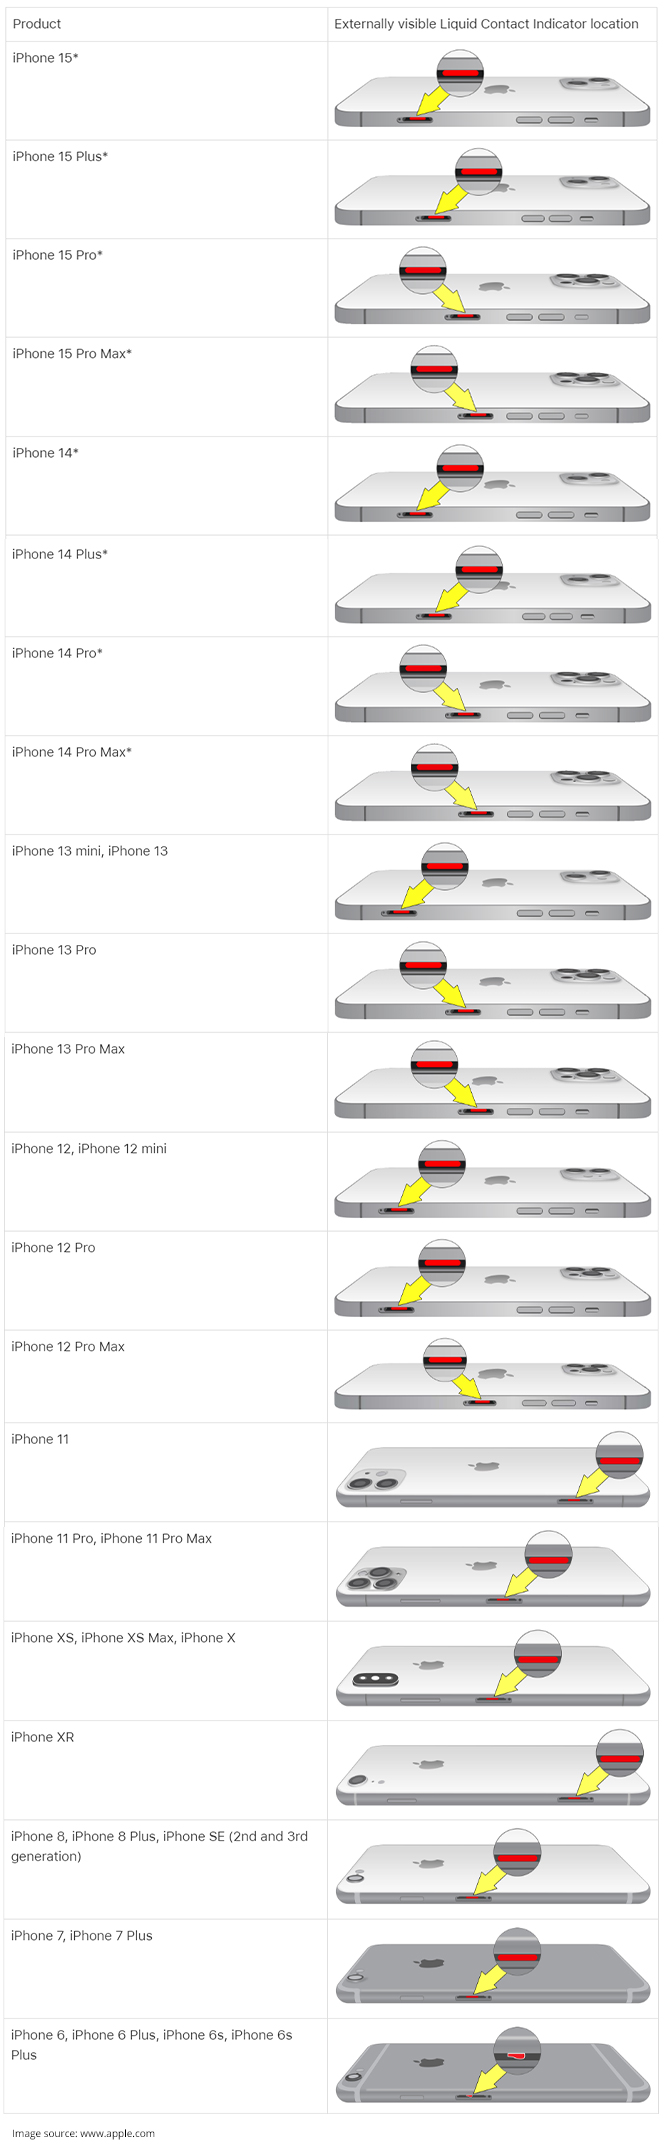
Liquid Contact Indicator, or LCI, is the new way to determine whether or not your iPhone is exposed to water damage. An LCI is generally of white or silver color; however, when it comes in contact with water or other liquid, it turns red.
See the table to learn where the indicators are planted in your respective iPhone, depending upon its model.
How To Recover Data From Water-Damaged iPhone?
Once you have powered on your water-damaged iPhone after drying, it is possible to recover data from it. There are two ways to recover lost data from water-damaged iPhones: backup services or professional iPhone data recovery software .
Let’s see various scenarios where you can recover data from a water-damaged iPhone:
iPhone won’t turn on
If your iPhone won’t turn on even after drying the wet iPhone using the tips mentioned above, it has short-circuited or water has eroded some of its internal components. In such a situation, use any backup service to recover your iPhone data.
If you have enabled iCloud backup on your iPhone, you can easily restore your data. You can visit the official iCloud website and log into your account to save the lost data on your computer. Or, set up your new iPhone using the existing iCloud credentials to restore the data of your previous iPhone.
iPhone starts but data is lost
If you turn your iPhone back on again, but its data is lost, try setting up your phone with existing iCloud account to recover the data. However, if you haven’t enabled iCloud backup, it is recommended that you use reliable iPhone data recovery software like Stellar Data Recovery for iPhone. This software recovers deleted/lost photos, videos, audio, messages, voice memos, calendars etc. from iPhone, iPad, iTunes, and iCloud backup files.
The software supports recovery in all data loss scenarios like water-damaged devices, accidental deletion, failed iOS updates, iPhone stuck in recovery mode, etc. This iPhone recovery software is compatible with all variants of iPad and iPhone, including the series of iPhone 15/14/13/12/11 and below.
Conclusion
We hope you fix the water-damaged iPhone after following the above suggestion. However, it would be best if you were extra careful to protect your iPhone from any type of water damage. Here are some best practices you must follow:
- Use a waterproof case to provide an additional layer of protection to your iPhone against water.
- Keep your iPhone away from sinks, bathrooms, toilets, etc.
- Be mindful in rainy conditions, and put your phone in a waterproof bag or safe pocket.
- Refrain from touching your iPhone with wet hands.
- Take regular data backups, as it is handy in data loss situations.
Was this article helpful?
FAQs
What do I do if my iPhone speaker doesn’t work after falling into water?
If there is water in your iPhone speaker, it may not work. In such a situation, try drying your iPhone and turning it on to take a backup of your data before testing the speaker. You can even visit Apple Genius Bar to get the help of a tech expert to fix your iPhone.
iPhone Data Recovery – An Infographic to Conquer iPhone Data Loss

DID YOU KNOW?
- More than 70% of people choose to upgrade to iOS 16 within a few days of release
- Analysis shows that about 20,000+ users experience data loss due to update failures and other related problems
TOP 5 CAUSES OF DATA LOSS
- iOS Update
- Accidental Deletion of Data
- Jailbreak failure
- iOS Restore
- Hardware or System Malfunction
WHAT ABOUT RECOVERING iOS DATA AFTER DATA LOSS?
iPhone Data Recovery software helps you in such situations. Data exists in the internal memory of your iPhone even after deletion until it is overwritten by new data. Its advanced algorithm and internal underlying technology helps recover all deleted data from your iOS device, be it your iPhone or your iPad.
WHAT YOU CAN RECOVER?
- Recovers Deleted Photos from your iPhone – In just 3 steps you can recover your memorable photos from Camera Roll, Voice Memo, Photo Stream, etc.
- Recovers deleted text messages from your iPhone – It not only recovers your text messages but also recovers your WhatsApp messages along with its attachments
- Recovers deleted contacts from your iPhone – It retrieves your lost or deleted contacts from your iPhone, iTunes, or iCloud backup files
- Recovers Safari Bookmarks – It easily recovers bookmarks from the Safari browser which you may have deleted accidentally
- Recovers deleted data from iCloud backup files – It also recovers and restores data from your damaged iPhone through iCloud backup files
- Recovers deleted data from encrypted iTunes backup files – In case any of your backup files gets accidentally deleted, the software enables you to access the data by removing encryption.
How to Recover Deleted Videos from iPhone Without Backup?
Your iPhone 8 Plus is supported by a strong and powerful operating system that makes your daily activities such as calling, emailing, messaging, web browsing, notes making, etc. easily possible. Also, capturing happy moments spent with family, friends, and your loved ones is another thing that you do with it. It is natural that the good times that you record becomes your favorite videos, which you love watching anytime you feel like.
However, at times in the event of making space in your iPhone 8 Plus, or due to any other reason, you accidentally delete the videos, and end up losing one, more, or all of them. The situation becomes grim when you realize that you haven’t taken a backup of your favorite videos. You really do not know what to do to recover your deleted videos from iPhone 13 without backup. It is then that you understand the importance of having a backup and regret not creating the same for your favorite videos.
You can come out from such a situation with the help of Stellar Data Recovery for iPhone. It is a comprehensive iPhone data recovery software tool through which you can recover deleted videos from iPhone 8 Plus without a backup.
The videos you capture with your iPhone 8 Plus gets stored in either the memory of the phone. However, once the videos are lost or accidentally deleted from there, you lose access to them. To recover deleted videos of iPhone 8 Plus with Stellar Data Recovery for iPhone, you need to execute the following steps:
Step 1) Download and install the software on your system, the one on which you want to recover the deleted videos of your iPhone 8 Plus.
Step 2) Connect your iPhone 8 Plus to your system.
Note – You can connect your iPhone 8 Plus with multiple devices and the software will enlist all the connected devices. You can connect the iPhone 8 Plus after or before the launch of the software.
Step 3) Next, launch the software that you installed.

Step 4) To recover deleted videos from your iPhone 8 Plus, click on the ‘Recover from iPhone’ option that comes up on the screen.
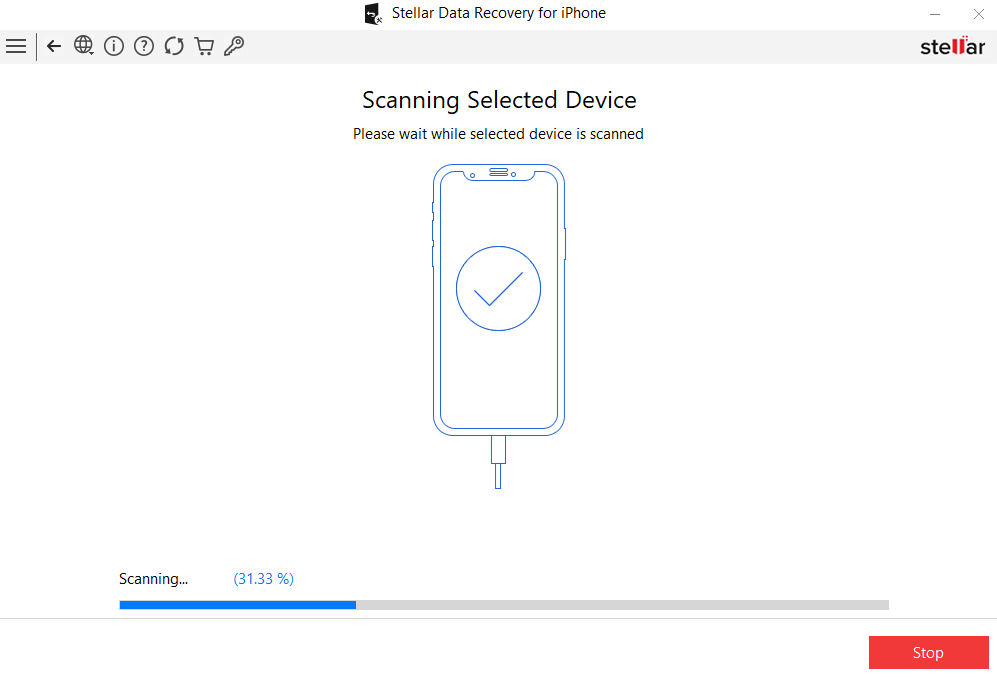
Step 5) The Stellar Data Recovery for iPhone software will scan the iPhone 8 Plus to list all the recently deleted data including videos.
Step 6) All deleted videos will be listed in red, while the rest will be listed in black color as shown in the image placed below.
Step 7) After that, select the videos you want to recover by putting check marks in the boxes in front of them.
Step 8) Provide the address of the location where you would want the recovered videos to be saved.
Step 9) Click Save button to finally save the videos. With this, the ‘Save Files’ dialog appears as shown below:
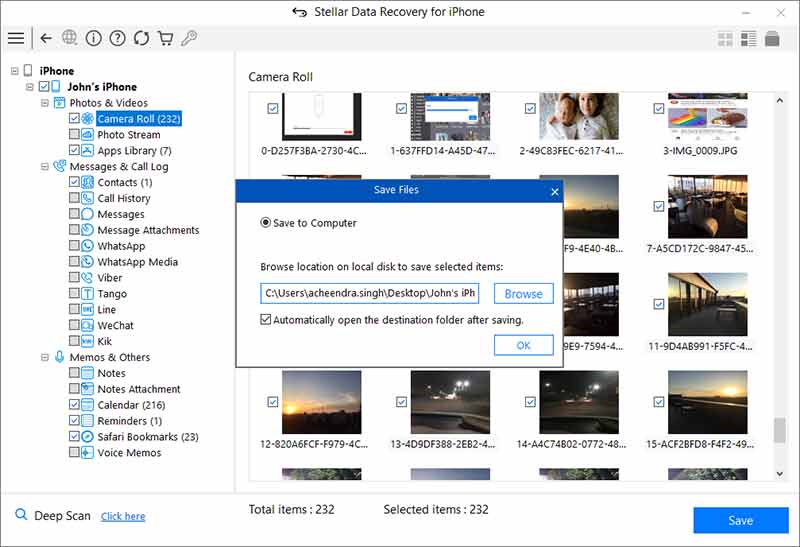
(i) Chose the option ‘Save to Computer’ if you want to save the recovered videos to your computer. Click Browse and select a destination for saving the recovered files and click OK.
(ii) Choose the option ‘Save to iPhone’ if you want to save the recovered files to your iPhone 8 Plus. From the drop-down menu, select the iPhone 8 Plus to which you want to save the recovered videos.
Step 10) Finally, click on the OK tab to complete the recovery process of deleted videos from your iPhone 8 Plus.
Also read:
- New iPhone 15 Restore from iCloud Stuck on Time Remaining Estimating | Stellar
- Remove FRP Lock on Motorola Edge 40 Pro
- Possible ways to recover deleted files from Xiaomi Redmi Note 13 5G
- Realme Data Recovery – recover lost data from Realme Narzo 60 Pro 5G
- In 2024, Dose Life360 Notify Me When Someone Checks My Location On Honor Magic 5? | Dr.fone
- Identify missing hardware drivers with Windows Device Manager in Windows 11/10/7
- In 2024, Full Guide to Fix iToolab AnyGO Not Working On Nokia C12 | Dr.fone
- In 2024, Fake the Location to Get Around the MLB Blackouts on Realme Narzo N55 | Dr.fone
- It's Easy to Share Your Winning Forex Trades With Friends and Family
- Remove Google FRP Lock on Meizu 21 Pro
- How To Upgrade or Downgrade iPhone 15 Plus? | Dr.fone
- How To Transfer WhatsApp From iPhone 8 to other iPhone 15 Pro devices? | Dr.fone
- In 2024, Does Airplane Mode Turn off GPS Location On Apple iPhone 14? | Dr.fone
- How To Update or Downgrade iPhone 13 mini? | Dr.fone
- In 2024, Complete Tutorial to Use GPS Joystick to Fake GPS Location On Samsung Galaxy A24 | Dr.fone
- How to Use Face ID to Pay for Apple TV+ on iPhone 13 mini
- In 2024, How Can I Use a Fake GPS Without Mock Location On Tecno Pova 5 Pro? | Dr.fone
- How to unlock Motorola Edge 40 Neo
- In 2024, Does Airplane Mode Turn off GPS Location On Motorola Edge 40 Neo? | Dr.fone
- Remove FRP Lock on Xiaomi Mix Fold 3
- How To Transfer Data From iPhone 6 Plus To Others Android Devices? | Dr.fone
- In 2024, Does Airplane Mode Turn off GPS Location On Poco M6 Pro 5G? | Dr.fone
- In 2024, Complete Tutorial to Use GPS Joystick to Fake GPS Location On Motorola Moto G04 | Dr.fone
- In 2024, Fixing Foneazy MockGo Not Working On Vivo Y200 | Dr.fone
- How To Transfer WhatsApp From iPhone XR to other iPhone 11 Pro Max devices? | Dr.fone
- Infinix Data Recovery – recover lost data from Infinix Note 30 Pro
- In 2024, Complete Tutorial to Use VPNa to Fake GPS Location On Samsung Galaxy F04 | Dr.fone
- In 2024, Complete Tutorial to Use VPNa to Fake GPS Location On Infinix Smart 7 HD | Dr.fone
- In 2024, Dose Life360 Notify Me When Someone Checks My Location On Xiaomi Redmi 12? | Dr.fone
- In 2024, How Can I Use a Fake GPS Without Mock Location On Nubia Red Magic 9 Pro+? | Dr.fone
- Possible solutions to restore deleted videos from Nokia XR21
- How to Change Xiaomi 13T Pro Location on Skout | Dr.fone
- In 2024, How to Change Netflix Location to Get More Country Version On Nokia C110 | Dr.fone
- How to Unlock Motorola Moto G84 5G Without Password?
- How To Transfer Data From iPhone 13 Pro Max To Other iPhone 12 devices? | Dr.fone
- Recover Lost Photos during Transfer from iPhone 12 Pro Max to PC or Mac | Stellar
- In 2024, Complete Tutorial to Use GPS Joystick to Fake GPS Location On Google Pixel 7a | Dr.fone
- Possible solutions to restore deleted call logs from Xiaomi Redmi A2+
- In 2024, Dose Life360 Notify Me When Someone Checks My Location On Itel S23+? | Dr.fone
- In 2024, How Can I Use a Fake GPS Without Mock Location On Xiaomi 13 Ultra? | Dr.fone
- In 2024, Does Life360 Notify When You Log Out On Infinix Zero 30 5G? | Dr.fone
- In 2024, Does Life360 Notify When You Log Out On Apple iPhone 15 Pro? | Dr.fone
- Possible solutions to restore deleted contacts from Galaxy Z Flip 5.
- MKV playback issues on Motorola Edge+ (2023)
- In 2024, Can Life360 Track You When Your Vivo S18e is off? | Dr.fone
- How to Unlock Infinix Note 30 Pro Without Password?
- How To Update or Downgrade iPhone 6s Plus? | Dr.fone
- In 2024, Complete Tutorial to Use GPS Joystick to Fake GPS Location On Lenovo ThinkPhone | Dr.fone
- 7 Fixes for Unfortunately, Phone Has Stopped on Oppo Reno 8T | Dr.fone
- Learn How To Lock Stolen Your iPhone 15 Pro Max Properly
- Fix Xiaomi 13T Android System Webview Crash 2024 Issue | Dr.fone
- 2024 Approved How To Use Speed Ramping to Create an Intense Action Footage
- In 2024, How to Spruce Up Your Telegram Profile
- Everything To Know About Apple ID Password Requirements For Apple iPhone 6s
- What Pokémon Evolve with A Dawn Stone For Samsung Galaxy S23 FE? | Dr.fone
- In 2024, Process of Screen Sharing Samsung Galaxy A14 4G to PC- Detailed Steps | Dr.fone
- Fuel Your Creativity with 10 Awesome Collection of 2D Animation Examples for 2024
- In 2024, How to Transfer Contacts from Oppo Find X6 to Outlook | Dr.fone
- In 2024, Easy Ways to Manage Your Poco F5 Pro 5G Location Settings | Dr.fone
- 5 Hassle-Free Solutions to Fake Location on Find My Friends Of Motorola Moto G 5G (2023) | Dr.fone
- In 2024, Ultimate Guide from Vivo Y36 FRP Bypass
- What Is a SIM Network Unlock PIN? Get Your OnePlus 11 5G Phone Network-Ready
- How Do You Get Sun Stone Evolutions in Pokémon For Oppo Reno 11 Pro 5G? | Dr.fone
- Title: New iPhone 8 Plus Restore from iCloud Stuck on Time Remaining Estimating | Stellar
- Author: Vivienne
- Created at : 2024-04-29 22:58:22
- Updated at : 2024-04-30 22:58:22
- Link: https://review-topics.techidaily.com/new-iphone-8-plus-restore-from-icloud-stuck-on-time-remaining-estimating-stellar-by-stellar-data-recovery-ios-iphone-data-recovery/
- License: This work is licensed under CC BY-NC-SA 4.0.
