
Recover Lost Photos during Transfer from iPhone 15 Pro to PC or Mac | Stellar
Recover Lost Photos during Transfer from iPhone to PC or Mac
Summary: Lost your precious photos during the transfer from iPhone to computer? Learn 4 ways to recover photos lost during transfer. These methods are applicable to all variants of iPhone and iPad or in short all iOS devices.


Transferring photos from iPhone 15, 14/13/12/X/8/7 to PC or Mac system is a simple task that can often get skewed causing serious photo loss situations. If you have also lost your valuable photos during one such event of photos transfer, then here’s a guide to get back photos lost during the transfer.
Photo loss while transferring from iPhone to a computer is a common problem faced by many. You try to transfer your photos from your iPhone to your computer and select the location to save them.
But when you check the drive folder in the system, to your shock the photos are not there! And if this is a ‘cut and paste’ transfer from iPhone, it’s a big jolt for you.
But do not worry, thankfully, data recovery technology is always there to recover lost photos in any situation.
There can be several reasons for the loss of photos during transfer, such as below:
- Sudden power failure during the transfer of photos
- Disconnecting iPhone from the PC/Mac while transferring photos
- Lack of enough space in the drive to save the photos
- Corruption of the drive in which you saved the photos
- Virus in the system
- Anti-virus on your PC/Mac scans and detects viruses in the photo resulting in photo loss

How to Recover Photos Lost during Transfer from iPhone 15, 14/13/12/11/X/8/7 to PC/Mac?
Typically, if you have not deleted the required photos from your iPhone, try transferring them again from the device to the PC or Mac. If already deleted then, try the below methods to recover the photos lost during transfer from iPhone 15, 14/13/12/11/X/8/7 to PC or Mac.
Solution 1: Search for missing photos in the PC/Mac hard drive
It might be possible you transferred the iPhone photos to the PC but forgot the location where you saved them. Try once searching the complete hard drive for your photos.
- Click on My PC or My Computer
- Type the command kind:=picture into the search box and press Enter
- The list of images will be displayed
- Right-click on the required photos from the search results, and click Open File Location to view where they are saved
For MAC follow the below steps:
- Open the Finder and go to your home directory
- Go to the Pictures folder
- Right-click on Photos Library.photoslibrary and select Show Package Contents
- Open the folder Masters to find the images in the Photos app. The Masters folder comprises the photos by date in subfolders. You can open the folders of the relevant dates to find your pictures.
Solution 2: Recover lost transferred photos from iTunes Backup
If you have synced your iPhone to iTunes, you can recover lost photos from this Apple’s backup utility.
Drawback: You cannot selectively pick the lost photos during the file transfer, rather complete data of iTunes is saved on your PC/Mac.
| Note: In Mac, the iTunes backup is stored in Library > Application Support > MobileSync > Backup.
In Windows 7, 8, 10, & 11 the iTunes backup is stored in Users > username > AppData > Roaming > Apple Computer > MobileSync > Backup.
|
| — |
Solution 3: Recover Lost Photos from iCloud
If you have iCloud backup of the iOS device, you can recover photos lost during transfer through the cloud facility.
Drawbacks: You cannot directly restore iCloud backup photos on your PC or Mac. It is saved only to an iOS device.
You have to reset your iPhone X/8/7 to factory settings to restore the iCloud backup on it.
How to recover data from iCloud Backup on a computer
- Take the backup of your iPhone data on iTunes
- Reset your iPhone to factory settings
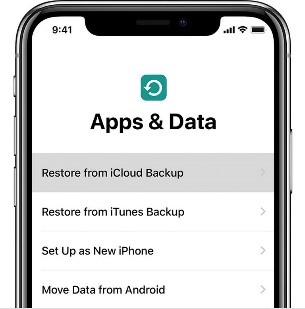
- Go to the Apps & Data screen of your iPhone by pressing the Sleep/Wake button for a few seconds and following the onscreen instructions
- Under Apps & Data, click on Restore from iCloud Backup
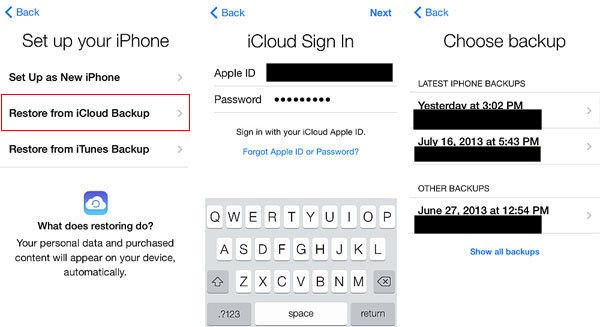
- Sign in to iCloud by entering your Apple ID
- Select Choose Backup and pick the relevant one from the list of backups
- Tap After completion of the process, the iPhone restarts and recovers complete data including photos, apps, videos, etc.
- Select the required photos from the recovered data and transfer them again to your PC or Mac from iPhone
| Tip: For selective recovery of lost photos from iCloud/iTunes use Stellar Data Recovery for iPhone . It recovers missing Photos from Camera Roll and Photo Stream in iCloud/iTunes/iPhone. You can preview, select and save only the desired photos at your preferred location. |
|---|
Solution 4: Use the Best Photo Recovery Software
When no backup, take the help of a third-party photo recovery tool. This is regarded as the easiest way to recover lost photos during the transfer from iPhone 15, 14/13/12/11/XR/XS/X/8/7 to PC/Mac. Use a risk-free application – Stellar Photo Recovery to recover your lost photos from your PC or Mac
The do-it-yourself software recovers all types of media files lost due to deletion, corruption, virus infection or accidental formatting, etc.
How to recover lost photos using Stellar Photo Recovery?
- Launch Stellar Photo Recovery Software.
- On the home screen of the software – ‘Select What to Recover’. Click Next.
- Next, select the location from where you want to recover. Click Scan to start the scanning process
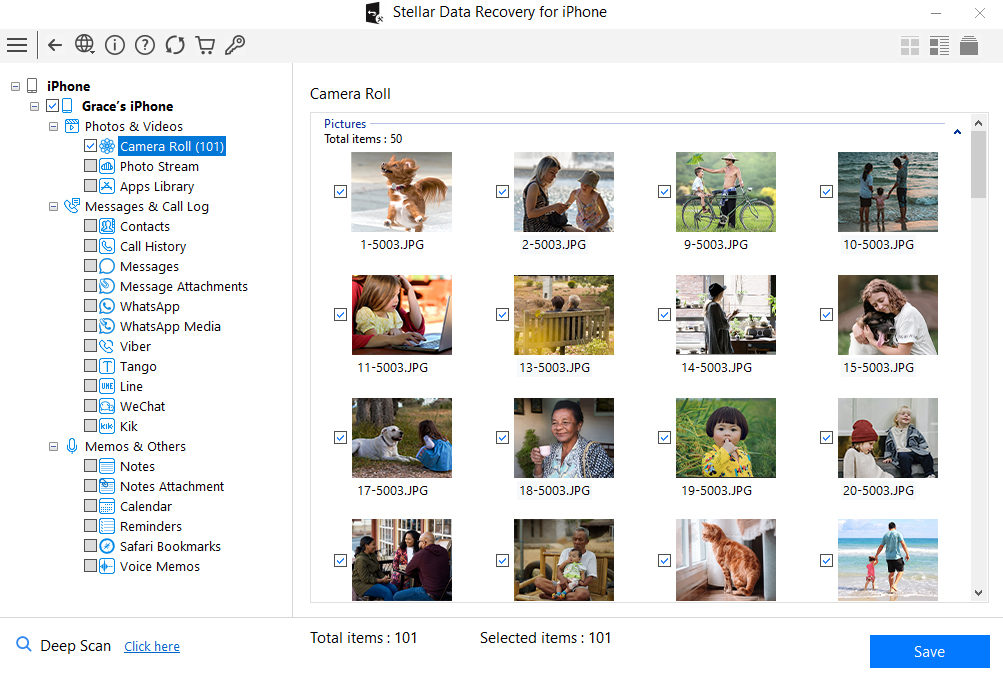
- A dialog box of ‘Scanning Completed Successfully!’ displays the scan results – the number of files found and the size of the data. In the left pane of the main window, all the recovered data is listed. You can preview them in the right pane.
Note: If you do not see the required photos in the list, opt for the Deep Scan option at the bottom. - Click Recover. You can also choose to recover only the selective files – select the photos that you need, right-click, and click Recover.
- In the dialog box, specify the location to save the image files. Click Save. All the files get saved at the specified location Click Save. All the files get saved at the specified location.
Conclusion
Backup is the undisputable solution to any kind of photo loss situation. However, if you have not taken your photos backup in iTunes, iCloud, or other storage media, recovery through Stellar Photo Recovery software is the best way to get back photos lost during transfer from iPhone 15, 14/13/12/XS/XR/X/7/8 to PC or Mac.

How to Fix & Retrieve Pictures/Videos From a Water Damaged iPhone That Won’t Turn on
Summary: Spilled water on your iPhone? This article guides you in detail, how to fix water-damaged iPhone and do’s to avoid further damage. Also learn ways to recover lost photos and videos when your iPhone is not turning on due to the damage.
| Q. I accidentally dropped my iPhone in swimming pool and now it does not turn on anymore. How can I fix my water damaged phone? Is there any way I can rec__over photos and videos from my water damaged iPhone
A. To fix a water damaged iPhone, try to dry it completely while to recover your lost photos and videos you have two options:
- Recover from Apple iCloud and iTunes backup
- If, backup files are not accessible or deleted, recover using third-party software
|
| — |
This article guides you in detail, how to fix such water-damaged iPhone and recover lost photos and videos when the device is not turning on.
The damage caused by water or any other liquid on iPhones is unpredictable. Your iPhone may or may not turn on and there is a high possibility of losing your data including photos and videos on it.
Even if your iPhone is under the one-year warranty, Apple does not cover liquid damages to iPhone. So now you are in a crazy situation of double loss, of owning a faulty device and losing precious photos and videos stored in it.
First, a piece of advice: Stay calm. Before trying to retrieve lost photos through any method follow the essential dos and don’ts to fix your iPhone and avoid further loss.
DOs fo****r Water Damaged iPhone
- **Try drying
**Remove excess water off the iPhone by rubbing it dry on a towel. Gently shake it to clear the water in the sockets and ports of the phone. - **Do not plug it in or turn it on
**Do not plug or turn on the wet iPhone as this can cause a short circuit. Even if it turns on, it will stop working forever after sometime. If the iPhone is in Power on or Sleep Mode, switch it off completely and leave it to dry for at least two days. - **Remove the SIM card
**Take out the SIM card from the iPhone to avoid damage to key components and rub it dry on a clean cotton cloth. - **Dry with silica gel sachets
**Use silica gel packets to dry your wet iPhone and leave it for at least 48 hours.
DON’Ts for Water Damaged iPhone
- Do not press any buttons of wet iPhone
- Do not try to switch on your iPhone to avoid short circuit
- Do not use a hairdryer or other drying tools to dry your phone
- Do not place your iPhone in raw rice to avoid foreign particles entering inside
How to Recover Data from Water Damaged iPhone
After doing above essential hacks, once you power on your water damaged iPhone, there are two possibilities, either your phone starts working but you have lost your data or iPhone does not switch on at all!
Do not panic, as in either case, you can recover your lost photos and videos from a water damaged iPhone via two methods
Method 1: Recover from **iCloud and iTunes backup
**Apple has this remarkable feature in which all iPhone data is automatically saved in iCloud and iTunes backup. You just you need to sign in to iCloud or iTunes through your Apple ID on the new iOS device. Next, select and transfer the desired files to the new device from the list of available backups in iCloud/iTunes.
_**Method 2: Recover from third-party application
**_In case you are unable to restore photos from the iCloud and iTunes backup files or have deleted your desired files from the backup, opt for a third-party application to recover photos or videos from your water damaged iPhone.
From a plethora of iPhone data recovery software available in the market, experts recommend to pick only the trusted and secure data recovery tool, specially designed for the iOS device.
**Use iPhone Data Recovery Software by Stellar
**One of the commonly used third-party data recovery software is Stellar Data Recovery for iPhone. The easy-to-use interface and 100% safe download makes it a popular choice among iPhone users.
If your iPhone is synchronized with iCloud and iTunes backup, you can retrieve lost photos and videos from water damaged iPhone using Stellar Data Recovery for iPhone. In the situation when your iPhone is not detected by the system or do not switch on at all, after it is damaged due to water, the software offers two ways to recover photos and videos:
- Recovery from iCloud Backup
- Recovery from iTunes Backup
Step-by-step: Recovery from iCloud Backup
Step 1: Install and Run Stellar Data Recovery for iPhone and select “Recover from iCloud Backup” from the main menu.
Figure 1: Illustrates the main screen
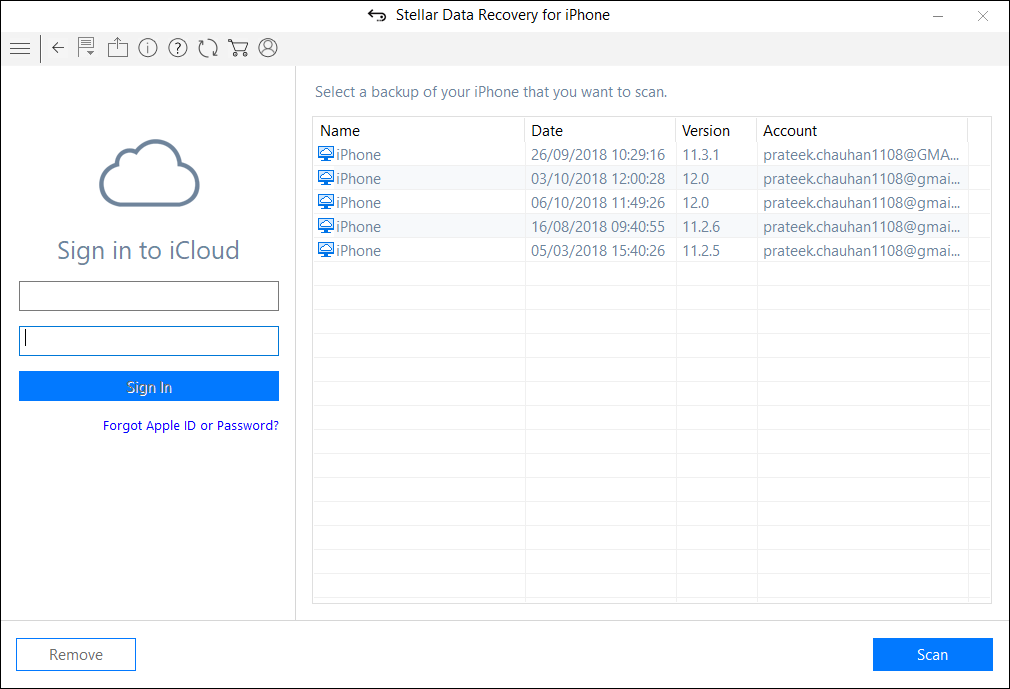
Step 2: Enter the Apple ID and password to sign in to iCloud.
 Figure 2: Illustrates the credential screen
Step 3: After entering the credentials, the software displays the list of all backup files. Select the desired files and click Scan
Figure 4: Illustrates backup files list
Step 4: Preview the selected files and press Save. You can save recovered photos or videos at the desired location.

Figure 5: Illustrates the preview of the files
Step-by-step: Recovery from iTunes Backup
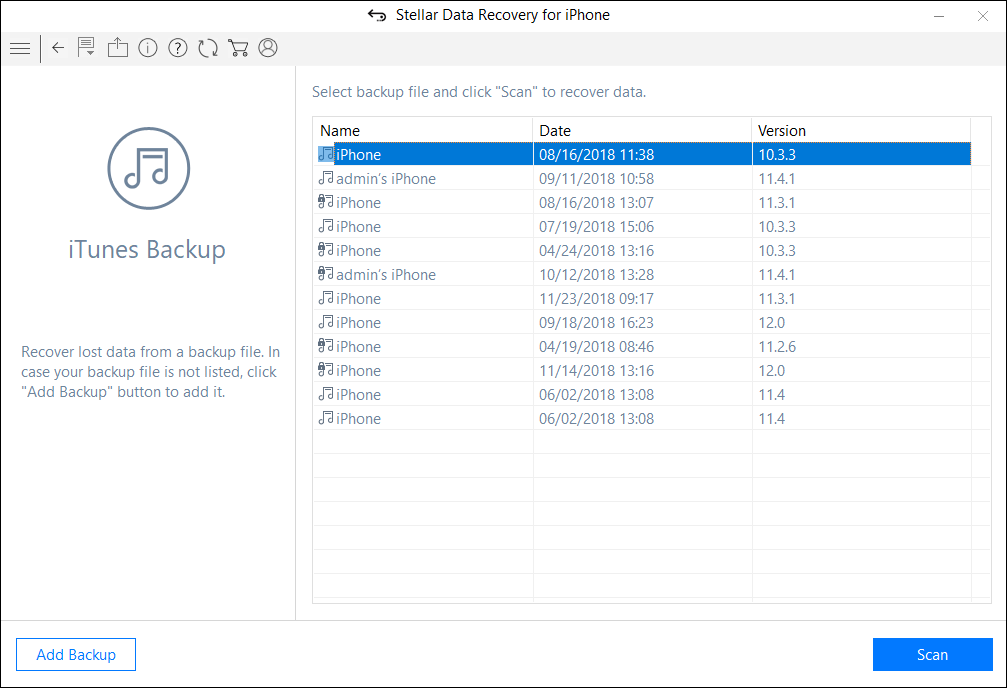
Step 1: Select “Recover from iTunes Backup” option on the main screen
Step 2: The software displays all iTunes backup files. From the Tree view, select the file categories from which you want to recover photos/videos. it will list all files under that category.

Figure 6: Illustrates the backup files list
Step 3: Preview the existing and/or deleted files

Figure 7: Illustrates the Preview of files under the selected category
Step 4: Click ‘Save’ to recover the file. You can either choose to save all or a few files by selecting the checkboxes.
_  Figure 8: Illustrates the file saving process_
**Conclusion
**The safest way to _rec_over lost photos and videos from water damaged iPhone is through a secure third-party tool.
The easy-to-use interface along with scanning and recovery precision makes iPhone Photo Recovery Software by Stellar most sought by iPhone users. It comes as a blessing, especially when the iTunes and iCloud backup files become inaccessible or unreadable.
Try the Free Demo Version of the software to recover your lost and deleted pictures/videos in Mac or in Windows.
iPhone users adore its camera. Capturing priced memories using its compelling features is one of the biggest attraction of the iOS device. However, like any other phone, the digital photos may get lost from iPhone too.
And the situation can be devastating if the lost photos include your precious memories — of a vacation, wedding, your child’s first birthday or a friend’s party, which you wanted to keep with you for a lifetime.
Helping you out in such a situation, here we bring the methods to recoup your memories back into your iPhone.
Why are your photos lost from iPhone?
There could be many possible reasons for the loss of photos from iPhone. Some common reasons are listed below:
- Accidental deletion
- Factory reset
- Camera Roll or Photo Stream crash
- Failed iOS update
- iPhone jailbreak
- Water damaged, stolen iPhone, and others
Methods to recover permanently deleted photos from iPhone
Different situations call for distinct methods to restore lost photos from iPhone.
Since with iCloud and iTunes, Apple ensures a backup for the iPhone photos, if available, get back the lost iPhone photos from there.
Wherein in absence of backup, an iPhone photo recovery software is the best way to get back the deleted or missing photos on your iPhone and iPad. An efficient iPhone recovery software , works regardless of the reason of the photo loss.
Other methods such as photo recovery from ‘Recently Deleted’ folder or turning on iCloud Photos can also work in specific situations.
These methods can be applied on all iPhone models including series of iPhone 15, 14, 13, 12, 11, XS, XS Max, XR, X, 8 Plus, 8, 7 Plus, 7, 6S Plus, 6S, 6 Plus, 6, 5S, 5c, 5, 4S and 4.
1. Recover photos from ‘Recently Deleted’ on iPhone

The ‘Recently Deleted’ folder on iPhone keeps all the deleted photos for 30 days. Beyond this duration, the photos are automatically deleted from iPhone and this time permanently.
You can find the deleted photos from Camera Roll, Photo Stream, WhatsApp, SnapChat or Instagram etc., in this folder.
Check the ‘Recently Deleted’ folder on your iPhone. Find the required photos and move them back to your album.
Steps to restore photos from ‘Recently Deleted’ on iPhone:
- Go to the Photos app > Albums > Recently Deleted
- Find the missing photo and tap on it to Recover
2. Use iPhone Photo Recovery tool
In case of absence of photos backup, download and install Stellar Data Recovery for iPhone on your Mac or PC. Stellar Data Recovery for iPhone works with all the iPhone models including series of iPhone 6, 7, 8, X, XS, XR, 11, 12, 13, and 14. It supports latest iOS 16.
Situations when you should use Stellar Data Recovery for iPhone:
- No backup of photos
- Permanently deleted photos from iPhone
- Accidentally deleted photos
- Unable to restore photos from iCloud
- Unable to restore photos from iTunes
- Photos lost after iOS update, Factory reset or jailbreak
- Photos lost after iPhone black screen of death
- Stolen iPhone, water/ liquid damaged iPhone etc.
Note: Apart from photos, Stellar Data Recovery for iPhone can recover your deleted Videos, Contacts, Texts, Calendar, text messages, Notes, and other data.
Try the Free Demo Version of the software to recover your lost and deleted photos in Mac System or in Windows Desktop/Tablet
Step-by-step: Recover deleted photos from iPhone
- Connect your iPhone to the computer
- Launch Stellar Data Recovery for iPhone
- On the first screen select Recover from iPhone
- Select Camera Roll and Photo Stream. To recover Instagram, SnapChat or other App’s photos, select Apps Library


- Click Next
- Preview and choose the photos you want to recover from the list
- Click Save

3. Recover from iCloud backup
Do you maintain iCloud backup of your photos? Then bring back the deleted photos on your iPhone via iCloud. iCloud photos recovery is possible in situations of accidentally or permanently deleted photos from iPhone. You can also recover photos lost after your iPhone is set on factory reset, damaged, or stolen.
Steps to restore photos from iCloud on iPhone:
- Click to follow Settings > General > Reset> Erase all Contents and Settings
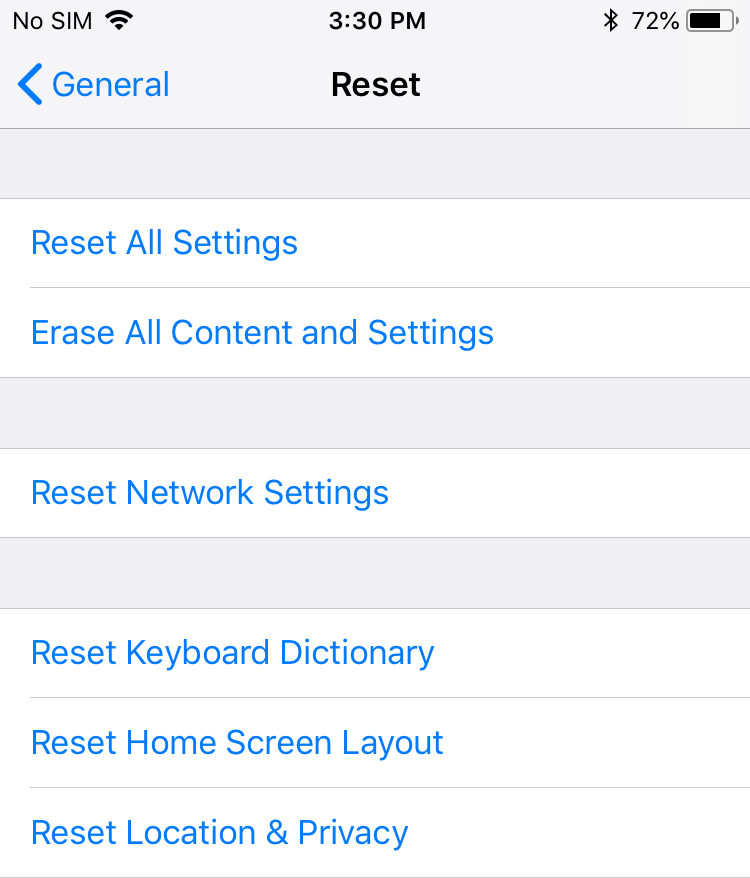
- A dialog box pops up, choose Erase Now
- Follow the instructions until you get on to the Apps & Data screenTap Restore from iCloud Backup
- Sign in to your iCloud account
- Choose the recent backup and click Restore to get back the deleted photos on iPhone
How to recover Photos from iCloud without losing existing iPhone data
This method of iCloud photo recovery protects your existing iPhone data. It also allows you to select and recover only the lost photos from iCloud instead of complete backup data.
Follow the below steps to restore only the lost/deleted photos from iCloud:
- Download and launch Stellar Data Recovery for iPhone on your computer. Note: You don’t need to connect your iPhone for recovering photos from iCloud backup files.
- Select Recover from iCloud Backup on main screen of software.
.png)
- Select Camera Roll and Photo Stream and click Next.
- Enter the Apple ID and password.
- List of all available iCloud backup files appears. Select the relevant backup of your iPhone and click Scan.
- Click Camera Roll and Photo Stream in the iCloud backup files list on the left window. Preview the existing and deleted photos or search for a specific photo by typing a keyword in the search box. If the desired photo is not in the recovered files list, click Deep Scan.
- Click Save. In the dialog box select either computer or iPhone to save the recovered photos. To save the photos on iPhone, make sure the iOS device is connected to the computer.
4. Recover deleted photos from iTunes
For those of you who maintain iTunes backup, it is the easiest way to retrieve the deleted photos of iPhone. iTunes backup also helps to restore photos lost due to deletion or after factory reset.
Steps to restore photos from iTunes backup:
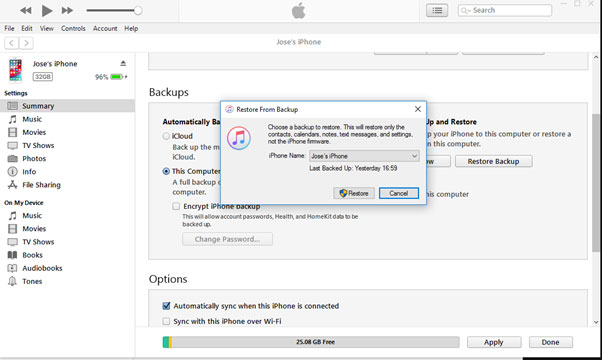
- Connect iPhone to your PC/Mac
- Launch iTunes
- Select your iPhone under the device list
- Select the recent backup date
- Click Restore Backup
All your lost and deleted photos will be restored on your iPhone.
### How to recover Photos from iTunes without losing the existing iPhone dataUse Stellar Data Recovery for iPhone to protect your current data on iPhone. The software allows you to select and recover only the lost photos from iTunes. With this method, you can prevent unnecessary data recovery on your iOS device.
Follow the below steps to recover only the lost/deleted photos via iTunes:
- Download and launch Stellar Data Recovery for iPhone software. Note: You can connect your iPhone to computer, if want to save the recovered photos in the iOS device.
- Select Recover from iTunes Backup on the main screen of the application.
- Select Camera Roll and Photo Stream option. Click Next.
.png)
- From the list of the iTunes backup files, select the relevant iTunes backup from which you want to restore photos.
- If your iTunes backup is encrypted, a dialog box will open prompting you to enter the password. Enter the password and click OK.
- From the backup files list in the left pane, click Camera Roll and Photo Stream. Preview the existing and deleted photos or search for a specific photo by typing a keyword in the search box. Click Deep Scan at the bottom left side, if your desired photos are not in the list.

.png)
- Click Save. A dialog box appears asking to select the location to save photos. You can save the recovered photos either onto your iPhone or computer.
5. Enable iCloud Photos
Sometimes you could see the photos on iPhone but not on your synced iPad, iPod Touch, or Mac. To view these missing iPhone pictures on the synced iOS devices turn on iCloud Photos.
iCloud Photos stores the photos in iCloud. It ensures you can view them on your synced devices. If you can’t find a photo on your synced iPad, iPhone, or Mac etc., enable iCloud Photos under Settings of the iOS device.
Steps to turn on iCloud Photos on iPhone/iPad/ iPod Touch
- Click to follow Settings > [your name] > iCloud
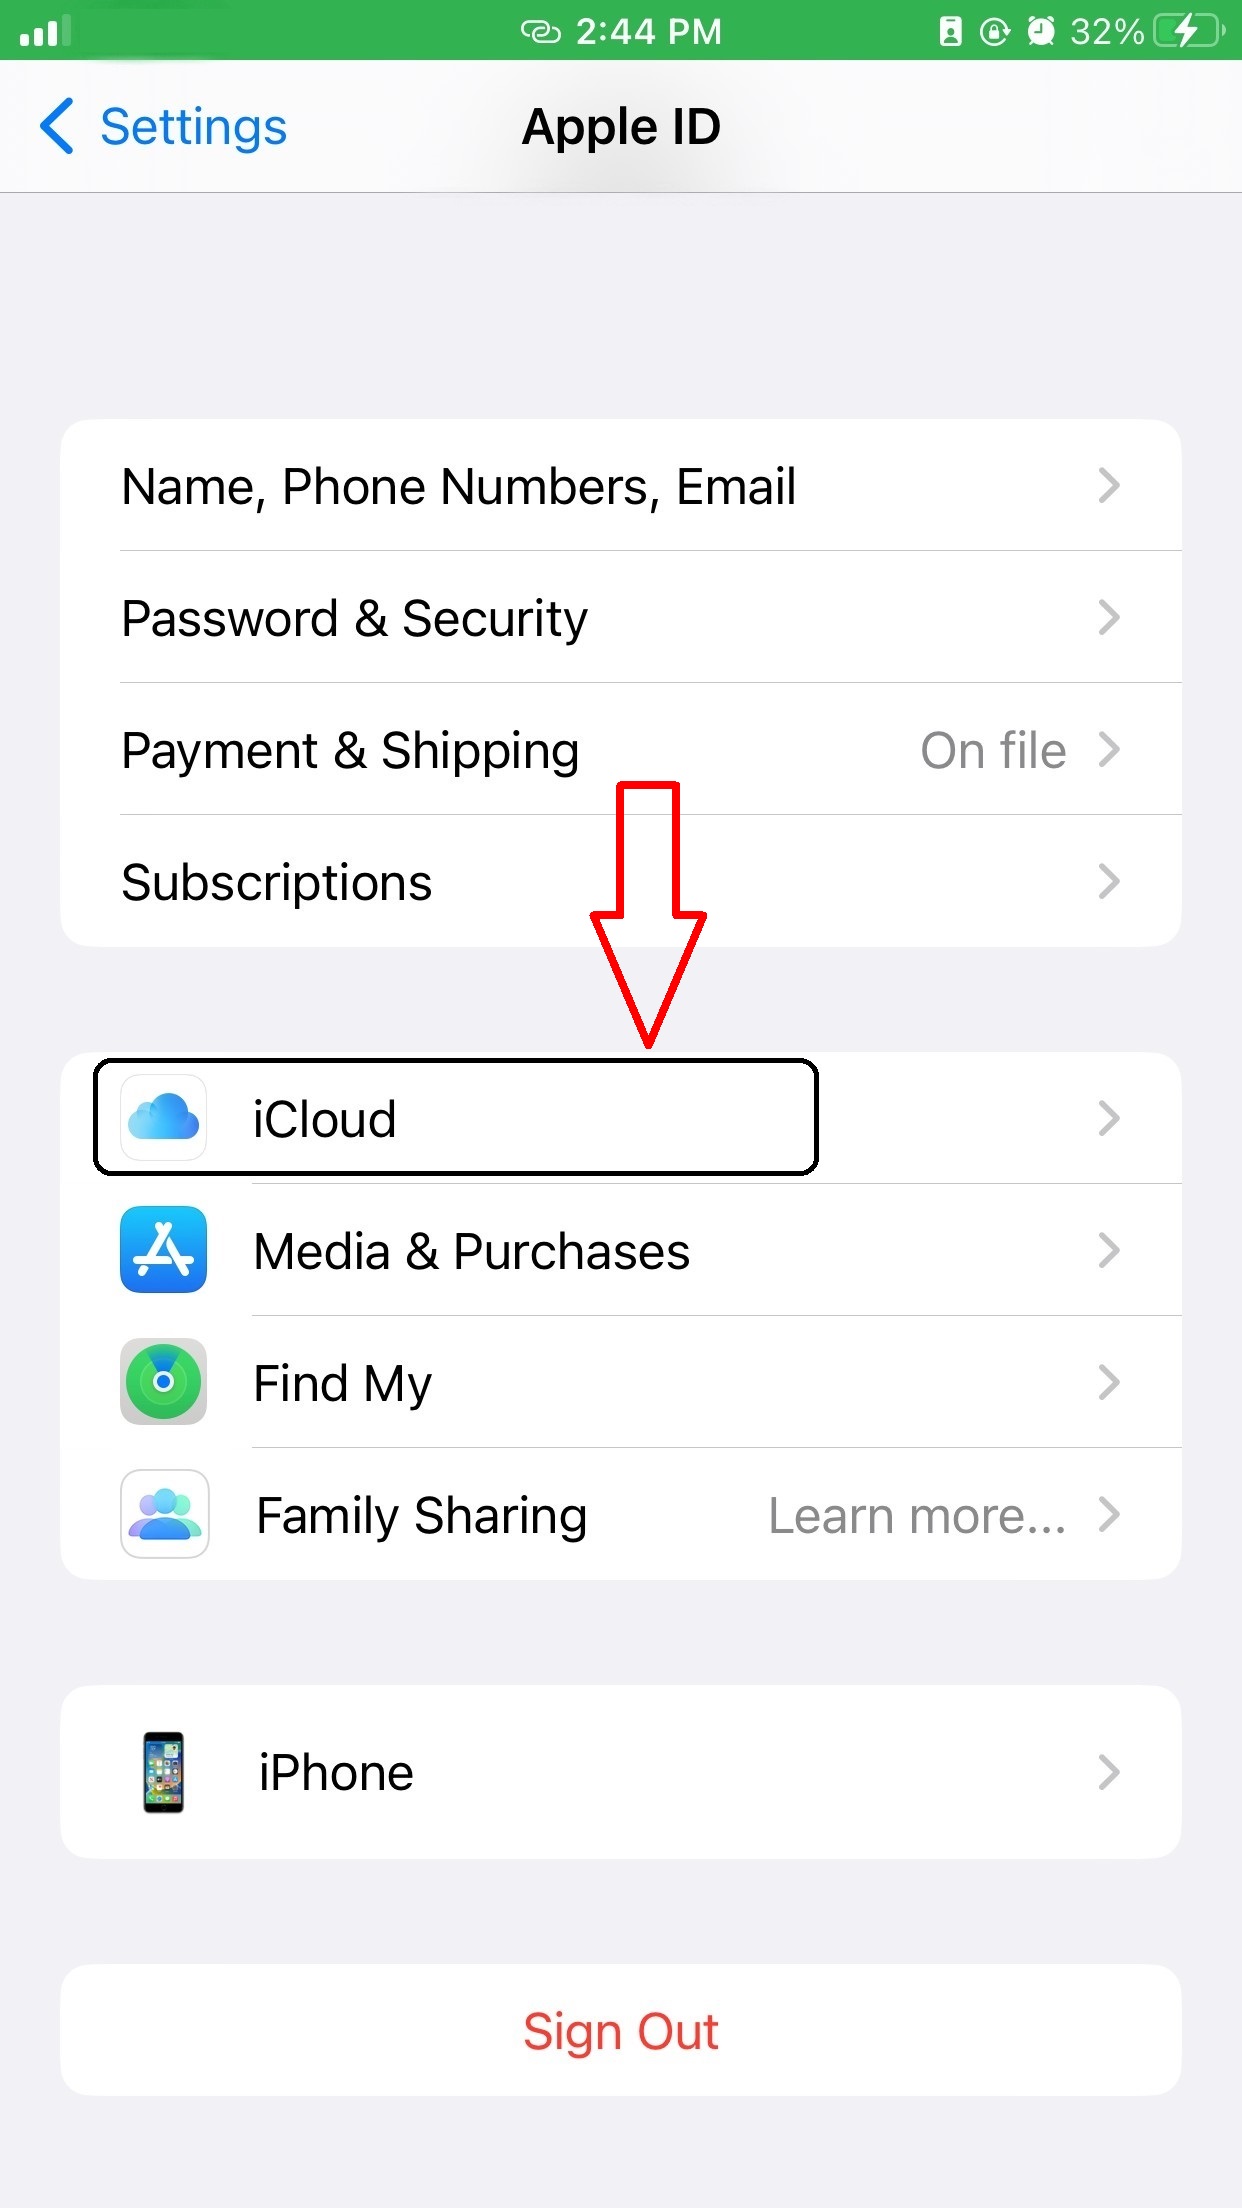
- Tap Photos
- Toggle on iCloud Photos.
To turn on iCloud Photos on Mac
- Go to System Preferences > iCloud.

- Next to Photos, click Options
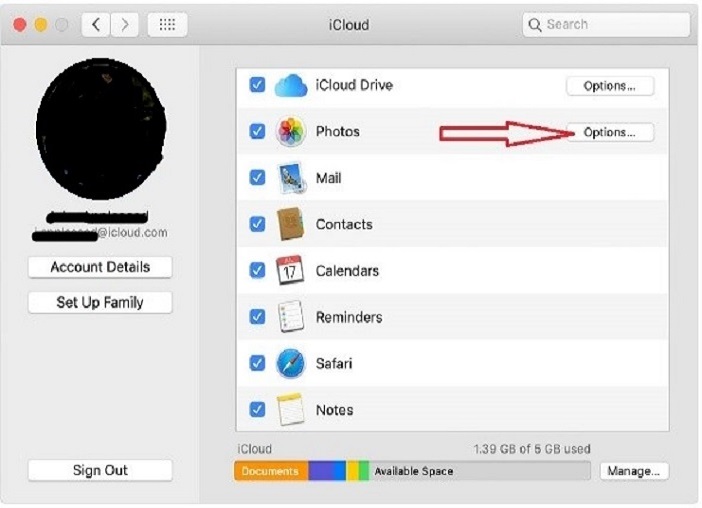
- Select iCloud Photos
Next, connect to Wi-Fi and wait for some time until your photos appear again on the synced devices.
Tip: When you turn on iCloud Photos, photos upload to iCloud but they are not duplicated in your iCloud backup. So make backup of your photo library. You can download your photos from iCloud.com to your PC/Mac and store them as a separate library or store them on a separate drive.
Comparison — iPhone Photo Recovery Methods
|
| Stellar Data Recovery for iPhone | Recover from iCloud | Recover from iTunes | Recently Deleted folder | Enable iCloud Photos |
| — | — | — | — | — | — |
| Success Rate | High | Medium | Medium | Low | Medium |
| Photo Recovery without backup | Yes | No | No | Yes | Yes |
| Effect on iPhone’s existing photos & other data after recovery | Existing data remains in iPhone | Deletes the existing iPhone data | Deletes the existing iPhone data | Existing data remains in iPhone | Existing data remains in iPhone |
| Select Photo and restore | Yes | No | No | Yes | Not applicable |
| Preview photos before recovery | Yes | No | No | Yes | Yes |
| Difficulty level | Nil | Medium | Medium | Nil | Medium |
| Recovery options | Recovers from iPhone, iPad, iCloud & iTunes | Recovers from iCloud only | Recovers from iTunes only | Recover from iPhone & iPad (within 30 days of photo deletion) | Recover on iPhone synced devices |
How to Recover Deleted Notes from iPhone?
Summary: Lost Notes from iPhone after iOS upgrade, deletion, factory reset, etc.? This post shares 5 best ways to restore lost Notes on iPhone. Also learn how Stellar Data Recovery for iPhone quickly recovers only the missing Notes from your iPhone.
When Matt opened his iPhone 14 Notes after iOS 16.4 upgrade, he found many of his old Notes had disappeared. He was repenting about the upgrade and now looking for ways to get back his Notes on his iPhone.
Notes are important for those who make optimum use of this app. However, if you have also lost them for some reason, this post shares how to restore the lost Notes on your iPhone.
Often underrated, iPhone Notes app lets you do much more than you can think of — scribbling thoughts, ideas, checklists, sketching, adding photos, and videos, attaching location links from Maps, etc.
However, Notes may disappear after an iOS update, jailbreak, factory reset, accidental deletion, etc.
How to Recover Notes on iPhone?
Usually, Notes can be recovered from iCloud, iTunes, or your recently deleted Notes App folder.
But, if in a situation when you have deleted Notes and also don’t have a backup in iCloud, an iPhone recovery software is the way to go.
Top 5 methods that can recover lost Notes from iPhone
- Recover iPhone Notes & Attachments without backup
- Restore Notes from iCloud backup
- Restore from iTunes backup
- Recover Recently Deleted folder
- Restore Notes from e-mail account on iPhone
1. Recover iPhone Notes & Attachments without Backup
There is a plethora of iPhone recovery software. Carefully pick that supports Notes and attachments recovery. Most importantly, the iPhone recovery software should be 100% secure to download and free from viruses.
Advanced tools such as Stellar Data Recovery for iPhone can recover even permanently deleted Notes and their attachments. It is fast, easy to use, and supports the latest iOS and iPhone versions.
Stellar Data Recovery for iPhone restores in situations like,
- In the absence of iCloud backup
- Factory Reset of iPhone
- Unable to retrieve Notes from iCloud/ iTunes
- iPhone is damaged or stolen
- and others
The software lets you recover deleted Notes from iPhone , iPad, iCloud, and iTunes. It thoroughly scans the iOS device and backup to restore every bit of lost data. If you don’t find the required Notes after running the initial quick scan, it offers a second-level Deep Scan for a more comprehensive search.
Unlike Apple backups — iCloud and iTunes, you can select only those Notes and their attachments that you need. Thus, the software protects you from unnecessary data recovery.
You can view the lost and deleted Notes of iPhone in the demo version of the software.
Step-by-step: Recover deleted/ lost Notes and Attachments on iPhone
- Download Stellar Data Recovery for iPhone on your Mac/PC
- Connect your iPhone to your computer and launch the software
- Choose “Recover from iPhone”, select “Notes & Reminders” and click “Next”
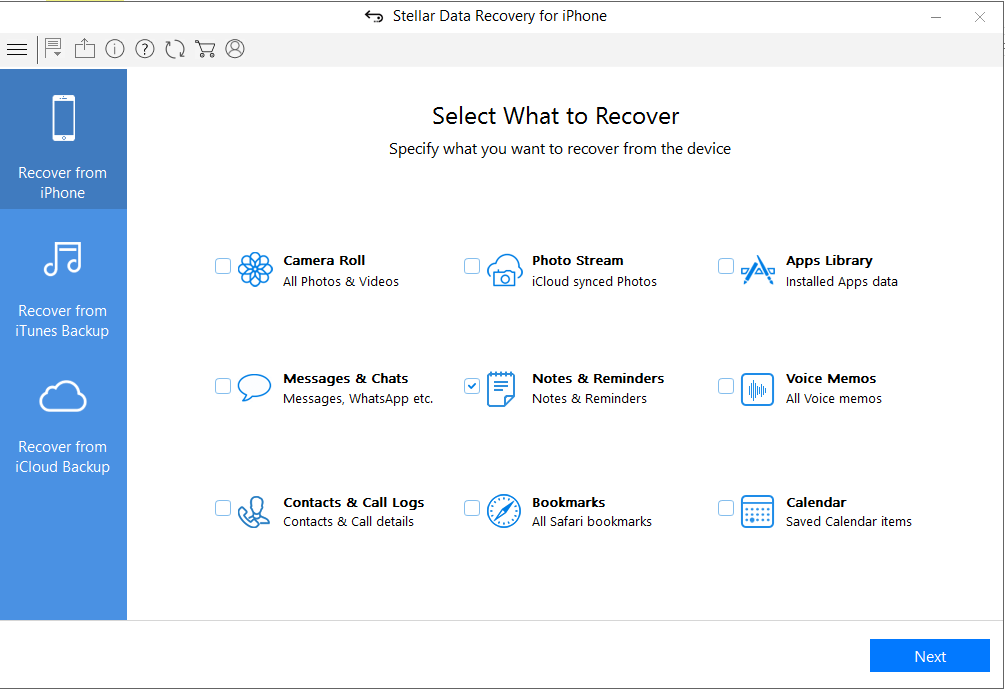
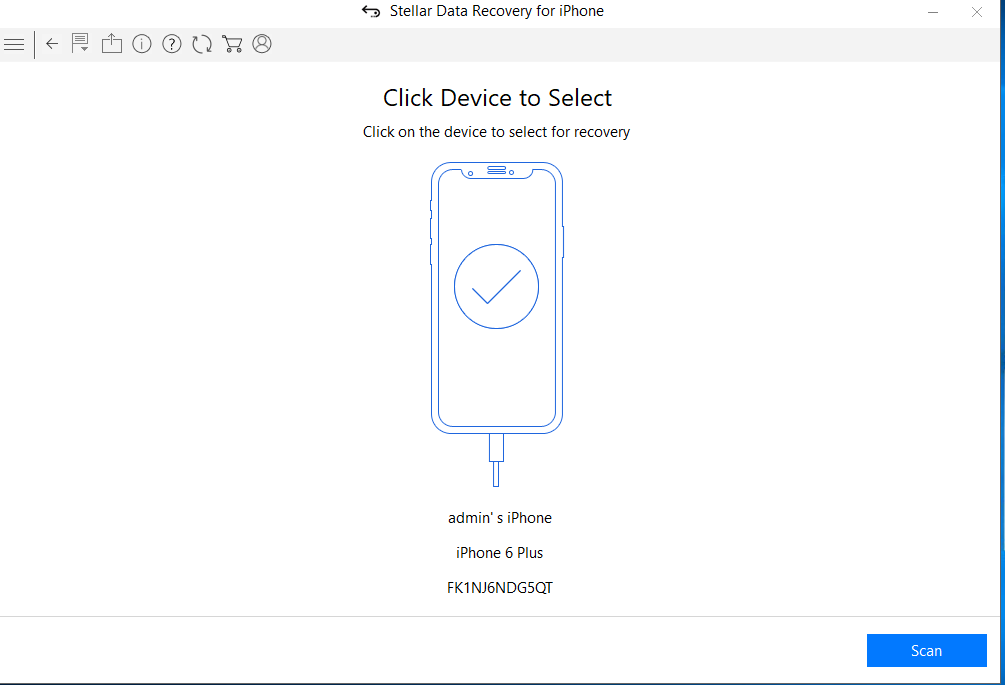
- Select your device and click “Scan.”

- After scanning, select Notes on your left pane to preview in the right pane before saving.

- Click on Save and browse the desired location to save the recovered notes.
Recover Notes from Apple Backups
iCloud and iTunes backup storage protect against data loss. If your Notes are backed up in any of the two, recover the files from there.
Just log in through your Apple ID and restore Notes from backup.
However, one of the major drawbacks of this method is that it will remove and replace all your existing iPhone data, including Camera Roll, apps, messages, music, etc.
2. How to recover iPhone Notes from iCloud backup
- Go to Settings > General > Reset> Erase all Contents and Settings
- On Apps & Data screen, tap Restore from iCloud Backup
- Sign in to your iCloud account
- Choose the last backup and Restore
3. How to restore Notes from iTunes
- Connect iPhone to PC/Mac
- Launch iTunes
- Select your iPhone under the Device list and choose the recent backup entry date
- Click Restore Backup
4. Recover iPhone Notes from ‘Recently Deleted.’
Once you delete Notes, they remain in the recently deleted folder on your iPhone for 30 days. After that, Notes are permanently deleted from the device.
Steps to restore from ‘Recently Deleted.’
- In the Notes app, tap Recently Deleted.
- Select the notes you want to restore
- Click Recover in the toolbar. The note moves to the Notes folder
5. Restore Notes from an e-mail account on iPhone
When you delete a Note from your iPhone, it remains in your e-mail account of your iPhone. So, for example, suppose you use Gmail on your iPhone, and all your Notes are saved to the e-mail address.
Steps to restore Notes from e-mail on iPhone
- Go to Setting > Accounts & Passwords
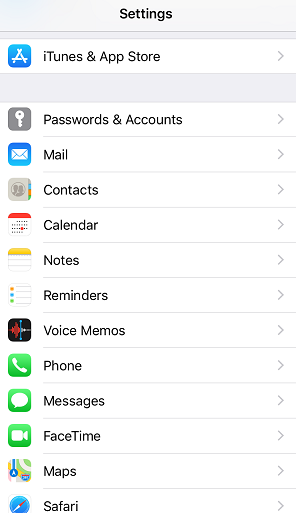
- Click on each email account (Gmail, Yahoo, AOL, etc.) one by one

- Turn on Notes for each account

- Open the Notes app to see if they are back
Byte: Do you know the email accounts on your iPhone can store Contacts, Calendars, and Notes, apart from sending e-mails.

Wrapping Up
Notes are your best companion; you don’t want to part with them. Recover all or specific Notes with the help of iPhone notes recovery software.
However, you can also try to restore deleted Notes from an iCloud, e-mail accounts,s or recently deleted folders on your iPhone. However, Stellar iPhone Recovery software is the best solution for permanently deleted Notes in case of the absence of backup.
- Title: Recover Lost Photos during Transfer from iPhone 15 Pro to PC or Mac | Stellar
- Author: Vivienne
- Created at : 2024-07-17 04:48:29
- Updated at : 2024-07-18 04:48:29
- Link: https://review-topics.techidaily.com/recover-lost-photos-during-transfer-from-iphone-15-pro-to-pc-or-mac-stellar-by-stellar-data-recovery-ios-iphone-data-recovery/
- License: This work is licensed under CC BY-NC-SA 4.0.