
Recover Lost Photos during Transfer from iPhone 14 Plus to PC or Mac | Stellar
Recover Lost Photos during Transfer from iPhone to PC or Mac
Summary: Lost your precious photos during the transfer from iPhone to computer? Learn 4 ways to recover photos lost during transfer. These methods are applicable to all variants of iPhone and iPad or in short all iOS devices.


Transferring photos from iPhone 15, 14/13/12/X/8/7 to PC or Mac system is a simple task that can often get skewed causing serious photo loss situations. If you have also lost your valuable photos during one such event of photos transfer, then here’s a guide to get back photos lost during the transfer.
Photo loss while transferring from iPhone to a computer is a common problem faced by many. You try to transfer your photos from your iPhone to your computer and select the location to save them.
But when you check the drive folder in the system, to your shock the photos are not there! And if this is a ‘cut and paste’ transfer from iPhone, it’s a big jolt for you.
But do not worry, thankfully, data recovery technology is always there to recover lost photos in any situation.
There can be several reasons for the loss of photos during transfer, such as below:
- Sudden power failure during the transfer of photos
- Disconnecting iPhone from the PC/Mac while transferring photos
- Lack of enough space in the drive to save the photos
- Corruption of the drive in which you saved the photos
- Virus in the system
- Anti-virus on your PC/Mac scans and detects viruses in the photo resulting in photo loss
How to Recover Photos Lost during Transfer from iPhone 15, 14/13/12/11/X/8/7 to PC/Mac?
Typically, if you have not deleted the required photos from your iPhone, try transferring them again from the device to the PC or Mac. If already deleted then, try the below methods to recover the photos lost during transfer from iPhone 15, 14/13/12/11/X/8/7 to PC or Mac.
Solution 1: Search for missing photos in the PC/Mac hard drive
It might be possible you transferred the iPhone photos to the PC but forgot the location where you saved them. Try once searching the complete hard drive for your photos.
- Click on My PC or My Computer
- Type the command kind:=picture into the search box and press Enter
- The list of images will be displayed
- Right-click on the required photos from the search results, and click Open File Location to view where they are saved
For MAC follow the below steps:
- Open the Finder and go to your home directory
- Go to the Pictures folder
- Right-click on Photos Library.photoslibrary and select Show Package Contents
- Open the folder Masters to find the images in the Photos app. The Masters folder comprises the photos by date in subfolders. You can open the folders of the relevant dates to find your pictures.
Solution 2: Recover lost transferred photos from iTunes Backup
If you have synced your iPhone to iTunes, you can recover lost photos from this Apple’s backup utility.
Drawback: You cannot selectively pick the lost photos during the file transfer, rather complete data of iTunes is saved on your PC/Mac.
| Note: In Mac, the iTunes backup is stored in Library > Application Support > MobileSync > Backup.
In Windows 7, 8, 10, & 11 the iTunes backup is stored in Users > username > AppData > Roaming > Apple Computer > MobileSync > Backup.
|
| — |
Solution 3: Recover Lost Photos from iCloud
If you have iCloud backup of the iOS device, you can recover photos lost during transfer through the cloud facility.
Drawbacks: You cannot directly restore iCloud backup photos on your PC or Mac. It is saved only to an iOS device.
You have to reset your iPhone X/8/7 to factory settings to restore the iCloud backup on it.

How to recover data from iCloud Backup on a computer
- Take the backup of your iPhone data on iTunes
- Reset your iPhone to factory settings
- Go to the Apps & Data screen of your iPhone by pressing the Sleep/Wake button for a few seconds and following the onscreen instructions
- Under Apps & Data, click on Restore from iCloud Backup
- Sign in to iCloud by entering your Apple ID
- Select Choose Backup and pick the relevant one from the list of backups
- Tap After completion of the process, the iPhone restarts and recovers complete data including photos, apps, videos, etc.
- Select the required photos from the recovered data and transfer them again to your PC or Mac from iPhone
| Tip: For selective recovery of lost photos from iCloud/iTunes use Stellar Data Recovery for iPhone . It recovers missing Photos from Camera Roll and Photo Stream in iCloud/iTunes/iPhone. You can preview, select and save only the desired photos at your preferred location. |
|---|
Solution 4: Use the Best Photo Recovery Software
When no backup, take the help of a third-party photo recovery tool. This is regarded as the easiest way to recover lost photos during the transfer from iPhone 15, 14/13/12/11/XR/XS/X/8/7 to PC/Mac. Use a risk-free application – Stellar Photo Recovery to recover your lost photos from your PC or Mac
The do-it-yourself software recovers all types of media files lost due to deletion, corruption, virus infection or accidental formatting, etc.
How to recover lost photos using Stellar Photo Recovery?
- Launch Stellar Photo Recovery Software.
- On the home screen of the software – ‘Select What to Recover’. Click Next.
- Next, select the location from where you want to recover. Click Scan to start the scanning process
- A dialog box of ‘Scanning Completed Successfully!’ displays the scan results – the number of files found and the size of the data. In the left pane of the main window, all the recovered data is listed. You can preview them in the right pane.
Note: If you do not see the required photos in the list, opt for the Deep Scan option at the bottom. - Click Recover. You can also choose to recover only the selective files – select the photos that you need, right-click, and click Recover.
- In the dialog box, specify the location to save the image files. Click Save. All the files get saved at the specified location Click Save. All the files get saved at the specified location.
Conclusion
Backup is the undisputable solution to any kind of photo loss situation. However, if you have not taken your photos backup in iTunes, iCloud, or other storage media, recovery through Stellar Photo Recovery software is the best way to get back photos lost during transfer from iPhone 15, 14/13/12/XS/XR/X/7/8 to PC or Mac.
How to Recover FaceTime Call History on iPhone
Summary: Have you deleted or lost FaceTime calls from your iPhone? Once deleted from the call history, the Facetime calls are removed from the app’s history and vice versa. This post shares quick methods to restore FaceTime call history from any series of iPhone 15, 14, 13, 12, X, XS Max, XR, X, 8, 8 Plus, 7, and below versions and iPads’.

‘Just noticed, that the FaceTime call history suddenly disappeared. Cellular calls history is fine. I am using iOS 16.2, iPhone 14. I don’t have iTunes backup and don’t want to try iCloud backup as it will remove my current data. Is there any other way to get back FaceTime call history?’
‘I deleted the call history on my iPhone and without realizing that FaceTime calls will also be erased. How can I recover deleted FaceTime history?’
You love using FaceTime — Apple’s popular calling app, on your iOS device. It’s a free and easy way to connect with family and friends anywhere in the world through audio and video calls.
But what if ever you accidentally delete or lose FaceTime calls from your iPhone or iPad. They may be important calls you wanted to keep.
Since FaceTime calls are integrated into your recent calls list on iPhone, once deleted from the call history, the calls are removed from the app’s history as well and vice versa.
Here we share various methods to restore FaceTime call history on iPhone 14, 13, 12, 11, XS, XS Max, XR, X, 8, 8 Plus, 7, 7 Plus, 6 and below versions and iPad.
How to recover the lost or deleted FaceTime call history?
1. Restore FaceTime call history without iTunes/ iCloud backup
Deleted FaceTime history can be recovered by using Stellar Data Recovery for iPhone software. The software can restore lost FaceTime call history after accidental deletion, factory reset, app crash, jailbreak, and other issues.
The DIY software thoroughly scans your iPhone or iPad to recover the lost FaceTime call history.
In contrast to iTunes and iCloud backup, Stellar iPhone data recovery software lets you select and restore specific iPhone deleted call history along with the details like name, date, call duration, source country. This saves you from restoring other unnecessary data.
Step-by-step: Recover deleted/ lost FaceTime calls from iPhone
- Connect your iPhone to the computer
- Launch Stellar Data Recovery for iPhone
- Select Recover from iPhone on the left
- Select Contacts & Call Logs under What to Recover

- Click Next
- Preview and choose the FaceTime calls you want to restore from the list. Note: All the calls marked in red color are the deleted calls

- Click You can save the call history either on your computer or iPhone.
2. Recover FaceTime call history with iCloud
Stellar Data Recovery for iPhone can also restore FaceTime calls from iCloud backup on your iPhone or iPad. This method allows you to select and recover only the lost FaceTime call history from iCloud instead of restoring complete backup data.
Two methods to restore FaceTime log from iCloud:
- Restore lost/deleted FaceTime calls from iCloud without losing existing iPhone data
- Restore FaceTime call history from iCloud backup for free, deleting the current iPhone data
Method 1: Restore lost/deleted FaceTime calls from iCloud without losing existing iPhone data:
- Download Stellar Data Recovery for iPhone on your PC/ Mac
- Select Recover from iCloud Backup on main screen of software

- Select Contacts & Call Logs and click Next
- Enter the Apple ID and password. List of all available iCloud backup files appears. Select the relevant backup of your iPhone
- Click Scan

- Click Call History on the left window. Preview the existing and deleted FaceTime calls. Click Deep Scan, if you don’t find your required calls.


- Click Save to save the recovered call history either on iPhone or computer
Method 2: Restore FaceTime from iCloud backup for free (this deletes the current iPhone data)
- Go to Settings > General > Reset> Erase all Contents and Settings


- On Apps & Data screen, tap Restore from iCloud Backup

- Sign in to your iCloud account


- Choose the last backup and Restore
Note – The drawback of this method is that it deletes all your existing data from the iPhone.
Recover FaceTime calls from iTunes Backup
3. Recover FaceTime calls from iTunes Backup
FaceTime recovery from iTunes backup is also possible if you have enabled the backup in iTunes.
Restore FaceTime call log from iTunes either with the help of Stellar Data Recovery for iPhone or directly from your system without the help of software.
However, if you don’t want to part ways with your iPhone’s existing data and lose all the current photos, videos, etc. with the old backup file, take the help of Stellar Data Recovery for iPhone.
The software protects your current data on iPhone and recovers only the call history as required.
Two methods to restore FaceTime call history from iTunes
- Restore FaceTime call history from iTunes without losing existing iPhone data
- Restore FaceTime call history from iTunes backup, deleting the current iPhone data
Method 1: Restore FaceTime call history from iTunes without losing existing iPhone data
- Download Stellar Data Recovery for iPhone software on your PC/ Mac. Note: Connect your iPhone to a computer, if want to save the recovered FaceTime call history on iPhone.
- Select Recover from iTunes Backup on the main screen of the application.

- Select Contacts & Call Logs
- Click Next. From the list of the iTunes backup files, select the relevant iTunes backup

- Click Scan
- Click Call History. Preview the existing and deleted FaceTime calls. Click Deep Scan, if you don’t find your required calls.
- Click Save. You can save on your computer or iPhone
Method 2: Restore FaceTime call history from iTunes for free (this method deletes the current iPhone data)
- Connect iPhone to PC/ Mac
- Launch iTunes on your computer
- Select your iPhone under the Device list and choose the recent backup entry date

- Click Restore Backup
4. Contact Apple
Apple uses end-to-end encryption in FaceTime calls. It will not decrypt the content of your conversations. Apple may record and store information, such as to whom you had called and your iPhone/ iPad network configurations. It stores this information for up to 30 days. You don’t get the details like the content of the conversation or whether your call was answered or not.
Nevertheless, you can contact Apple requesting for FaceTime call logs by clicking on this link and submitting the request – Read More
Apple will get back to you.
Conclusion
iCloud and iTunes backup are the natural way for Apple users to recover FaceTime deleted call history. However, Apple’s solution though workable is not efficient when it comes to the recovery of specific types of data. The iTunes or iCloud backup recovery methods replace every existing data on your iPhone with an old/recent backup. You lose your current photos, videos, call history, messages, chats, etc.
Whereas Stellar Data Recovery for iPhone tackles this recovery issue more effectively. It recovers lost FaceTime calls and also keeps your current data intact on the iPhone.
The software works in all data loss situations due to deletion, jailbreak, water damage, factory reset, etc. You can restore FaceTime call history from any iPhone including series of iPhone 15, 14, 13, 12, 11, X, XS, XR, iPhone 8, iPhone 7, iPhone 6 and older versions. It is available for both Windows and macOS computers.
How to Recover Deleted iPhone Camera Roll Photos and Photo Stream Pictures?
Your iPhone is not only a medium to connect but also serves as a personal repository for your priceless photos, videos, and music. However, in case your iPhone crashes or you lose files due to accidental deletion, your data stands at risk and may be lost forever. But with Stellar Data Recovery for iPhone, your data is here to stay. This professional solution helps to retrieve your lost or accidentally deleted photos, audio, as well as video files from Camera Roll, Photo Stream, and App Library. It also offers a complete recovery of your iPhone data such as Contacts, Messages along with attachments, Notes, Call History, Calendars, Safari Bookmarks, iTunes, and iCloud backup files.
An iPhone stands apart for its high image quality, among its other notable features. With several iPhone releases over the years, its camera specifications have improved indescribably, and this has increased the percentage of buyers to a considerable extent. Though it cannot be likened to a professional DSLR, yet it stands superior in its category.
How to recover your deleted iPhone Photos?
If your collection of photos, audios, and video files gets accidentally deleted or lost due to iOS crash, the question that comes to mind is whether they can be recovered. If you have created a backup already, then all you need to do is to restore data from the most recent backup. However, if you have not created a backup either on iTunes or iCloud, then the situation needs attention.
Your photos and other multimedia files are important to you. Therefore, it is important to look for an efficient and reliable recovery tool. Here, Stellar Data Recovery for iPhone serves as a perfect solution with its straight forward and user-centric interface. This tool accommodates all the major specifications of different iPhone versions.
The Process: Let’s look at how Stellar Data Recovery for iPhone recovers your lost or accidentally deleted photos from your iPhone:
Step 1) Download, Install, and Launch Stellar Data Recovery for iPhone on your system
Step 2) Next, select Recover from iPhone option from the three alternates provided on the home screen. Select what you want to recover and click “Next”.

Step 3) Now connect the iPhone device to your system for initiating further recovery process. Alternatively, the device can be connected before you launch the tool
Step 4) The iPhone photo recovery tool will start scanning the connected device. A message will then pop up on the screen which reads: “_Please wait! Scanning your iPhone._” It will appear along with the live progress generator.
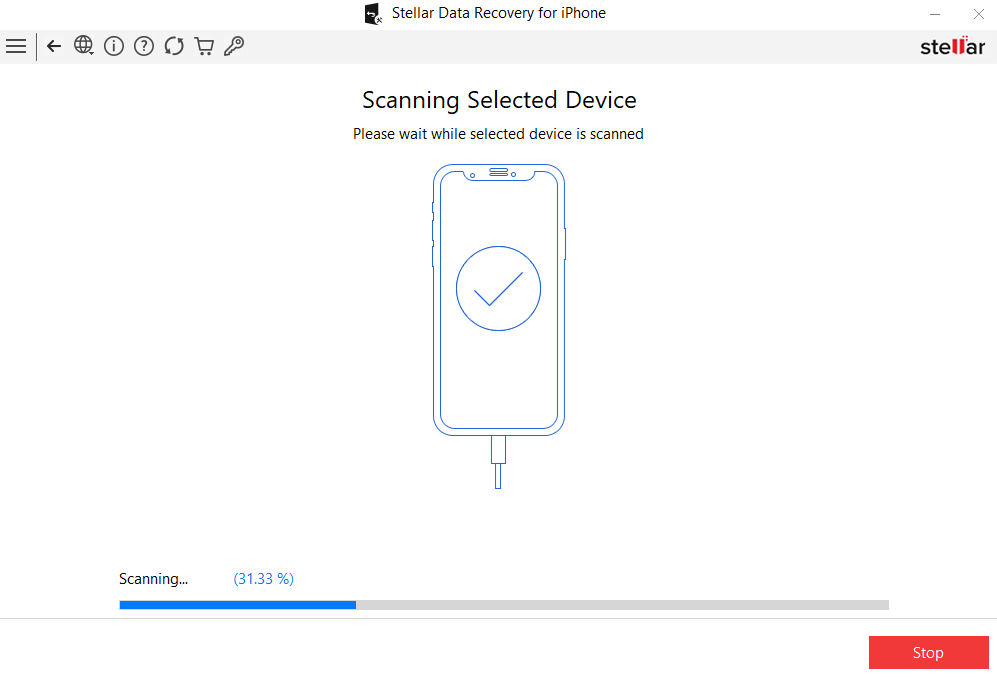
Note: Here, you can select to stop the scan process in between by selecting the Stop button
Step 5) Once the scanning is completed, the tool will enlist all the files and folders existing within the iPhone device.
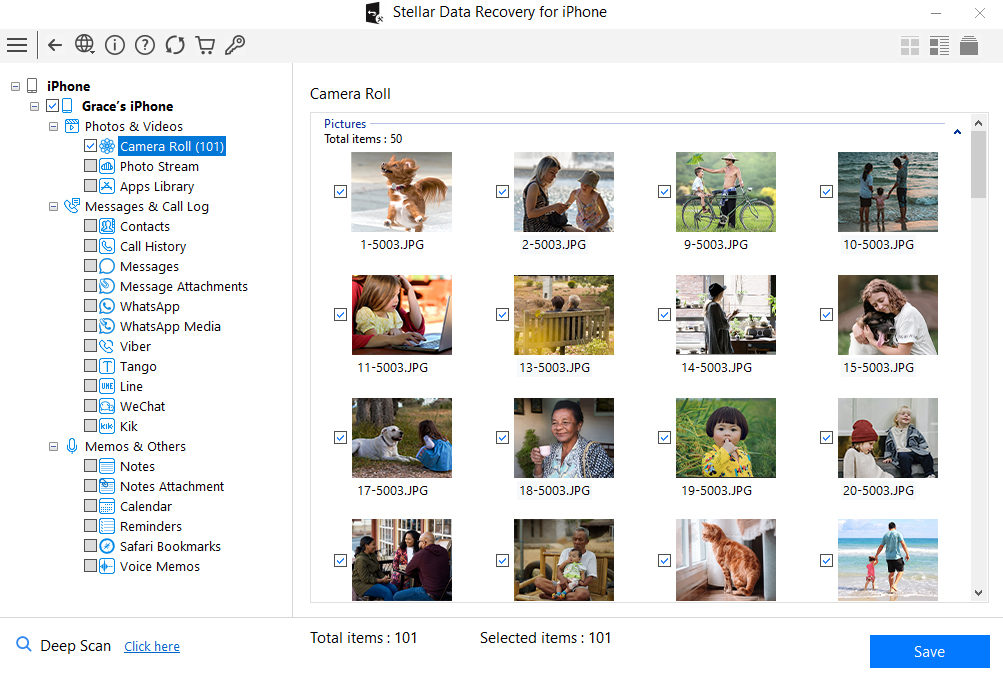
Step 6) From the left panel, you can select Photos & Videos category from the tree structure. It will then expand associated options that include Camera Roll, Photo Stream, and Apps Library.
Step 7) Select Camera Roll and Photo Stream and the tool will display all the items from these two folders in the middle pane
Step 8) Now from the middle pane, you can either select a single file for recovery, or you can select multiple items by checking the associated boxes
Step 9) Once you select all the items that you need to recover from Camera Roll and Photo Stream, click on Save button
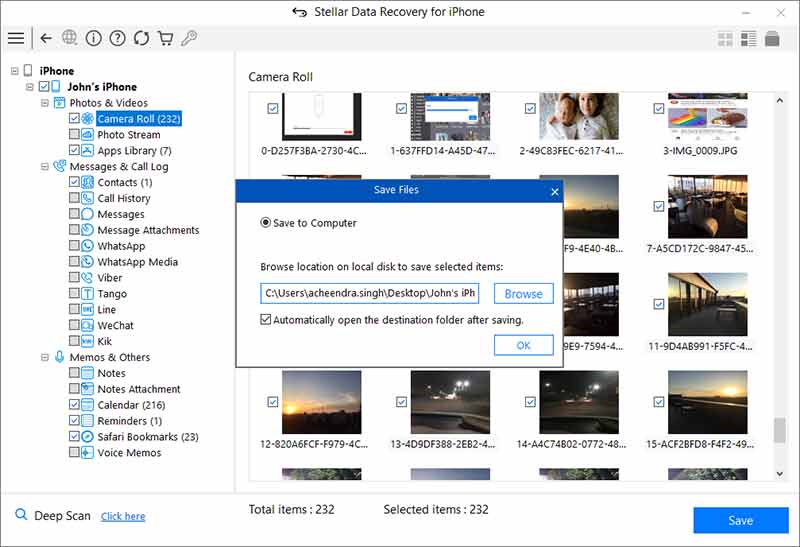
Step 10) The Save Files window will appear. Click on Browse and provide the location for storing the recovered data on the hard drive. Else use, the default location provided by the software which is Desktop << iPhone Default Name.
Step 11) Click OK to proceed saving the recovered files.
Step 12) Exit from the tool and go to the selected location to access the Camera Roll and Photo Stream recovered pictures.
Stellar Data Recovery for iPhone also restores data from the following:
- If you are looking to recover data from your iPhone backup such as iTunes backup or iCloud backup, then you need to select Recover from iTunes backup or Recover from iCloud backup options. The tool also allows importing files from Windows and Mac machines to iPhones.
- After the scan is completed, the tool will display all integrated components of deleted iTunes backup or iCloud backup files within its panel from where it can be selected as per priority and preferences. The powerful algorithms are fully advanced to recover every single bit of data.
- The tool also recovers encrypted iOS iTunes backup files and restores it back to the device. You can also recover lost or deleted data from iPad using the iPhone Data Recovery tool. Backup files of small, medium and large scale are handled effectively by the tool.
- The tool also recovers bookmarks deleted accidentally from your iPhone default browser Safari. Since bookmarks hold information about useful links and websites, this feature can be very helpful for technically savvy users.
How to Recover Deleted Videos from iPhone Without Backup?
Your iPhone 14 Plus is supported by a strong and powerful operating system that makes your daily activities such as calling, emailing, messaging, web browsing, notes making, etc. easily possible. Also, capturing happy moments spent with family, friends, and your loved ones is another thing that you do with it. It is natural that the good times that you record becomes your favorite videos, which you love watching anytime you feel like.
However, at times in the event of making space in your iPhone 14 Plus, or due to any other reason, you accidentally delete the videos, and end up losing one, more, or all of them. The situation becomes grim when you realize that you haven’t taken a backup of your favorite videos. You really do not know what to do to recover your deleted videos from iPhone 13 without backup. It is then that you understand the importance of having a backup and regret not creating the same for your favorite videos.
You can come out from such a situation with the help of Stellar Data Recovery for iPhone. It is a comprehensive iPhone data recovery software tool through which you can recover deleted videos from iPhone 14 Plus without a backup.
The videos you capture with your iPhone 14 Plus gets stored in either the memory of the phone. However, once the videos are lost or accidentally deleted from there, you lose access to them. To recover deleted videos of iPhone 14 Plus with Stellar Data Recovery for iPhone, you need to execute the following steps:
Step 1) Download and install the software on your system, the one on which you want to recover the deleted videos of your iPhone 14 Plus.
Step 2) Connect your iPhone 14 Plus to your system.
Note – You can connect your iPhone 14 Plus with multiple devices and the software will enlist all the connected devices. You can connect the iPhone 14 Plus after or before the launch of the software.
Step 3) Next, launch the software that you installed.
Step 4) To recover deleted videos from your iPhone 14 Plus, click on the ‘Recover from iPhone’ option that comes up on the screen.
Step 5) The Stellar Data Recovery for iPhone software will scan the iPhone 14 Plus to list all the recently deleted data including videos.
Step 6) All deleted videos will be listed in red, while the rest will be listed in black color as shown in the image placed below.
Step 7) After that, select the videos you want to recover by putting check marks in the boxes in front of them.
Step 8) Provide the address of the location where you would want the recovered videos to be saved.
Step 9) Click Save button to finally save the videos. With this, the ‘Save Files’ dialog appears as shown below:
(i) Chose the option ‘Save to Computer’ if you want to save the recovered videos to your computer. Click Browse and select a destination for saving the recovered files and click OK.
(ii) Choose the option ‘Save to iPhone’ if you want to save the recovered files to your iPhone 14 Plus. From the drop-down menu, select the iPhone 14 Plus to which you want to save the recovered videos.
Step 10) Finally, click on the OK tab to complete the recovery process of deleted videos from your iPhone 14 Plus.
- Title: Recover Lost Photos during Transfer from iPhone 14 Plus to PC or Mac | Stellar
- Author: Vivienne
- Created at : 2024-07-17 04:48:21
- Updated at : 2024-07-18 04:48:21
- Link: https://review-topics.techidaily.com/recover-lost-photos-during-transfer-from-iphone-14-plus-to-pc-or-mac-stellar-by-stellar-data-recovery-ios-iphone-data-recovery/
- License: This work is licensed under CC BY-NC-SA 4.0.