
Recover Excel 2019 Files from Virus-Infected Pen Drives for Free | Stellar
Recover Excel Files from Virus-Infected Pen Drives for Free
Summary: Imagine you lost your important Excel file on which you had been working since the morning and in the next moment you realized that the file was not saved and you just lost hours of work. Wondering how to deal with this situation? Read this blog to know how Stellar free data recovery software can help you.

From making annual reports to business growth representation figures, excel is a commonly used program for organizing data, creating pivot tables, charts etc. People from all walks of life, know the importance of Excel and the part it plays. Although it is a common file, there is a probability that you may accidentally delete excel files while working or are unable to access it due to unexpected errors. In addition, one of the major issues users face is to recover excel files from a virus infected pen drive.
Pen drives have made it possible to store and carry our important files such as excel, word document, photos, videos, etc. with us day in and day out. They just fit perfectly in our pockets and are compatible with almost every device; hence, they are widely used for transferring data from one system to another. But what if your pen drive is infected by a virus and due to it you end up losing your excel files, how will you recover your excel files for free?
A user reported that his pen drive got virus-infected and to remove the virus from it, he ran an antivirus program which removed the virus but also deleted excel files stored on it.
When your pen drive is infected by a virus, the first thing you ought to do is stop using it, even not for removing virus as an antivirus utility may remove your files as well. Further, if you have a backup, then you can recover your excel files from it, else you can use these free data recovery methods to recover your excel files.
1. Free File Recovery Software Approach
Stellar Windows Data Recovery – Free Edition is an easy to use tool to recover files from a virus-infected pen drive. The software is equipped with powerful utilities to recover lost and deleted files for free. Further, it supports a wide range of file systems and is efficient in recovering files such as Excel, emails, word files, photos, audio and video files.
Using Stellar Windows Data Recovery – Free Edition, you can recover your files from all storage devices for free. Here’s how the software works:
- From the website, download Stellar Windows Data Recovery – Free Edition. Connect your pen drive to your system and launch the software
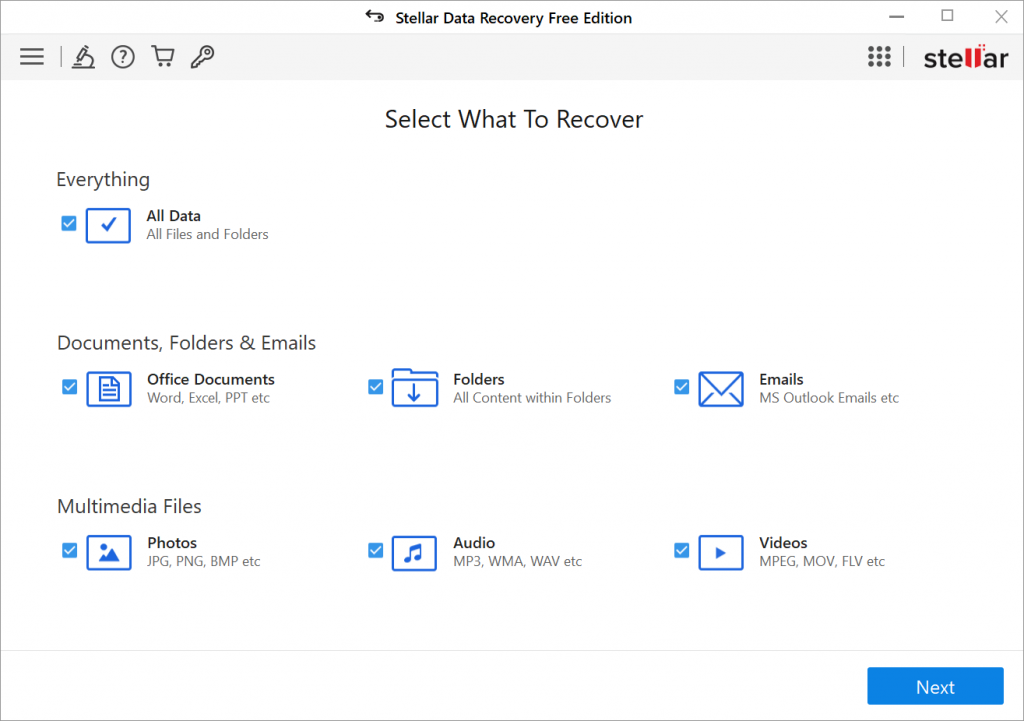
- On ‘Select What to Recover’ screen, select file types from the given option that you wish to recover. For instance, if you want to recover photos, then under Multimedia Files, select ‘Photos’ and click on ‘Next’

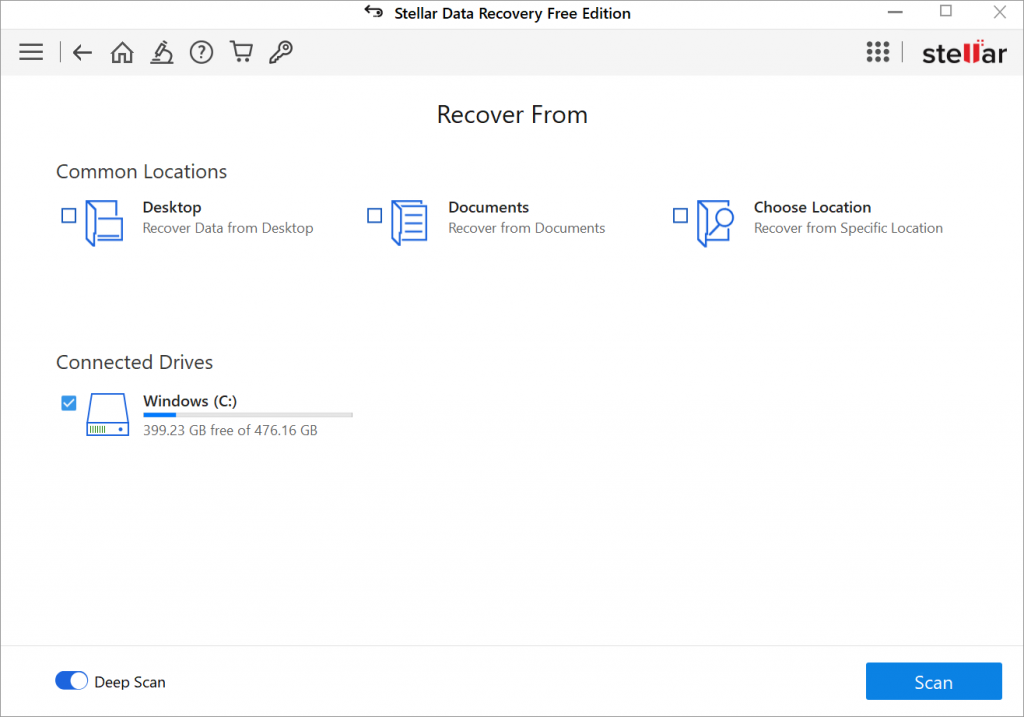
- From ‘Select Location’ screen, select the connected pen drive and click ‘Scan’
- The scanning process starts and once the process is complete, software lists all the recoverable files
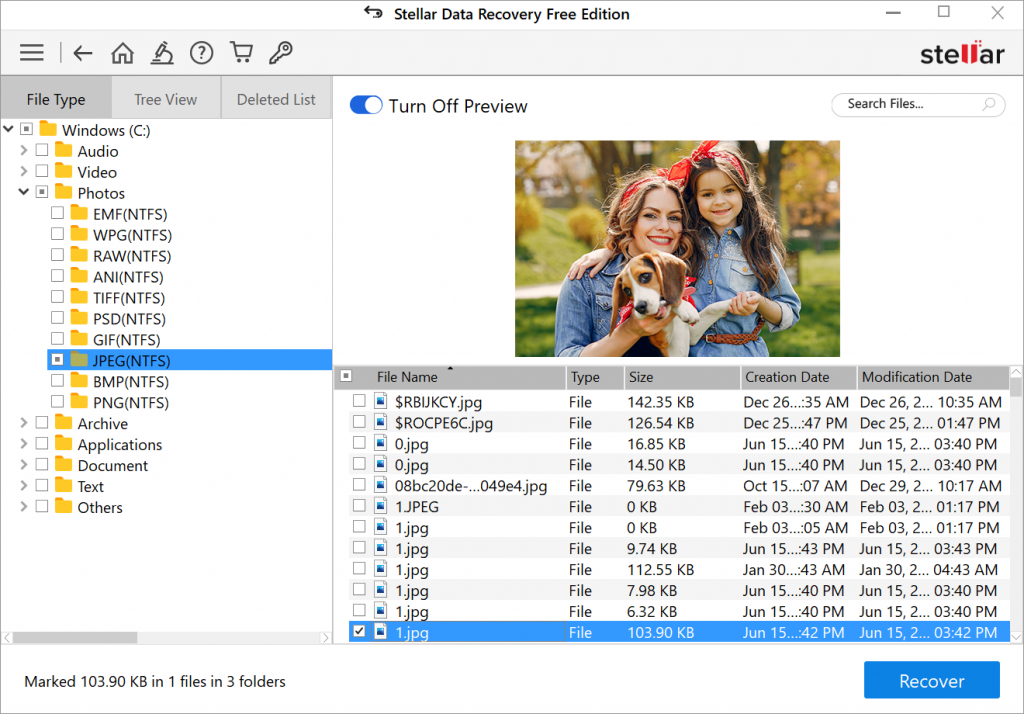
- Select the files from the list and click on ‘Recover’ to save the files
2. Restore Excel File from the Previous Version
If excel files are deleted from your pen drive or from your system; then you can recover them from the previous version. This feature works when Windows Backup option is enabled, else, it will not work.
Follow these steps to recover excel files:
- Connect your pen drive to your system, go to This PC and navigate to the folder of excel files
- Select the folder, right-click on it and select ‘Restore previous versions’
- From the available version of excel files, select the required one and click on ‘Restore’
3. Use Command Line to Recover Excel Files
The Command prompt should be your first choice to recover excel files from the virus-infected pen drive. Here’s how command prompt recovers your files:
- Connect your virus-infected pen drive to your system and then in the search box type ‘CMD’ and hit ‘Enter’
- In the command window, type in attrib –h-r-s /s/ drive letter:\*.*”, for example, “attrib -h -r -s /s /d G:\*.*” and hit ‘Enter’
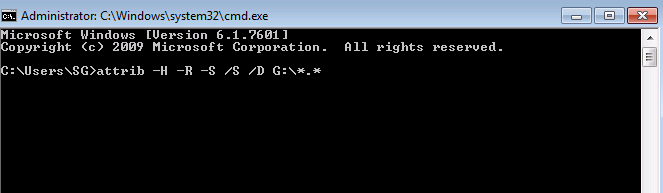
- Windows starts repairing the virus-infected pen drive and once the process is complete, you can access your pen drive and recover excel files.
Even after following the above-mentioned steps you’re unable to recover your excel files, then try a Home approach i.e. a data recovery tool.
To Sum Up
It is always a good idea to create a backup of important files since no one can anticipate what might go wrong. The scenario presented in the blog paints a clear picture of how you can recover your Microsoft excel files for free from a virus-infected pen drive. For quick and better results, you can always go with Stellar Windows Data Recovery – Free Edition.
[Fixed]: Freeze Panes not Working in Excel
Summary: This blog discusses the “freeze panes not working” issue in Excel. It mentions the possible reasons behind the issue and offers workarounds and methods to fix it. If the issue is associated with corruption in the Excel file, you can use the specialized Excel repair tool mentioned in the blog to repair the affected file.

The freeze panes feature in Excel is used to freeze the row/column headings to keep them visible while scrolling the worksheet. It is a useful feature when you’re working on a large worksheet containing data that exceeds the rows and columns on the screen. Sometimes, you notice that the ‘Excel freeze panes feature is not working’. There could be numerous factors that can trigger this issue. Let’s know the reasons for the freeze pane not working issue in Excel and how to resolve this issue.
## Why can’t I freeze panes in excel?Several factors may contribute to the Excel freeze panes not working issue in Excel. A few of them are:
- The cell editing mode is enabled in the workbook in which you are trying to use the Freeze Panes feature.
- The Excel file is corrupted.
- The worksheet is protected.
- Advanced Options are disabled in Excel Settings.
- The Excel application is not up-to-date.
- You might be trying to lock rows in the middle of the worksheet.
- Your Excel workbook is not in normal file preview mode.
- Wrong/incorrect positioning of the frozen panes.

How to fix ‘Freeze Panes not Working’ in Excel?
The freeze panes option is available in the View bar. Sometimes, you’re unable to see the View option. It usually occurs if you are using the Excel Started version. Check and try to open the file in the advanced Excel version, which supports all the features. If you are using the advanced Excel version, then try the below workarounds to fix the freeze panes not working issue in Excel.
Workaround 1: Exit the Cell Editing Mode
If your Excel file is switched from normal file view mode to cell editing mode, you can encounter the freeze panes not working issue. In cell editing mode, certain features in Excel, such as the freeze panes, are temporarily disabled to prevent any conflicts. You can disable cell editing mode by pressing the ESC or Enter key. Now locate the View tab and check whether the freeze pane feature is working. If not, then try the next workaround.
Workaround 2: Change the Page Layout View
The Excel freeze panes not working issue can also occur if your workbook is opened in Page Layout view. The Page Layout view doesn’t support freeze panes. If you select page layout, the freeze panes option gets disabled.

To enable the freeze pane option, go to View and click the Page Break Preview tab.

Workaround 3: Check and Remove Options under the Data Tab
Sometimes, you can experience the “freeze panes not working” issue if Sorting, Data Filter, Group, and Subtotal options are enabled in Excel workbook. Such options, when enabled, can lead to unexpected problems with the freeze panes’ functionality. You can check and remove these features from your workbook. To do so, follow these steps:
- Open the Excel file in which you are getting the issue.
- Navigate to the Data tab.
- Check and remove the below features (if enabled):
- Sort
- Filter
- Group
- Subtotal

Workaround 4: Check and Unprotect Worksheet
The freeze panes feature may stop working if your worksheet is protected. You can try to disable the worksheet protection option. Here are the steps:
- In the Excel file, go to the Review tab.
- Click Unprotect Sheet.

After unprotecting the sheet, check whether the “freeze panes not working” issue is resolved. If not, follow the next workaround.
Workaround 5: Use Correct Cell Positioning
The freeze pane is not working issue in Excel can also occur when you use incorrect cell positioning to apply the freeze panes feature. Several users have reported facing this issue when trying to lock multiple rows with the wrong cell selection. So, use correct cell positioning to freeze the rows. For example, if you are trying to lock two rows in an Excel worksheet, then you need to click on 3rd row’s column.

What if the above Workarounds Fail to Fix the Freeze Panes not Working Issue?
If none of the above workarounds works, then there are chances that the workbook is damaged or corrupt. In such a case, you can try the below methods to repair the corrupt Excel workbook.
Run Open and Repair Utility
In case of corruption in the Excel file, you can use the Open and Repair tool in Excel to repair the file. To use this utility, follow these steps:
- In the Excel application, navigate to File and then click Open.
- Click Browse to select the workbook in which you are facing the issue.
- The Open dialog box is displayed. Click on the affected file.
- Click the arrow next to the Open option and then click Open and Repair.

- Click on the Repair option to recover as much data as possible.
- You can see a completion message once the repair process is complete. Click Close.
Use a Professional Excel Repair Tool
If the Open and Repair tool doesn’t work to resolve complex file-related issues and your Excel file is severely corrupted, you can opt for a reliable third-party Excel repair tool, such as Stellar Repair for Excel. This tool can help you repair the Excel file and recover all the data with complete integrity. You can try the software’s demo version to scan the affected file and preview the recoverable data. The software is compatible with all MS Excel versions and Windows operating systems, including Windows 11.
Closure
The “freeze panes not working” issue in Excel can occur due to several reasons, like protected worksheet, incompatible Excel version, and incorrect cell position. Try the workarounds shared in the blog to fix the issue. If the Excel file is corrupt, you can use Stellar Repair for Excel to fix the corruption issues in the file. This tool can quickly repair the Excel file and recover all the data from the file with 100% integrity.
Top 5 Ways to Fix Excel File Not Opening Error
Summary: MS Excel users sometimes face issues while using the MS Excel application. One such issue is the Excel file not opening error. In this post, we’ve mentioned the reasons that may result in this error and the ways to resolve it. Also, you’ll find about an Excel repair software that can help you repair corrupt Excel files.
Several Microsoft Excel users have reported encountering the ‘Excel file not opening’ error when opening their Excel file. There are several reasons that may cause this error. In this post, we’ll be discussing the reasons that may lead to the ‘Excel file not opening’ error and the top 5 ways to fix this error.
Why Does the ‘Excel File Not Opening’ Error Appear?
Following are some possible causes that may result in the ‘Excel file not opening’ error:
- There may be a problem with an add-in that is preventing you from opening the Excel files.
- There’s a chance that your Excel application is faulty.
- Your Excel program is unable to communicate with other programs or the operating system.
- The file association might have been broken. This is a common problem faced by users who have upgraded their Excel application or operating system.
- The file you’re trying to open is corrupted.
5 Ways to Fix Excel File Not Opening Error
Let’s explore the ways to resolve the Excel file not opening error:
1. Uncheck the Ignore DDE Checkbox
Dynamic Data Exchange (DDE)allows Excel to communicate with other programs. The Excel error may occur due to incorrect DDE settings. You need to ensure that the correct DDE configuration is enabled. Follow the steps provided below:
- Launch your MS Excel file.
- Go to File > Options.

- Now click on Advanced.

- Further, find the General option on the screen.

- Uncheck the option **‘Ignore other applications that use Dynamic Data Exchange (DDE)**’.
- Click OK to save the changes.

2. Reset Excel File Associations
When you launch your Excel file, the file association ensures that the Excel application is used to open the file. You can try to reset these associations and see if Excel opens after this. Proceed with the following steps to do so:
- Navigate to Start Menu and launch Control Panel.
- Now, navigate to Programs > Default Programs > Set Your Default Programs.


- A new window will open. Herein, find the Excel program in the list and select it. Now, select the option ‘Choose defaults for this program’. Click OK.

- A new window for ‘Set Program Associations’ will open.
- Check the box against the ‘Select All’ option.
- Further, click Save to reset the Excel File Associations settings.

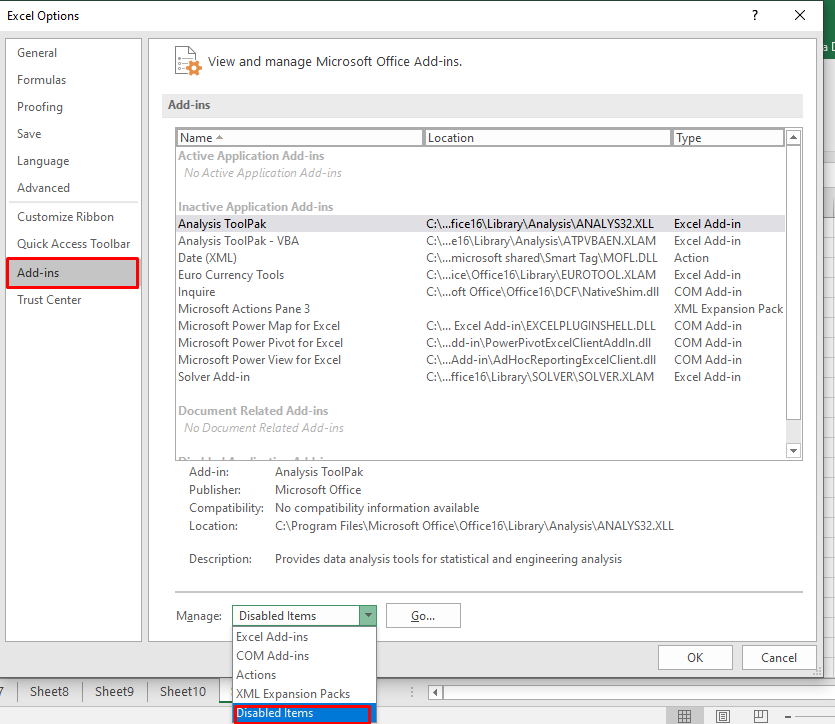
3. Disable Add-Ins
Many people install third-party add-ins to enhance the application’s functionality. Sometimes, these add-ins can create an issue. Follow the below-mentioned steps to disable the problem creating add-ins:
- Launch MS Excel application.
- Navigate to File > Options > Add-ins.

- In the window that opens, go to the Manage option at the bottom.
- Herein, select the COM Add-ins option from the dropdown list. Click Go.


- In the COM Add-ins window, uncheck all the boxes to disable the add-ins. Click OK.

4. Repair MS Office Program
Sometimes the issue is not with your Excel file. Instead, the reason for the error can be a corrupt MS Office application. You can repair the program to fix the Excel file not opening error. Here are the steps:
- Press the Windows + R keys to launch the ‘Run’ dialog box.

- Enter the text ‘appwiz.cpl’ to launch the program and features window.

- Find the MS Office program in the list of applications.

- Right-click on it and select Change.

- In the new window, select the Quick Repair radio button. Click Repair.

- Follow the on-screen instructions to repair the Office application. Once the repair process is completed, you can try opening the Excel file to see if the problem is resolved.
5. Disable Hardware Graphics Acceleration
The hardware graphics acceleration assists in the system’s better performance, especially when you use MS Office applications, like MS Excel or Word. Sometimes, this causes the Excel file not opening issue. You can disable this option to try to resolve the issue. Here are the steps:
- Launch your MS Excel application.
- Navigate to File > Options > Advanced.
- Herein, go to the Display option.
- Uncheck the Disable hardware graphics acceleration checkbox. Click OK.

What If These Solutions Do Not Work?
If you have applied all the methods mentioned above and still cannot open your Excel file, there are chances that your file is corrupted. You can use a specialized Excel repair tool , such as Stellar Repair for Excel to repair the corrupted Excel file. This software has powerful algorithms that can scan and repair even severely corrupt Excel files, without any file size limitation. After repairing the file, it restores all the data, including tables, charts, rules, etc. to a new Excel, with 100% integrity.
To know how the software works, see the video below:

Conclusion
Before you proceed with resolving the Excel file not opening error, try to find out the root cause of this error. If you know the real reason, you can try the method right away. If the reason for the error is corruption in the Excel file, the best option is to repair the file using a professional Excel repair tool, such as Stellar Repair for Excel .
Ways to Fix Personal Macro Workbook not Opening Issue
Many users have reported encountering issues while accessing personal macro workbook, such as personal macro workbook not opening, personal macro workbook not loading automatically, Excel personal macro workbook keeps getting disabled, etc.
Such issues may arise due to a problem with the directory where the personal workbook is stored. However, there are various other reasons that may lead to such issues. Below, we’ll discuss the reasons behind the personal macro workbook not opening issue and the solutions to troubleshoot and fix the issue. But before proceeding, let’s understand why personal macro workbook is used.
Why Personal Macro Workbook is used?
You can access macros in a specific Excel workbook. However, when you need to use the same macro in other Excel worksheets, then you can create a personal macro workbook. A personal macro workbook (Personal.xlsb) is a hidden workbook that is used to store all macros. It makes your macros available every time you open Excel.
Causes of Personal Macro Workbook not Opening Issue
You may encounter personal macro workbook is not opening issue when attempting to record macros. Some possible causes behind such an issue are:
- Personal macro workbook is stored at an untrusted location
- Location of xlsb is changed
- Personal macro workbook is hidden
- Personal macro workbook becomes corrupted
- Disabled items in add-ins
- Workbook is Read-only
Methods to Fix the “Personal Macro Workbook not Opening” Issue
Follow the given methods to fix the personal macro workbook is not opening issue:
Method 1: Check the Path of Personal.xlsb
The personal macro workbook (Personal.xlsb) file is stored in XLStart folder. It opens automatically when you open your Excel application. However, sometimes it fails to load automatically. It usually occurs when you try to open the file from an incorrect path. You can check the path of Personal.xlsb by following these steps:
- Open the workbook.
- Click on the Developer tab.

- Press Alt + F11 to open Visual Basic Editor.
- Go to View > Immediate Window.
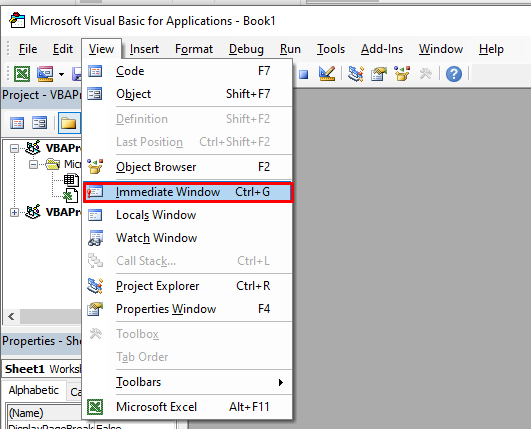
- In Immediate Window, type the following code to know the location of the workbook:
?thisworkbook.path.
- Then, hit Enter.
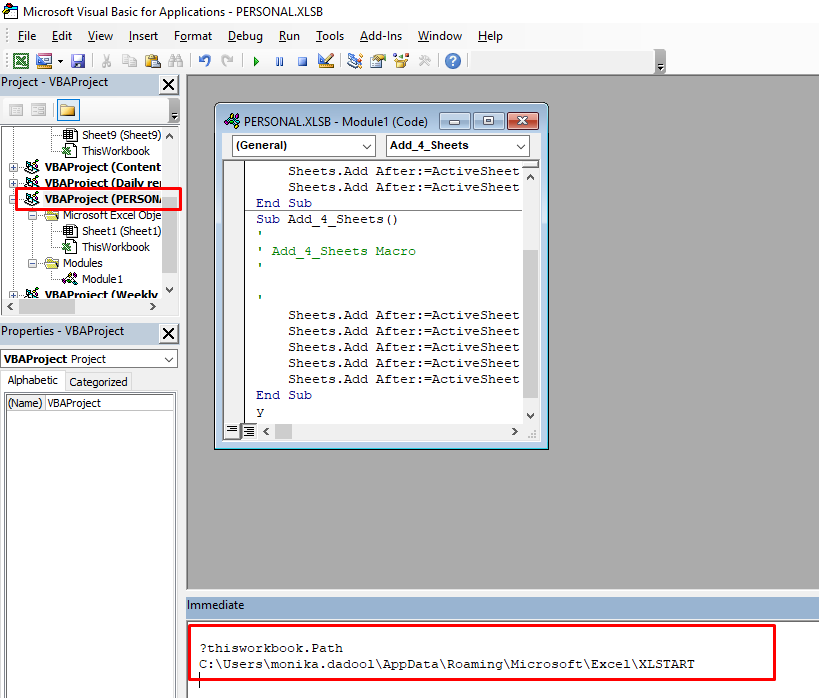
- You will see the path of the personal macro workbook.
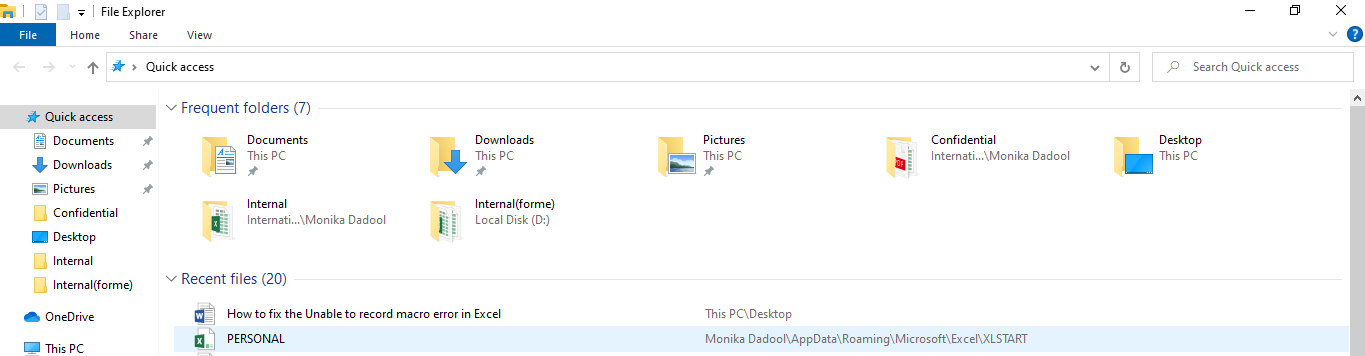
- Copy the path and paste it into Quick Access field in File Explorer.
Method 2: Unhide Personal Macro Workbook
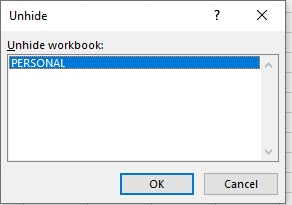
If personal macro workbook is hidden, you may unable to see and open the Personal.xlsb file. To unhide the personal Macro workbook, follow the below steps:
- In Microsoft Excel, go to View and then click Unhide

- The Unhide dialog box is displayed. Click PERSONAL and then OK.
Method 3: Enable the Macro Add-ins
You may unable to open the previously recorded macros in your personal macro workbook if the macros are disabled. To check and enable the items, follow these steps:
- Go to File > Options.
- In Excel Options, click on the Add-ins
- Select Disabled Items from the Manage section and click on Go.
- The Disabled Items dialog box appears. Click on the disabled item and then click Enable.
Method 4: Change the Trusted Location
You may encounter the “personal macro workbook not opening” issue if the Personal.xlsb file is stored at an untrusted location. You can check and modify the path of XLSTART folder using the Trust Center window. Here are the steps:
- Open MS Excel. Go to File > Options.
- Click Trust Center > Trust Center Settings.
- In the Trust Center Settings dialog box, click on Trusted Locations.
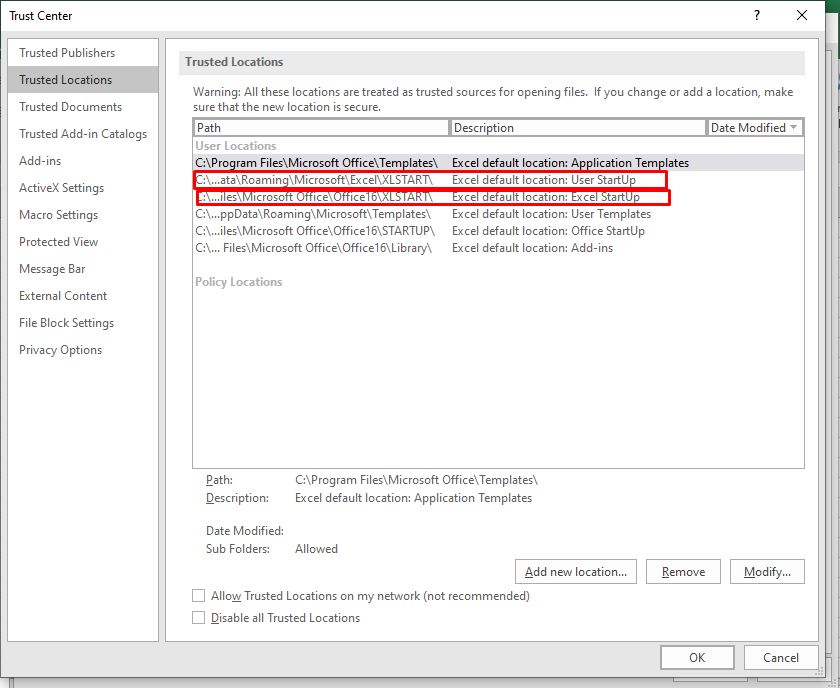
- Verify the path of the XLSTART If it is untrusted or there is any issue, then click Modify and then click OK.
Method 5: Repair your Excel File
You may fail to open personal macro workbook if it is corrupted. To repair the corrupt workbook, you can use the built-in Open and Repair utility in MS Excel. To use this tool, follow these steps:
- Open your Excel application.
- Click File > Open.

- Browse to the location where the corrupted file is stored.
- In the Open dialog box, select the corrupted workbook.
- From the Open dropdown list, click Open and Repair.
The dialog box appears with the Repair and Extract buttons. Click Repair to retrieve all possible data or the Extract option to recover the data without formulas and values.
If the Open and Repair utility fails to repair the corrupted Excel workbook, then you can use a professional Excel repair tool, such as Stellar Repair for Excel. It can easily repair severely corrupted Excel (XLSX and XLS) files and recover all the components. You can download the free trial version of the tool to preview the recoverable data.
Closure
This article discussed the ways to fix the personal macro workbook not opening issue. In case you are unable to open the personal macro workbook because of corruption in the workbook, you can use the Open and Repair utility in MS Excel. If it fails, then you can use Stellar Repair for Excel to fix corruption in the Excel file and recover all its data with complete integrity.
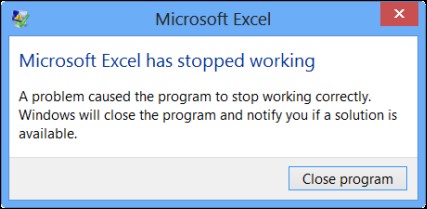
## \[Solved\] : How to Fix MS Excel Crash IssueMicrosoft Excel may stop responding , hang, freeze, or stop working due to several reasons, such as in compatible add-ins. In such a case, you may receive one of the following error messages.
- Excel has stopped working
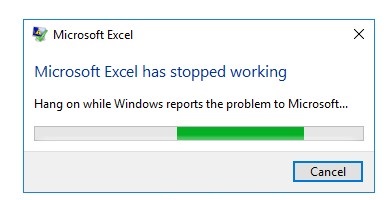
- Excel is not responding
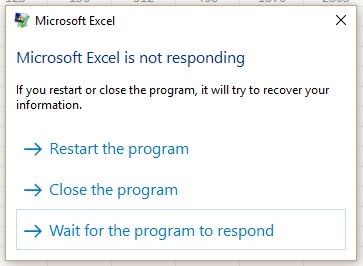
- A problem caused the program to stop working correctly. Windows will close the program and notify you if a solution is available.
Why Does Excel Keep Crashing?
If Excel keeps crashing on your PC while opening a workbook, saving Excel file, scrolling or editing cells, etc., it indicates a problem with your Excel program or the Excel file.
Microsoft Excel may crash due to any one or more reasons given below,
- Incompatible Add-Ins
- Outdated MS Excel program
- Conflict with other programs or antivirus tool
- Excel file created by third party software
- Problem with network connection
- Combination of Cell formatting and stylings
- Problem with MS Office installation
- Partially damaged or corrupt Excel file
Problems Caused by Excel Crash Issue
Microsoft Excel crash may cause damage to Excel file and also lead to Excel (XLS/XLSX) file corruption.
Such corrupt Excel files can’t be opened or accessed via MS Excel app. If you try to access a corrupt Excel file, MS Excel may fail to open the file or stop responding and crash. Additionally, you may receive the following or similar error message,
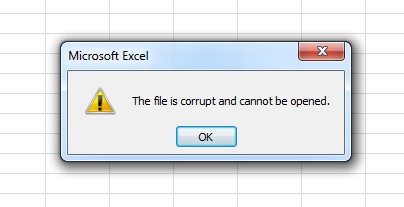
In such a case, you should immediately try to recover the Excel file. You may do so by restoring the Excel file from backup or by using an Excel File Repair software. Otherwise, continue following this guide.
How to Solve Excel Crash Issue?
Before heading to solutions, follow these troubleshooting steps to resolve the Excel Crash issue.
Parental Control Software
### **Step 1: Copy File to Local Drive**If you are trying to access and edit or view an Excel file from a network drive, try moving the file to local drive. This will help you find if there is something wrong with the file or the network.
Step 2: Ensure Sufficient Memory
Excel files can grow fairly large when you start adding lots of formatting and shapes. Make sure that your system has enough RAM to run the application.
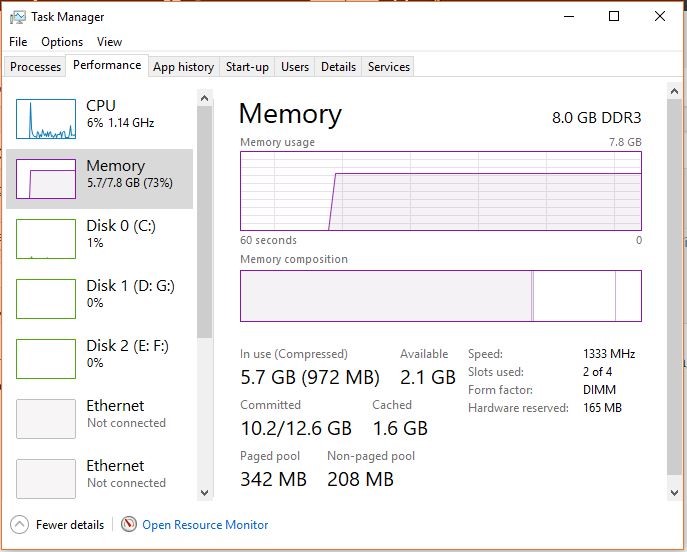
If you often work with large Excel files and complex data values& formulas, then install 64-bit versions of MS Office. It will give you an advantage of larger processing capacities and prevent Excel from crash or freeze.
Step 3: Check If Excel is Open and In Use by Another Process
Open Task Manager and close all processes or apps (tasks) that may be using or have access to your Excel file that you are working on. You can find this detail in status bar of Excel program at the bottom of program window.
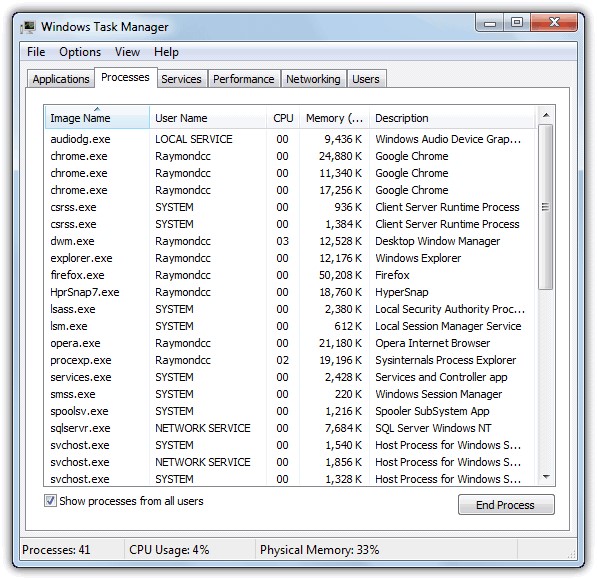
After closing the tasks, try to access the Excel file and check if this fixes the performance and crash problem in Excel.
Step 4: Test and Repair Excel File
Create a copy of the Excel file and install Stellar Repair for Excel software. It’s free to download. Scan and repair your Excel file using the software. After repair, save the Excel file at your desired location and then open the Excel file in the MS Excel program.
This should ideally fix all the issues with Excel.
However, if the Excel program still crashes, the problem lies within the system or program. Follow the solutions discussed in this guide to try to fix the Excel crash issue.
NOTE: To save repaired Excel file using the mentioned software, you must purchase the activation key and activate it.
Solutions to Fix MS Excel Crash Issue
Following are some solutions to resolve problems with MS Excel such as,
- Excel not responding
- Excel won’t open
- Excel keeps crashing
Follow these solutions in the given order. In case a method doesn’t work, move to the next one.
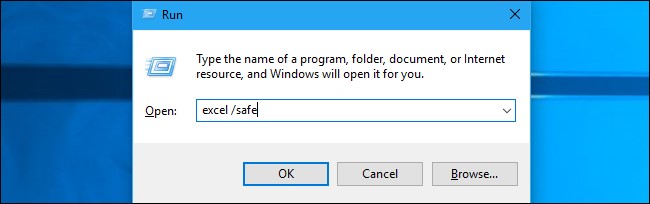
Solution 1: Restart Excel in Safe Mode
By starting MS Excel in safe mode, you can run the program without loading the Excel add-ins and with limited features. But COM add-ins are excluded.
To launch Excel in safe mode, close MS Excel and follow these steps,
- Create a shortcut of MS Excel (.exe) on Desktop
- Press and hold the Ctrl key while launching the program
- Click ‘Yes’ when a prompt appears to confirm
Alternatively, press Windows+R, type excel /safe and press ‘Enter’. Use this to open Excel in safe mode on Windows 10, 8.1, 8, or 7 system.
Now try to open and access the Excel file and check if the issue is resolved. If it’s not, head on to the next solution.
Solution 2: Check and Remove Faulty Add-ins
In case Excel doesn’t crash in Safe Mode, it’s possible that some faulty add-ins are the culprit behind frequent Excel crash and freeze. These Excel add-ins may interfere or conflict with the Excel program.
Find and remove the faulty add-in. It can resolve the issue. To do so, follow these steps,
- Restart Excel in normal mode and go to File> Options> Add-ins
- Choose COM Add-ins from the drop-down and click Go

- Uncheck all the checkboxes and click OK
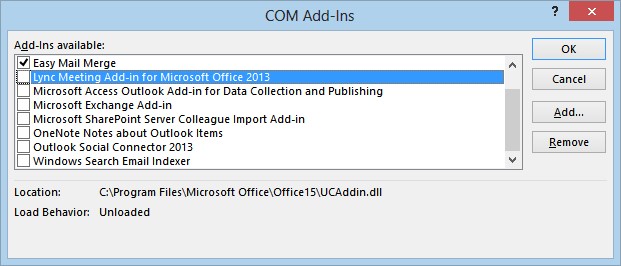
- Restart Excel and check if the issue is resolved
- If Excel doesn’t crash or freeze anymore, open COM Add-ins and enable one add-in at a time followed by Excel restart. Then observe Excel for freeze or crash problem
This will help you find out the faulty add-in, which is causing the problem. Remove the add-in which is causing the problem to resolve the issue. If that doesn’t fix, move to the next solution.
Solution 3: Check and Install the Latest Updates
If you haven’t set Windows to Download and Install Updates automatically, do it now.
Apart from updating the operating system, latest Windows updates sometimes fixes bugs for other applications installed on the system such as MS Office. Often installing an important update that you might have missed may correct the Excel crash problem.
You can also update MS Office manually. Follow these steps,
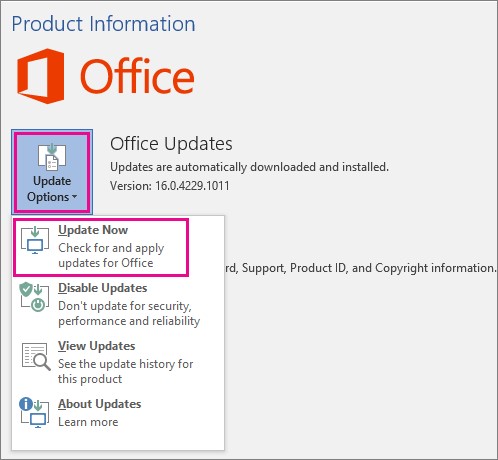
Go to File > Account
Under Product Information, select Update Options and click Update Now
If you have installed MS Excel from Microsoft Store, open the store and update your Office applications.
NOTE: This also works if you can’t open Excel file or Excel crashes after Windows upgrade from Windows 7 or Windows 8/8.1 to Windows 10.
After installing the latest MS Office updates, check if Excel works fine. If not, head to the next solution.
### Solution 4: Clear Conditional Formatting RulesIf a sheet is causing Excel to freeze or crash, there might be a problem with that particular sheet. In such a case, you may try clearing the Conditional Formatting rules. The steps are as follows,
- Under Home, click ‘Conditional Formatting > Clear Rules> Clear Rules from Entire Sheet’
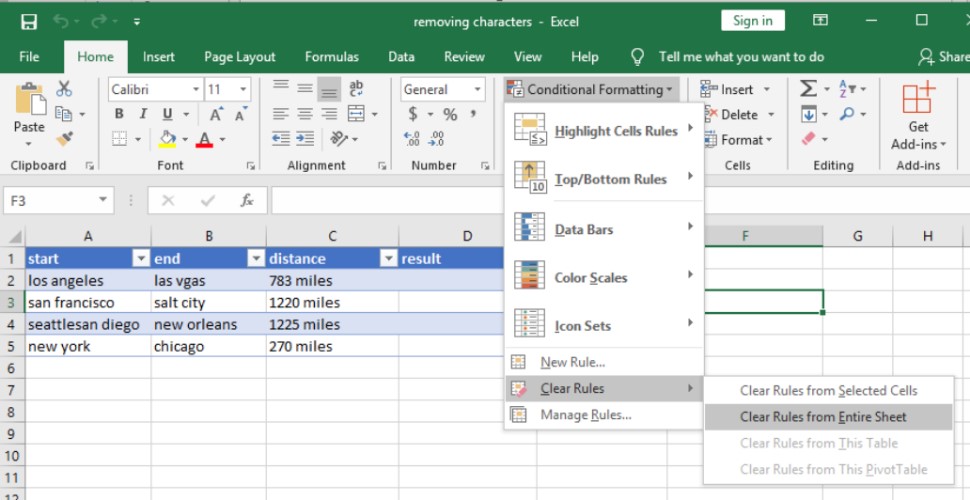
- You may repeat this step for all other sheets in the Excel workbook
- Then click File> Save as and save the Sheet as a new file at a different location
This avoids overwriting or making changes to the original Excel file. Once done, try working on the sheet.
If this doesn’t work out, move to the next solution.
Solution 5: Remove Multiple Cell Formatting and Styles
If a workbook is being shared and edited by others on different platforms then it’s possible that many cells are formatted differently. This can cause issues with Excel such as crash and freeze. It can also lead to Excel file corruption. The problem mostly occurs when a workbook contains multiple worksheets using different formatting.
You can follow this guide to remove different cell formats and styles, and then open the Excel file.
Solution 6: Disable Microsoft Excel Animation
Animations require additional processing power and resources. By disabling animations in Excel, you may resolve Excel freeze and crash issue. This also improves MS Excel performance.
To disable the animations in MS Excel, follow these steps:
- Go to File > Options
- Click ‘Advanced’ and check ‘Disable hardware graphics acceleration’animation
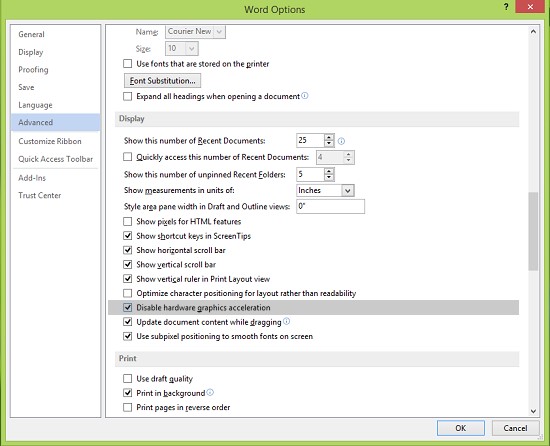
- Click ‘OK’ to close the window and then restart MS Excel
This has helped many users in fixing the Excel crash issue. If it doesn’t work for you, head to the next solution.

Solution 7: Check If Excel File is Generated by a Third-Party Application
There are applications which you may have used to generate Excel files to fetch data. For instance, downloading data from Google Analytics in Excel format.
Sometimes, these Excel files are not generated correctly by such third-party apps. Thus, some features in Excel may not work as intended when you access the files in MS Excel.
In such a case, you should get in touch with the app developer for help with the file or use Stellar Repair for Excel to repair such Excel files.
Solution 8: Check If Antivirus or Other Apps are Conflicting with MS Excel
Ensure your antivirus is up-to-date and not conflicting with MS Excel. An outdated antivirus tool may conflict with Excel which can cause the application to hang, freeze, or crash.
- Update your antivirus
- Try disabling the add-in or integration between Excel and antivirus. See if it works
Alternatively, you may disable the anti-virus tool temporarily to check if it is the culprit behind Excel performance issue and crash. If that resolves the problem, get in touch with your antivirus vendor and report the problem.
They might provide you with a better solution or workaround to fix this problem without disabling the antivirus protection.
IMPORTANT NOTE: Disabling or altering antivirus protection makes your PC vulnerable to malicious attacks and virus or malware intrusion.
Solution 9: Clean Boot Windows to Inspect the Cause Behind Excel Crash
When Windows boot, it starts several processes, services, and application during start up automatically, which runs in the background.
These startup apps and services can interfere with other applications such as MS Excel. To find out if that’s the cause behind Excel crash, you can perform a Clean Boot.
This helps you identify processes, services, or applications that are conflicting with Excel. Steps to perform Clean Boot are as follows,
- Press Windows key + R, type MSConfig, and press ‘Enter’
- In System Configuration window, click on the General tab and choose Selective startup
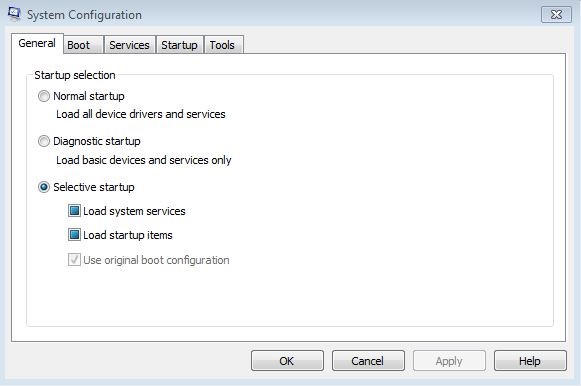
Uncheck ‘Load startup items’ and click ‘OK’
After this, close all running applications and restart your PC
Check if the crash problem with Excel is resolved. Uninstall the conflicting apps or update them. If your issue is not resolved, follow the next solution.
Solution 10: Repair or Reinstall MS Office
Repairing Office programs may also resolve Excel crash issues if caused by damaged MS Excel program or MS Office files. The steps are as follow,
- Close all MS Office apps and open the Control Panel
- Click Uninstall a program under Programs
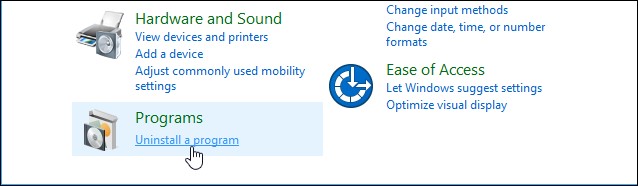
- Click on Microsoft Office and then click on the Change option
- Choose ‘Quick repair’ and then select ‘Repair’
- Click ‘Continue’ to repair MS Office installation
You may also try ‘Online Repair’ if this fails to fix the issue. After repair, if the Excel issue persists, reinstall MS Office.
Need More Help?
If none of the above-mentioned solutions worked for you, it indicates that the problem is not with the Excel program but with the Excel file. If you haven’t tried the Stellar Repair for Excel software, do it now.
Select the Excel file which is causing the problem and repair it with the software. It’s a powerful Excel repair software that can fix all the problems with Excel files (XLS/XLSX). It repairs corrupt and severely damaged Excel files.
The software is compatible with all Excel files created using MS Excel 2019, 2016, 2013, 2010, 2007, 2003 or 2000.
After repairing and saving the Excel file, you can open it in your MS Excel program and work on it without any performance issue. To know more about this software, visit this page.
How to Repair Corrupted or Damaged Excel File with Ease?
Summary: The Excel file is prone to corruption. Users can face several issues related to corruption. So here in this infographic, I am discussing a professional tool,- Stellar Repair for Excel, to easily repair corrupted Excel files.
Stellar Repair for Excel is among the top choices for repairing corrupt or damaged Excel (.XLS/.XLSX) files. This Excel recovery software restores everything from the corrupt file to a new blank Excel file. Incoming, the information graphics complete overview of the repair process is explained in step-by-step methodology. Explore and reap the benefits of recovering corrupt or damaged Excel files.

Very much sure about the result of using the excel file recovery tool, share your experience with us.

Fixed “Cannot Insert Object” Error in Excel | Step-by-Step Guide
Summary: The error “cannot insert object” in MS Excel can prevent you from modifying objects in the worksheet. This blog will discuss the primary reasons behind this error and the possible solutions to fix it. You will also learn about a professional Excel repair software that can help fix the error if it has occurred due to corruption in Excel file.
Many users have reported encountering the “cannot insert object” error while adding/embedding objects into the Excel file. It usually occurs when using Object Linking and Embedding (OLE) to add content (PDF, Microsoft documents) from external applications to worksheet. The error can also occur when using ActiveX control in Excel. Below, we’ll explain why you cannot insert object into Excel sheet and how to troubleshoot the issue.
Why the “Cannot Insert Object” Error Occurs?
- Macro Settings can prevent the insertion of objects into a workbook.
- The Excel file in which you are trying to add an element is corrupted.
- The object (you are inserting into the workbook) is damaged.
- Object size limitations.
- System’s insufficient memory might prevent new objects’ addition.
- Incompatible Excel file format.
- Add-ins controls are disabled.
- Incompatible or faulty Add-ins.
- Issue with Security Settings.
Methods to Fix the “Cannot Insert Object” Error in Excel
You may encounter the “Cannot insert object” error when trying to add an element stored on a network. It can occur due to issues with the file link, such as incorrect file location. In such a case, you can check the link by selecting the link to file option from the Insert tab.
Sometimes, the error can occur if the file in which you are trying to insert the object is locked and password-protected. In this case, you can unprotect the Excel file . If the issue still persists, then you can follow the below methods.
Method 1: Check and Change Restricted Security Settings
Excel provides security settings to protect your workbook. Sometimes, these settings can prevent inserting objects in the file. You can change the security settings to allow Excel to insert objects. To do so, follow these steps:
- Open your Excel application.
- Locate the File and then click Options.
- In Excel Options, click Trust Center.

- Click Trust Center Settings.
- In the Trust Center Settings window, select Protected View from the left pane.

- Under Protected View, unselect the below three options:
- Enable Protected View for files originating from the internet.
- Enable Protected View for files located in potentially unsafe locations.
- Enable Protected View for Outlook attachments.

- Click OK.
- Once you’re done with this, click on Macro Settings in the Trust Center window.
- Under Macro Settings, make sure “Disable all macros without notification” is not selected. If it is selected, then unselect it. After that, click OK.

- Restart Excel to apply the changes.
Method 2: Uninstall Microsoft Office Updates
You can also encounter the “Cannot insert object” error in Excel after installing MS Office updates. It might be due to the issues with the installed updates. To fix this, you can uninstall the recently installed Office updates. To uninstall the Office updates, follow these steps:
- Go to the system’s Control Panel.
- Click Programs and then click Program and Features.
- Search for “View Installed Updates” and click on the desired Office updates.
- Right-click on it and then click Uninstall.
- Follow the uninstallation steps on the screen.
- Once the process is complete, restart the system.
Method 3: Check Memory Usage
The “Cannot insert object” issue can also occur if your system is low on memory. You can check and close unnecessary processes and applications running in the background to free up memory. To do so, follow these steps:
- Press CTRL + ALT + DEL on the keyboard and click Task Manager.
- Click on the Processes tab and search for any unnecessary processes.
- Right-click on the process and then select End Task.
- Restart Excel to see if the issue is fixed.
Method 4: Check Excel File Size
If your Excel file size exceeds the prescribed limit, it can also lead to the “Cannot insert Excel object” error. So, check the Excel file size. You can reduce the file size by removing unnecessary objects, such as formulas or images.
Method 5: Check and Change Excel ActiveX Settings
You can get the “Excel cannot insert object” error if your Excel file contains macros, controls, and other interactive buttons. It usually occurs if the ActiveX Controls option is disabled. You can check and change the ActiveX Settings to fix the issue. Here are the steps:
- Open your Excel application.
- Navigate to File and then click Options.
- In Excel Options, click the Trust Center tab.
- In the Trust Center Settings, click ActiveX Settings.
- Under ActiveX Settings, make sure the “Enable all controls without restrictions and without prompting” option is selected.

- If the option is not selected, then select it and click OK.
- Restart the Excel and check if the error is fixed or not.
Method 6: Repair the Excel Workbook
The “Cannot insert object” error can occur if the object you are trying to insert is corrupted or the file in which you are inserting the object is damaged. If the issue has occurred due to a corrupted Excel file, then you can repair the file using the Open and Repair utility in MS Excel. To use this Microsoft-inbuilt utility, follow these steps:
- In the Excel application, go to the File tab and then click Open.
- Click Browse to choose the affected file.
- The Open dialog box is displayed. Click on the corrupted file.
- Click on the arrow next to the Open button and then click Open and Repair.
- Click on Repair.

- After repair, a message will appear (as shown in the below figure).

- Click Close.
If the Open and Repair utility fails to fix the issue, then try a professional Excel Repair software, like Stellar Repair for Excel. It is designed to repair severely corrupted Excel files. It can restore all the Excel file objects, such as tables, charts, formulas, etc. It helps fix all types of corruption related errors. The software is compatible with all versions of Excel.
Conclusion
You might encounter the “Cannot insert object” error when embedding or inserting objects in Excel. In this post, we have discussed the possible solutions to fix this error. We have also mentioned an Excel repair software that can help to easily repair the corrupted Excel file and recover all the data. You can download the Stellar Repair for Excel’s free demo version to preview the recoverable objects of the corrupted Excel file.
- Title: Recover Excel 2019 Files from Virus-Infected Pen Drives for Free | Stellar
- Author: Vivienne
- Created at : 2024-07-17 04:39:05
- Updated at : 2024-07-18 04:39:05
- Link: https://review-topics.techidaily.com/recover-excel-2019-files-from-virus-infected-pen-drives-for-free-stellar-by-stellar-guide/
- License: This work is licensed under CC BY-NC-SA 4.0.