
New iPhone 12 Pro Max Restore from iCloud Stuck on Time Remaining Estimating | Stellar
New iPhone 14 Restore from iCloud Stuck on Time Remaining Estimating
Summary: The joy of using iPhone 14 comes to a halt if your newly purchased iOS device remains stuck at “iCloud backup remaining estimating time” loop. You’ll Google how to restart an iPhone but end up being confused about what to do or what not to do. We understand your angst. So, in this blog, we offer you lucrative options to restore new iPhone 14 from iCloud backup. Also, we have taken the liberty to recommend a reliable iPhone data recovery software to use in case of accidental data loss. Use the given buttons to free download and try it yourself.


Every time you buy a new iPhone, restoring backup becomes a vital necessity to finish the setup. Long wait to restore a new iPhone 14 is killing the joy of using the most awaited Apple product. You can restore iTunes or Finder backup using laptop or MacBook, but as soon as you perform iCloud backup on iPhone 14, the device gets stuck at estimated time remaining. It’s a prominent issue, pointed by many iPhone 14 users recently.
The problem arises at setting up a new iPhone with existing iCloud backup. Possibility of getting stuck on Restore in Progress: An estimated storage (XXGB) required to finish restoring your apps and data.
Why is my new iPhone 14 stuck at restore from iCloud?
Before finding your options to overcome the problem and learn how to restore an iPhone, get familiar with the root cause of the problem:
- Perhaps additional data storage space is required.
- Apple server is preventing iCloud data restoration.
- iCloud system status is not working for iCloud backup and iCloud Account login.

- Slow or unstable WiFi connection.
- Numerous unwanted backup files stored on iCloud.
Generally, restoring in progress doesn’t take more than 20 to 60 minutes for an iPhone to restart. Nonetheless, if restoring is stuck beyond that time, then be wary that it might take hours to finish. Anyhow, iPhone offers you ample options to get around a stuck iCloud backup.
How to restart an iPhone stuck at “Restore from iCloud- Time Remaining: Estimating”
Read the below methods to identify a perfect route to finish restoring iPhone 14 from iCloud backup. You can also stop restoring your iPhone and experiment with other alternatives:
Cancel the iCloud Restore in Progress
Stop the ‘Restore from iCloud’ process and start afresh after giving rest to your iPhone for a while. The move allows iOS device to optimize operations after turning off all the activities. To do so, you need to interrupt the ongoing restore from iCloud backup, which is already stuck at a specified time remaining. Rebooting your iPhone will fix all the minor glitches liable for creating such. Follow these steps:
- Press and hold the side button (on the right hand side of your iPhone) along with volume up/ down button till the power-off slider appears on your iPhone 14 screen.

- Drag the slider to your right and wait for 30-seconds to turn off the device.


- To turn the iPhone back on, press and hold the side button until the Apple logo appears on screen.
![]()
Restart Restoring iCloud Backup
Once your iPhone 14 restarts, follow these steps to restore iCloud backup:
- Go to Settings > General > Transfer or Reset iPhone > Reset > Reset All Settings.

- Set up your iPhone and select Restore from iCloud Backup on the Apps & Data screen.
- You can also choose another restoration option- Transfer Directly from iPhone.
- Follow the instruction available on-screen to restore your iOS device.
If your new iPhone 14 continues getting stuck at iCloud restore progress, then you need to check your internet connection. Also, make sure the iOS device has adequate space to handle large volume of data you are trying to copy in it.
Check the iCloud System Status
At rare occasions, even Apple server prevents the iCloud data restoration. The first thing you can do in such situations is to ascertain whether the restore process was stalled because of an internet issue or iCloud System Status. To do so, go to Apple system status page and check if iCloud Backup, Apple ID, and iCloud Account and Sign In, are working. If not, then you can’t do much but wait for Apple support to fix the issue at their end.
iCloud backup restore stuck while setting up a new iPhone 14 is not stressful until you lose a significant amount of data in the process. It is possible that in the search and trial of different options to restore iCloud backup on new iPhone 14, you might lose a significant amount of data. Use a reliable iPhone data recovery software like Stellar Data Recovery for iPhone to restore all the lost or deleted iPhone data from different variants of iPhone, iPad, and iPod touch.


Note that the software also supports recovery from iCloud backup and iTunes backup. The advanced software allows you to select and restore only a selected few or the desired files lost from iCloud. Moreover, the iOS recovery software executes recovery in the least possible time and could manage every bit of data stored in your iCloud backup. Refer to our KB to learn how to recover deleted iCloud data .
Conclusion:
This blog encapsulates various methods to swiftly get out of the trouble of new iPhone 14 stuck at restore from iCloud. As you try these methods, eventually, you will find the most suitable option to resolve the iPhone 14 stuck at restore from iCloud error. At times, the process of data restore remains slow for reasons beyond your control. Perhaps the files you wish to restore to the newly purchased iOS device are way too large or the process is taking longer because of a weak Wi-Fi network or the Apple Server is undergoing maintenance. Either of the reasons may further enhance the risk of data loss on the iPhone. Therefore, you need an infallible solution like Stellar Data Recovery for iPhone to retrieve lost contacts, photos, videos, apps, games, chats, and more.
How to Recover Files after iPhone Factory Reset?
If you detect anything anomalous on your iPhone, you may need to reset it to factory settings. However, after a factory reset, you will lose all the data stored in your device. You will not be able to access your contact list, call logs, or messages, be it your imessages, WhatsApp, etc. But, why restore your iPhone?
Sometimes, there are issues that cannot be handled and the only solution is to restore the device to factory settings. This is usually done when the device functions abnormally or the performance is extremely slow. If your iPhone is restored to factory settings, every single bit of personal information will be permanently deleted from the device, and this may prevent others from getting access to your personal information.
How to reset your iPhone to Factory Settings:
To reset your iPhone to factory settings, follow the steps below:
- Click Settings and then select General
- Select Reset and click on Erase all contents and settings. The interface will prompt you to key in your Apple ID and Passcode
- Enter your Apple ID and Passcode to proceed. With this, the procedure to factory reset iPhone is complete
Important!
Before resetting the iPhone device to factory settings, it would be a good practice to back up your device on your system. If you have not created a backup, you will not be able to restore the data back to your device, and all you will lose all your data. You can use iCloud or iTunes to back up your iPhone data. If anything anomalous occurs, all the data can be restored from the most recent backup files right from anywhere.
How to recover deleted data from your iPhone:
Even if you have not backed up your iPhone data, there’s still a solution. You can now retrieve all your erased data from your iPhone with Stellar Data Recovery for iPhone . The tool is powered by sophisticated recovery algorithms that help restore all the data components back to your iPhone after a factory reset.
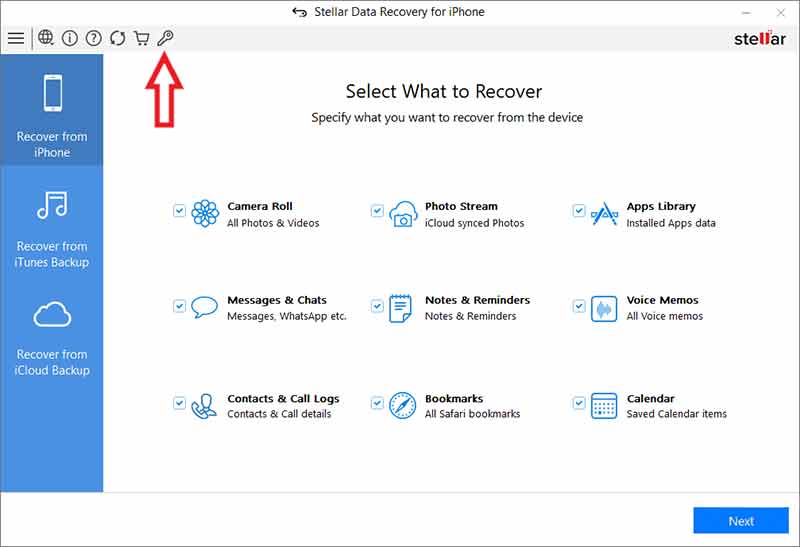
The tool provides the option to recover data through multiple channels. Since we need to recover data that has been erased after a factory reset, we need to select ‘Recover from iPhone’ option from the main interface of the tool.
Follow the steps below to restore your deleted data:
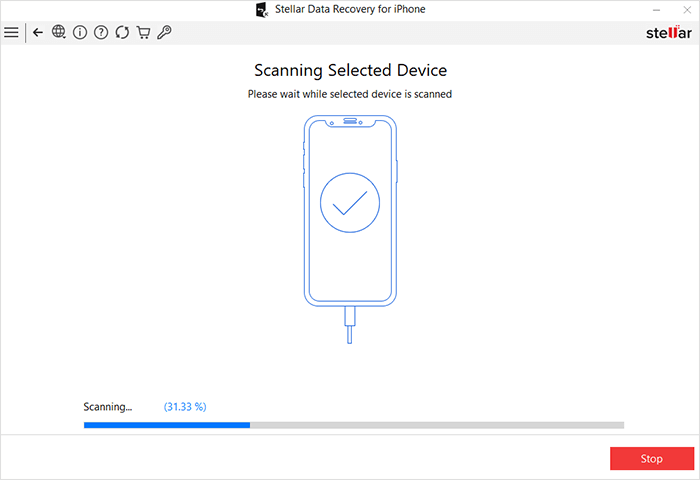
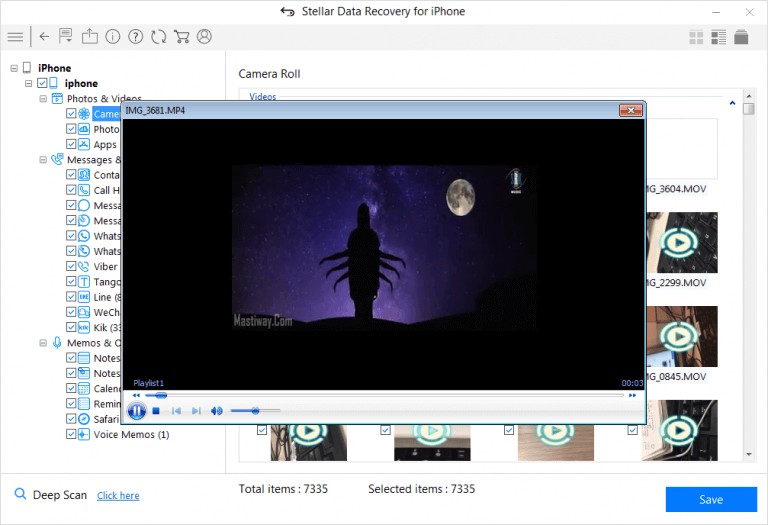
- Connect your iPhone device to the system. The tool will then begin to analyze the device for detecting the previously existing files from the connected device. The tool will generate a preview for all the folders and incorporated contents within its panel.
- You can then select single or multiple files for recovery that you have lost while resetting your iPhone.
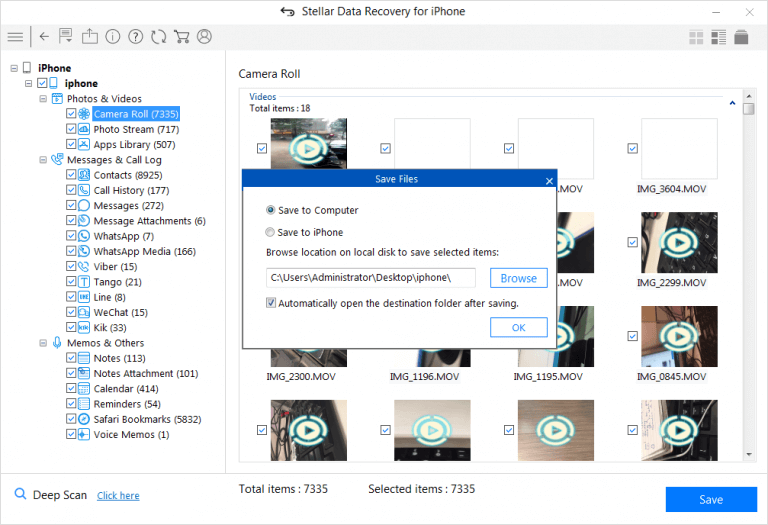
- The iPhone recovery tool will provide dual options to store data either on the hard drive on the computer or your connected iPhone device.
Not only the tool provides the benefit to recover data from iPhone device, but you will also be able to recover data from iTunes or iCloud backup files . Also, the iOS recovery tool can also be used to recover data from encrypted backup files. However, to utilize this feature, it is important to have a backup.
Important!
- Backup your data before performing any huge operation on the iPhone device such as restoring the device to factory settings.
- It is a good practice to store iPhone data on iCloud and perform a regular backup to prevent data loss.
- Saving iPhone data to iCloud offers an ease of accessing data contents from anywhere, even if the data is deleted from your device.
- In addition to online backups, it is beneficial to retain a replica of existing data on another device such as a system hard drive or external storage media.
How to Activate Stellar Data Recovery for iPhone
If you want to recover and save the missing or deleted iPhone data, activate Stellar Data Recovery for iPhone on your computer.
The demo version of the software is only for evaluation purposes. To use its full functionality, purchase the software and then activate it.
The software can be activated using the Activation Key, which you receive via email after purchasing the software. It would help if you had an active Internet connection to activate Stellar Data Recovery for iPhone .
Steps to activate Stellar Data Recovery for iPhone
- Run the demo version of Stellar Data Recovery for iPhone software
- On the main interface, click the Activation icon
- The Activation window appears. Enter the Activation Key you received in your email after purchasing the software.
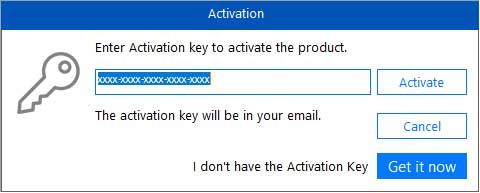
- Click Activate
- The software verifies the entered key. After successful verification, a message appears saying ‘Activation Completed Successfully’. Click OK.
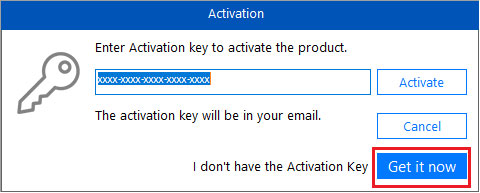
If you don’t have the Activation Key of Stellar Data Recovery for iPhone, here’s how to get it…
In case you don’t have an Activation Key, follow the below steps:
- Free download and install the software on your computer
- Click on the Activation icon on the home screen of the software
- Click Get it now
- The software directs you to the buy page. Next, click on Windows or Mac tab, as per your system.
- Click on Buy Now button to purchase the software
- Fill in your details as asked
- After purchasing the software within a few minutes, you will receive an Activation Key and the link to download the product on your email. Use that link and key to activate Stellar Data Recovery for iPhone as given in steps (1-6)
Note: If you didn’t receive the Activation Key at your registered email within a few minutes of purchasing the software, contact our customer support via mail, chat, or call.
Stellar Data Recovery for iPhone® Stellar Data Recovery for iPhone® is the best DIY software to recover missing or accidentally deleted Contacts, Messages, Calendar, Photos, Videos, Call History etc directly from iPhone or iPad.
How to Recover deleted pictures on iPhone? 5 Best Solutions
For many iPhone users, photos are the most important data stored on their device – so losing those photos can be a disaster.
However, even if you accidentally deleted some or all of your pictures on iPhone, you can get them back.
We’ll discuss how to recover deleted photos on your iPhone with or without backup.
How to Recover Deleted Pictures on iPhone?
There are five best solutions to recover deleted pictures on iPhone. Use the solution that fits your needs and helps you recover your lost pictures.
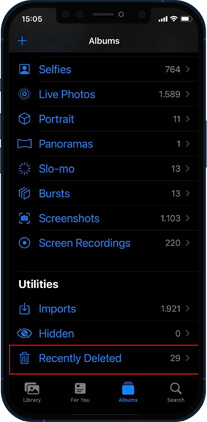
1. Recover Deleted Pictures on iPhone from Recently Deleted Albums
Pictures taken with the iPhone Camera application are saved by default in the Photos application. If a photo or video is deleted, it’s moved to the Recently Deleted folder in the Photos app. This folder is the same as your computer’s Recycle Bin and retains the deleted photos for 30 days. Once this period expires, your photos are permanently deleted from this folder. Perform these steps if you want to recover recently deleted photos on your iPhone:
- Open the Photos app.
- Tap on Albums at the bottom.

- Scroll down to find the Recently Deleted folder.
- Tap on the Select option at the top-right corner of the screen.

- Select the deleted photos you want to recover on your iPhone.
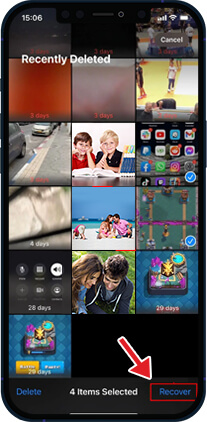
- Now, tap Recover, and the pictures will be returned to their original iPhone albums.
Note – If you want to restore all the deleted photos from your Recently Deleted folder, tap on the Recover All button.
How to Recover Deleted Pictures on iPhone From a Backup?
If your photos are not in the Recently Deleted folder, you might get them back by restoring your iPhone from a previous backup. There are three ways to restore deleted photos on iPhone – iCloud website, iTunes backup, or Finder.
When recovering photos from your iPhone from backup, pay attention to the date of creation of your backups. Use the most recent backup but don’t delete all older backups. It’s always good to have multiple backups if something goes wrong.
2. Recover Photos on iPhone using iCloud via the iCloud website
Apple’s iCloud Backup helps you recover deleted photos from your iPhone to your system. For iCloud to automatically back up all your pictures and videos, you must first set up and enable iCloud Photos on your device. Here’s how to enable iCloud Photos to Backup all your photos:
- Open the Settings app on your iPhone.
- Tap iCloud and then go to Photos.
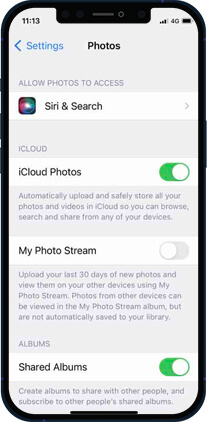
- Toggle on iCloud Photos to enable it.
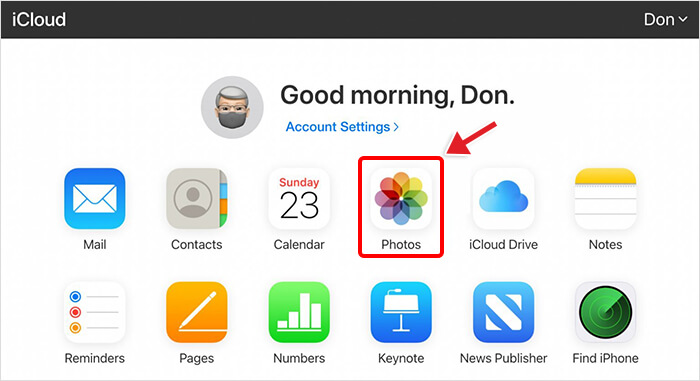
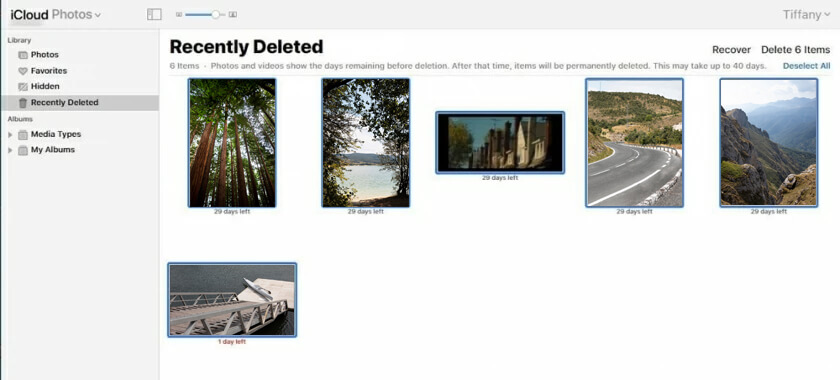
To restore photos from iCloud, follow these steps:
- Go to the iCloud Website and log in with your Apple credentials.

- Once logged in, select ‘Photos’ from the app list.
- Go to Recently Deleted Album, select the photos you wish to restore, and click Recover.
3. Recover Photos on iPhone using iTunes
Many iPhone users use iTunes backup to recover their deleted photos and videos. This Apple’s proprietary tool syncs your iPhone files to your PC or Mac. Follow the steps to recover deleted photos from iTunes backup:
- Connect your iPhone to your Mac system with macOS Mojave or an earlier version.
- Click on the iPhone icon at the upper-left corner of your iTunes window.

- Click the Summary tab in the left pane.
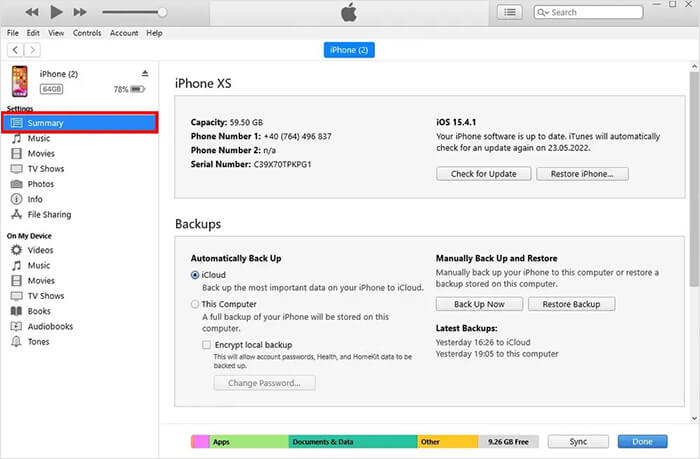
- Now in the Backups section, click on Restore Backup.
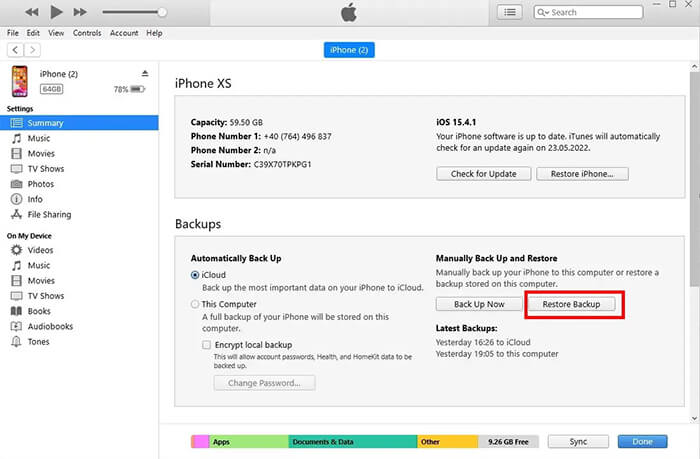
- Select the backup you want your phone to use.
Note - macOS Mojave is the last version of Apple’s OS to ship with iTunes. In macOS Catalina and newer version, iTunes is split into different apps: Podcasts, Books, TV, and Music. Moreover, Finder is used to manage and sync content on your iPhone, iPad, and iPod touch.
- Once the restoration process is complete, check the Photos app to see if the deleted photos were recovered. If not, try repeating the process and return to the most recent backup or choose an older backup.
4. Recover Deleted Pictures on iPhone using Finder
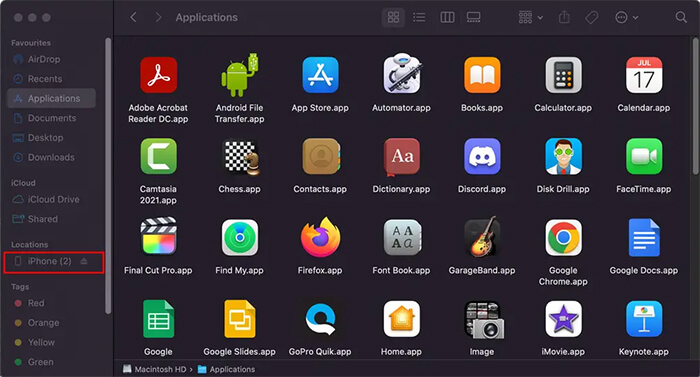
To restore the pictures on iPhone using Finder in macOS Catalina 10.15 or above, follow these steps:
- Open Finder on your Mac with macOS Catalina 10.15 or above.
- Connect your iPhone to your Mac system.
- Select your iPhone from the location lists on the left.
- Navigate to the General tab and click Restore Backup.
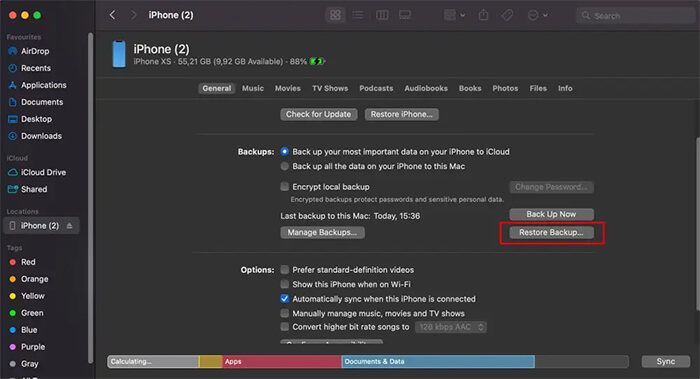
- Select the backup date you like to use for restoring.
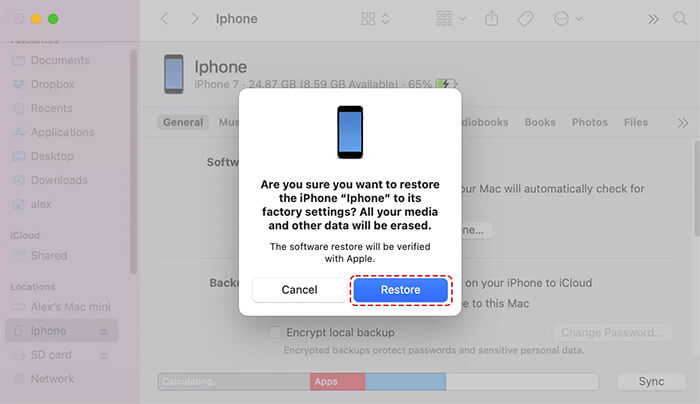
- Click the Restore button to confirm.
How to Recover Pictures on iPhone without Backup?
What to do if there is no iPhone backup or you cannot restore pictures using iCloud or iTunes? Use iPhone data recovery software to restore lost iPhone pictures.
Stellar Data Recovery for iPhone can find and restore deleted/lost pictures, videos, chat messages, audio, contacts, etc., from your iPhone/iPad/iPod touch. This software is easy to use when restoring deleted photos, and you can operate it even if you don’t have technical knowledge. Follow the steps to discover how to use software to recover deleted photos:
- Connect your iPhone to your computer.
- Download Stellar Data Recovery for iPhone on your PC or Mac.


- Select Recover from iPhone on the main screen of the software.
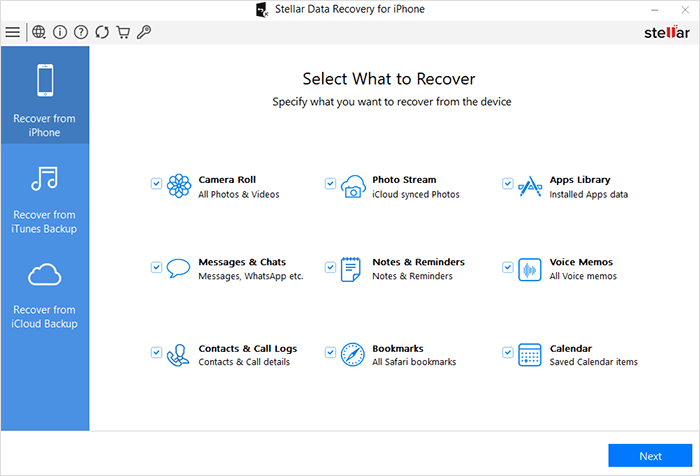
- Select the data type and click Next. The scanning process will start.
- Once the scanning is completed, preview the data. Select the recovered data you want to restore and click Save.
- Choose the destination to save the recovered data.
Conclusion
The data loss issues in Apple can be resolved easily through multiple backup solutions — iTunes, iCloud, and iCloud.com. However, these native backup recovery solutions fall short when you need to recover specific data, though you can easily recover deleted photos in your iPhone from these backup options. However, you will also end up replacing every existing data on your device!
Stellar Data Recovery for iPhone fills this gap quite efficiently. It recovers your deleted photos in water damage, jailbreak, factory reset, Black Screen of Death, etc. In addition, this software has an exceptionally high data recovery success rate, making it an essential utility for iPhone users.
- Title: New iPhone 12 Pro Max Restore from iCloud Stuck on Time Remaining Estimating | Stellar
- Author: Vivienne
- Created at : 2024-07-17 04:03:03
- Updated at : 2024-07-18 04:03:03
- Link: https://review-topics.techidaily.com/new-iphone-12-pro-max-restore-from-icloud-stuck-on-time-remaining-estimating-stellar-by-stellar-data-recovery-ios-iphone-data-recovery/
- License: This work is licensed under CC BY-NC-SA 4.0.