
In 2024, How to Find iSpoofer Pro Activation Key On Realme C53? | Dr.fone
How to Find iSpoofer Pro Activation Key On Realme C53?
There are specific situations where it is necessary to fake your GPS location. By spoofing locations, you can teleport to anywhere in the world, hide your true location to prevent others from tracking you, have access to content that is restricted in your current location, and so on. Spoofing locations is also conducive in location-based games such as Pokémon GO.
There are specific applications that allow you to spoof the location of your device. However, there are no such apps for iPhones as Apple does not allow GPS spoofing apps in the App store. To change the location of your iPhone, you can connect it to your PC and use a spoofing application there to change its location. We are going to talk about iSpoofer, a professional location spoofing application; 3 ways to get the iSpoofer Pro Plan License Key for free; Wondershare Dr.Fone - Virtual Location (iOS), a better alternative to iSpoofer; and the steps to spoof your iPhone GPS location using Wondershare Dr.Fone - Virtual Location (iOS).
Disclaimer: This post includes affiliate links
If you click on a link and make a purchase, I may receive a commission at no extra cost to you.
Part 1: Ways to Get the iSpoofer Pro Plane License Key Free 2022
iSpoofer is a professional GPS simulation desktop application that can be used to spoof the GPS location of an iOS device. It runs on Windows and Mac computers. To change the GPS location of your iOS device, you have to install and run this application on your PC, connect your iOS device to your PC, and then spoof its location by using the application on your PC.
iSpoofer has a free version and 2 subscription plans - Pro plan and Volume plan. For unlimited spoofing, you can use the Pro plan of iSpoofer, which is available at $4.95 per month. With this plan, you can change the location of up to 3 iOS devices at once. To activate iSpoofer Pro on your PC, you will have to enter a license key sent to you via email after you pay for its subscription. However, there are a few tricks with which you can get this license key without subscribing and activate iSpoofer Pro and use it for free. Below, we have mentioned 3 ways to get a free iSpoofer Pro Plan License Key.
- Check on Community Days: The game Pokémon GO sometimes offers free iSpoofer Pro PlanLicense Keys on Community Days. Community Day is a worldwide special event in Pokémon GO that occurs every month for a few hours. Various kinds of special bonuses and rewards are offered on Community Days. Among these offers, a free iSpoofer Pro Plan License Key might be available on a particular Community Day. Make assured you do not miss this offer because the key will be available only for a few hours before it gets expired.

- Check out websites: Certain websites throughout the internet occasionally offer free iSpoofer Pro Plan License Keys. Try to check them out from time to time, and someday you might be lucky to get a free iSpoofer Pro Plan License Key. One of such websites is http://www.spoofer.pro/.

- Subscribe to YouTube channels: Another way to get a free iSpoofer Pro PlanLicense Key is to subscribe to YouTube channels that offer giveaways of these license keys. There are specific YouTube channels that offer free iSpoofer Pro Plan License Keys to their lucky subscribers. Make sure you subscribe to such channels and keep checking their videos, especially around giveaway times, to see if you are the lucky subscriber to win the giveaway.

Part 2: The safer way to Spoof on iPhone
A much better and safer way to spoof your iPhone location is to do it using Wondershare Dr.Fone - Virtual Location (iOS). It is a desktop application that can be used to instantly fake the GPS location of your iOS device with just a click of your mouse. It is compatible with both Windows and Mac computers. You can use this fantastic application to safely change your GPS location on several applications, including WhatsApp, Snapchat, Tinder, and Pokémon GO. It allows you to change the location of up to 5 iOS devices at once.
Key features:
- It comes with an integrated joystick feature for controlling GPS movement.
- GPS movement can also be controlled with a keyboard.
- Offers 3 modes - teleport your location, simulate movement between two spots, and simulate movement along a specified route.
- Offers; both automatic and manual GPS movements.
- Compatible with Windows XP and above, and Mac OS X 10.13 and above.
- Requires a minimum RAM of 256 MB and a minimum free hard disk space of 200 MB.
Steps to spoof your iPhone location using Wondershare Dr.Fone - Virtual Location (iOS):
- Download and install Wondershare Dr.Fone - Virtual Location (iOS) on your Windows or Mac PC. Launch the application.
- Once the application is launched, a window will appear with a variety of options. Click “Virtual Location” from those options.


- Connect your iPhone to your PC. via USB cord. Once your device is connected successfully, click on the “Get Started” button.

- A new window will appear where the actual GPS location of your iPhone will be shown. If it is not accurately displayed, click on the “Center On” icon in the lower right part of the window to show the accurate location.

- Click on the “teleport mode” icon in the upper-right part of the window (the 3rd one from the right). This will activate “teleport mode”.
- In the search bar in the upper left part of the window, enter the name of the desired location where you wish to teleport. Then click “Go”.

- A popup box will appear. Click “Move Here”.

- With that, the GPS location of your iPhone has been successfully changed and fixed. You can check it by clicking on the “Center On” icon or checking your iPhone’s location. Also, the location of the location-based app; you are currently using on your iPhone has been successfully changed too.

Conclusion
So, that was all about the article. We have discussed 3 simple tricks to get a free iSpoofer Pro Plan License Key. Then, compared with iSpoofer Pro which allows you to change the location of up to 3 iOS devices at once, Wondershare Dr.Fone - Virtual Location (iOS) allows you to change the location up to 5 iOS devices at once. Compared with iSpoofer Pro, it is safer and easier to use and comes with more features.
5 Easy Ways to Change Location on YouTube TV On Realme C53
Through YouTube TV, people can access different TV channels such as news, sports, and entertainment. However, as every YouTube TV works in accordance with the assigned home area, sometimes you can forget or are unable to change the home area, which can lead to certain restrictions. If you want to change the location of YouTube TV to access more services, this article is for you.
Continue reading this article to learn how to change your YouTube TV location with the help of easy methods so that you won’t tire yourself. You can easily bypass YouTube TV restrictions by following this authentic guide.
Part 1: Change your Home Area to Change Location on YouTube TV
Before jumping on the method to change YouTube TV location, keep in mind that YouTube only allows changing the location twice a year. In this part, we will provide a manual method to change location on YouTube TV for both iOS and Android devices:
How to Change Your Home Area on an iOS Device
Step 1: Start logging into your YouTube TV account and navigating to your profile icon. Select “Settings” and then tap on “Area.”
Step 2: Afterward, tap on “Home Area” and then choose the option “Update” right next to it.
How to Change Your Home Area on a Computer or Android
Step 1: Signing to your YouTube TV on your Realme C53 or through a web browser. Afterward, tap on your profile icon to proceed.
Step 2: Go to “Settings” from the profile and then select “Area.” Now, locate the “ Home Area” option and click on it.
Step 3: Tap on the “Update” option next to the “Home Area” option.
Part 2: Using VPN to Bypass YouTube TV Restrictions
Sometimes, users encounter certain YouTube TV restrictions due to their home area changes. This section will suggest four amazing VPNs to help you bypass any YouTube TV restrictions.
1. NordVPN
NordVPN is a well-trusted VPN that provides exceptional security and protection from malware attacks. Furthermore, by using this VPN, you can change your device or computer location to any country by selecting a fast and secure server from its available options. Hence, you can enhance your cyber security to a great level through this platform while accessing inaccessible content.

2. Surfshark
Do you want to encrypt your browsing activity on your devices? Use Surfshark to browse in a secure manner so that no one can steal or track your information. You can also change your location through this platform to strengthen your privacy across online sites. You can access any specific YouTube TV content by selecting any location from its US servers category.

3. ExpressVPN
ExpressVPN enables the users to change the server’s location anytime and from anywhere across the world. It gives great reliability access to the server location in 94 countries. Moreover, you can enjoy internet browsing with great network speed through it.

4. CyberGhost
To bring your digital security to the next level, CyberGhost is a good option to rely upon. It is a one-click location changer VPN that helps you connect anywhere within seconds with a secured IP address. After that, you can anonymously visit and use online sites through its encrypted VPN protocols and safely hide your identity.

NordVPN | Surfshark | ExpressVPN | CyberGhost | |
Ranking | 1 | 2 | 3 | 4 |
Max Contract Length | 24 Months | 24 Months | 12 Months | 39 Months |
Torrenting | ✔ | ✔ | ✔ | ✔ |
Monthly Plan Cost | $11.99 | $12.95 | $12.95 | $12.99 |
IP Addresses | 5000 Servers | 3200 Servers | 3000 Servers | 8000 Servers |
Support System | Windows, Mac, iOS, Android | Windows, Mac, iOS, Android | Windows, Mac, iOS, Android | Windows, Mac, iOS, Android |
Support Main Streaming Platforms | Netflix, Amazon Prime, Disney+ | Netflix, HBO Max, Hotstar | Netflix, Apple TV+, Hulu | Netflix, HBO Max, Disney+ |
Part 3: One-stop Tool to Change GPS Location on iOS and Android
Although VPNs provide a great way to change YouTube TV location through IP address, it still lacks accuracy with the location. To be more precise with region accuracy, Dr.Fone – Virtual Location changes GPS location to connect your Realme C53 with a particular area in a specific city. As VPNs change the location by connecting to the city’s server via IP address, Dr.Fone targets the exact location in any city by using GPS.
Dr.Fone - Virtual Location helps the users locate a precise location for YouTube TV to access specific TV channels and features. Moreover, you can instantly change your YouTube TV location with a single click. Using this tool, you can fake your location anywhere in the world with excellent speed.
For changing YouTube TV location through Dr.Fone, use the below instructions:
Step 1: Navigate Virtual Location
Download Dr.Fone on your computer and open its main home page. Select “Virtual Location” from the displayed options by clicking on it. Now connect your smartphone to your computer via a USB cable.
Step 2: Show Current Location
A new window will pop up displaying your current location on a map. However, if you cannot locate it, click on the “Center On” icon that will show your current location.
Step 3: Turn On Teleport Mode
To turn on the teleport mode, click on the second icon that you can locate on the top right. Then, type the area in the search box and press the “Go” button.
Step 4: Confirm Location
Confirm by clicking on the “Move Here” option on the pop-up message. Once done, your phone will be connected to the chosen location, and thus YouTube TV location will be changed automatically.
Part 4: FAQs
- Is it allowed to watch YouTube TV other than the home area?
Yes, it is allowed to watch YouTube TV other than the home area in the US, but the channels will differ from location to location. You can watch national programs, including local programs and other YouTube videos, while traveling domestically in the US.
- How to modify the time zone on YouTube TV?
To change the time zone on YouTube TV, open your YouTube TV and click on your profile icon. Next, go to the “Settings” and tap on the “Area.” Now, locate “Home Area” and upgrade the time zone concerning your home area.
- Is it possible to watch YouTube TV in multiple locations?
You can easily watch YouTube TV in multiple locations, but to be careful, you should check your home area frequently in a month to be aware of local networks.
- Are users allowed to watch YouTube TV at two different houses?
YouTube has provided easy access through membership that allows the users to watch YouTube TV at two different houses. You can create a family group and let 5 members watch YouTube TV.
Conclusion
This writing comprises a detailed guide regarding the YouTube TV change location and the exact steps. We have also mentioned some of the well-trusted VPNs to change YouTube TV location, but to be precise in the results, we have suggested Dr.Fone - Virtual Location as a complete and advanced tool for changing the location.
Prevent Cross-Site Tracking on Realme C53 and Browser
Have you ever wondered why you get the advertisements of the websites you visited a few minutes ago on your social media sites? Here comes to Cross-Site Tracking, also termed CST, and it is a process where third-party cookies and sites track your browser history.
![]()
The CST process is like invading your privacy by collecting your browser history and personal information. So, to prevent these services, there are several ways by which you can cross-site tracking on your system as well as Realme C53 phone browsers. Keep reading to learn how to stop cross-site tracking on both Realme C53 and browser.
Part 1: Why Do We Need to Stop Cross-site Tracking?
Cross-site Tracking is all about collecting your browsing data and other information for advertising purposes. Though the process can prove convenient for many as it provides additional information about the products and services you have searched for and offers tailor-made content, it is intrusive and about breaching your privacy.
Cross-site tracking collects information about your browsing history. The third-party cookies also monitor the content type you have visited and your personal information, which is risky.
Besides invading privacy, the CST also poses several other issues. Based on your browsing history, additional content you have not asked for is loaded on your visited sites, slows down the page loading process, and puts an extra burden on your battery. Moreover, too much-unwanted content can interfere with the basic information you are looking for.
So, it is always better to prevent cross-site tracking for all the above and more reasons.
Further reading: A detailed guide on faking location in Mozilla Firefox . Don’t worry about your location privacy anymore!
Part 2: Can Private Browsing be traced?
Yes, private browsing can be traced. When you work in private browsing mode, the web browser does not save the browsing history, which means that anyone who uses your system will not check your online activities. But websites and cookies can track your browsing history as well as other information.
Part 3: How to Disable Cross-website Tracking on Safari for iOS Devices?
Safari is the most commonly used platform by iOS users. So, to prevent CST for Safari on your iOS devices and Mac systems, below is a complete guide.
Deactivate Safari cross-website tracking for iPhone & iPad
Safari cross-site tracking can be prevented using the below steps on your iPhone and iPad.
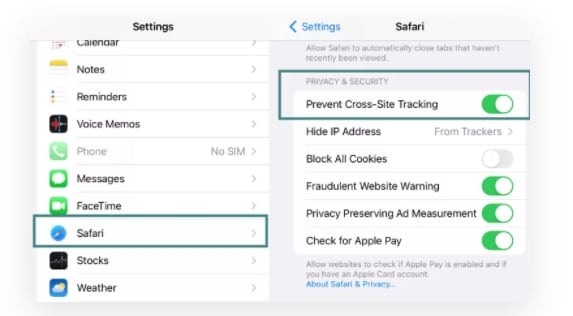
- Step 1. Launch the Settings app on your iOS device.
- Step 2. Find the Safari option by scrolling down the menu.
- Step 3. Move the slider to turn on “Prevent Cross-Site Tracking” under the PRIVACY & SECURITY option.
Deactivate Safari cross-website tracking for Mac
Use the steps below to turn off cross-site tracking on Safari on your Mac systems.
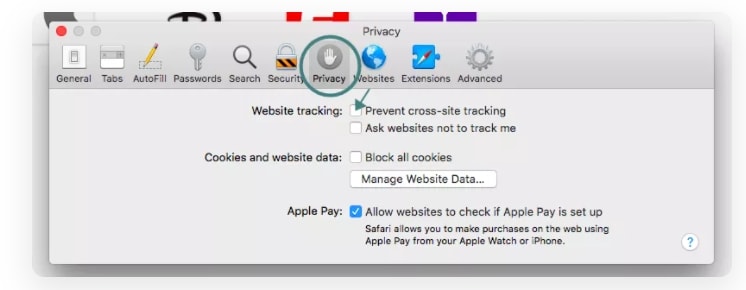
- Step 1. On your Mac system, open the Safari app.
- Step 2. Move to Safari > Preferences > Privacy
- Step 3. Enable the “Prevent cross tracking” option by clicking on the box next to it.
Part 4: How to Disable Cross-site Tracking on Google Chrome
Chrome is used widely on Windows systems and Android devices, and to prevent the CST from your browser, a detailed guide is given below.
Enable “Do Not Track” on Google Chrome for Android
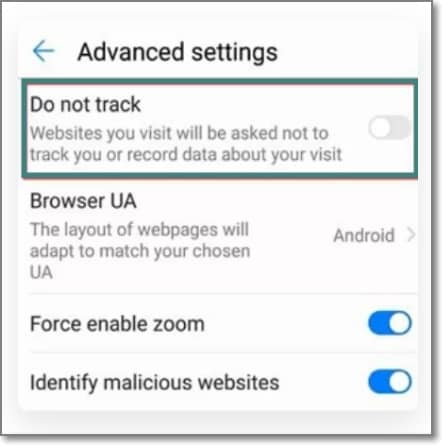
- Step 1. On your Realme C53, open the Chrome app.
- Step 2. At the right side of the address bar, click on the More option and choose Settings.
- Step 3. Choose the Privacy option from the Advanced tab.
- Step 4. Click on the “Do Not Track” option to turn on the feature.
Enable “Do Not Track” on Google Chrome for Computer
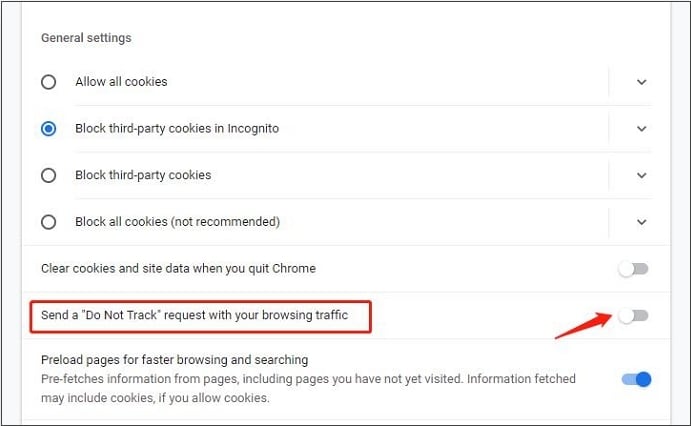
- Step 1. Launch Chrome on your system, and from the menu at the upper-right corner, click on the Settings option.
- Step 2. From the “Privacy and Security” tab, choose the “Cookies and other site data” option.
- Step 3. Tap and enable the slider next to “Send a “Do not track” request with your browsing traffic.”
Part 5: Recommended Solution: Fake a Location to Stop Cross-Site Location Tracking Using Dr. Fone
What if you let the sites and cookies track your phone location without worrying about your privacy? Yes, it can be done by spoofing your location. So, if you set a fake location while browsing the internet, you will not have to worry about cross-site tracking, as anyways, the sites and cookies will get misled browsing information that cannot harm you in any manner.
Setting a fake location on your iOS devices, a professional tool is needed, for we recommend Wondershare Dr.Fone - Virtual Location as the best tool. Using this Android and iOS-based software, you can set any fake GPS location on your device. The tool is simple to use and does not require any mastery of technical know-how.
Key features
- Simple tool to teleport to any GPS location in a single click.
- Allows simulating GPS movement along the route.
- All popular models of Android and iOS devices are compatible.
- Compatible with all location-based apps on your phone.
- Compatible with Windows and Mac systems.
Here is a video tutorial for you to take an overview of how to use Dr.Fone - Virtual Location to fake location on your Android and iOS devices.
 safe & secure
Steps to set fake location on your Android and iOS devices using DrFone-Virtual Location
Step 1. Download, install and launch the software on your Windows or Mac systems. On the main software interface, choose the Virtual Location option.
Step 2. Connect your iPhone or Android device to your system using a USB cable and then tap on the Get Started option on your software interface.
Step 3. A new window on the software interface will open, showing your connected phone’s real and actual location. If the detected location is incorrect, click on the “Center On” icon to display the right device location.
Step 4. Next, you need to activate the “teleport mode” and click o the 3rd icon at the upper-right corner.
Step 5. Next, you have to enter now the fake location to which you wish to teleport to at the upper-left corner. Click on Go.
Step 6. Finally, tap on the Move Here button and the new fake location for your connected Android or iOS device at the pop-up box.
Check the new location of your phone from the app.

Wrap it up
Preventing Cross-site tracking can be done on different browsers and devices using the guides listed in the above parts of the article. Settings a fake location for your device using Dr. Fone-Virtual Location is another interesting way to prevent tracking your browsing history by spoofing the sites and cookies. Setting a fake place will not only avoid monitoring your browsing history but will also work with all location-based apps on your phone.
safe & secure
Also read:
- [New] 2024 Approved Commanders' Crusade Revealing the Best of 7 Total War Sagas
- [New] Groundbreaking 14 Animated Text Techniques
- [New] How to Make Your Facebook Video Stand Out for 2024
- 2024 Approved Restore Lost Airdrop Functionality with Easy Solutions for iOS/macOS
- 2024 Approved Smart Solutions Apply Apple Watch, Open Mac
- Does Vivo Y27s Have Find My Friends? | Dr.fone
- In 2024, Does Life360 Notify When You Log Out On Honor Magic 5 Pro? | Dr.fone
- In 2024, IG Peak Performers IPhone + Android's Top Covers App
- Leverage These Keywords for Viral Success on Instagram Stories and Feed
- Prime Steadicam Devices for Drones in Filmmaking for 2024
- Recover lost data from Oppo Find X6 Pro
- Recover your contacts after Google Pixel 8 has been deleted.
- Recover your photos after Nokia XR21 has been deleted.
- Title: In 2024, How to Find iSpoofer Pro Activation Key On Realme C53? | Dr.fone
- Author: Vivienne
- Created at : 2024-09-30 19:08:10
- Updated at : 2024-10-02 23:12:34
- Link: https://review-topics.techidaily.com/in-2024-how-to-find-ispoofer-pro-activation-key-on-realme-c53-drfone-by-drfone-virtual-android/
- License: This work is licensed under CC BY-NC-SA 4.0.