
In 2024, How to Find iSpoofer Pro Activation Key On Lava Yuva 2? | Dr.fone
How to Find iSpoofer Pro Activation Key On Lava Yuva 2?
There are specific situations where it is necessary to fake your GPS location. By spoofing locations, you can teleport to anywhere in the world, hide your true location to prevent others from tracking you, have access to content that is restricted in your current location, and so on. Spoofing locations is also conducive in location-based games such as Pokémon GO.
There are specific applications that allow you to spoof the location of your device. However, there are no such apps for iPhones as Apple does not allow GPS spoofing apps in the App store. To change the location of your iPhone, you can connect it to your PC and use a spoofing application there to change its location. We are going to talk about iSpoofer, a professional location spoofing application; 3 ways to get the iSpoofer Pro Plan License Key for free; Wondershare Dr.Fone - Virtual Location (iOS), a better alternative to iSpoofer; and the steps to spoof your iPhone GPS location using Wondershare Dr.Fone - Virtual Location (iOS).
Part 1: Ways to Get the iSpoofer Pro Plane License Key Free 2022
iSpoofer is a professional GPS simulation desktop application that can be used to spoof the GPS location of an iOS device. It runs on Windows and Mac computers. To change the GPS location of your iOS device, you have to install and run this application on your PC, connect your iOS device to your PC, and then spoof its location by using the application on your PC.
iSpoofer has a free version and 2 subscription plans - Pro plan and Volume plan. For unlimited spoofing, you can use the Pro plan of iSpoofer, which is available at $4.95 per month. With this plan, you can change the location of up to 3 iOS devices at once. To activate iSpoofer Pro on your PC, you will have to enter a license key sent to you via email after you pay for its subscription. However, there are a few tricks with which you can get this license key without subscribing and activate iSpoofer Pro and use it for free. Below, we have mentioned 3 ways to get a free iSpoofer Pro Plan License Key.
- Check on Community Days: The game Pokémon GO sometimes offers free iSpoofer Pro PlanLicense Keys on Community Days. Community Day is a worldwide special event in Pokémon GO that occurs every month for a few hours. Various kinds of special bonuses and rewards are offered on Community Days. Among these offers, a free iSpoofer Pro Plan License Key might be available on a particular Community Day. Make assured you do not miss this offer because the key will be available only for a few hours before it gets expired.

- Check out websites: Certain websites throughout the internet occasionally offer free iSpoofer Pro Plan License Keys. Try to check them out from time to time, and someday you might be lucky to get a free iSpoofer Pro Plan License Key. One of such websites is http://www.spoofer.pro/.

- Subscribe to YouTube channels: Another way to get a free iSpoofer Pro PlanLicense Key is to subscribe to YouTube channels that offer giveaways of these license keys. There are specific YouTube channels that offer free iSpoofer Pro Plan License Keys to their lucky subscribers. Make sure you subscribe to such channels and keep checking their videos, especially around giveaway times, to see if you are the lucky subscriber to win the giveaway.

Part 2: The safer way to Spoof on iPhone
A much better and safer way to spoof your iPhone location is to do it using Wondershare Dr.Fone - Virtual Location (iOS). It is a desktop application that can be used to instantly fake the GPS location of your iOS device with just a click of your mouse. It is compatible with both Windows and Mac computers. You can use this fantastic application to safely change your GPS location on several applications, including WhatsApp, Snapchat, Tinder, and Pokémon GO. It allows you to change the location of up to 5 iOS devices at once.
Key features:
- It comes with an integrated joystick feature for controlling GPS movement.
- GPS movement can also be controlled with a keyboard.
- Offers 3 modes - teleport your location, simulate movement between two spots, and simulate movement along a specified route.
- Offers; both automatic and manual GPS movements.
- Compatible with Windows XP and above, and Mac OS X 10.13 and above.
- Requires a minimum RAM of 256 MB and a minimum free hard disk space of 200 MB.
Steps to spoof your iPhone location using Wondershare Dr.Fone - Virtual Location (iOS):
- Download and install Wondershare Dr.Fone - Virtual Location (iOS) on your Windows or Mac PC. Launch the application.
- Once the application is launched, a window will appear with a variety of options. Click “Virtual Location” from those options.

- Connect your iPhone to your PC. via USB cord. Once your device is connected successfully, click on the “Get Started” button.

- A new window will appear where the actual GPS location of your iPhone will be shown. If it is not accurately displayed, click on the “Center On” icon in the lower right part of the window to show the accurate location.

- Click on the “teleport mode” icon in the upper-right part of the window (the 3rd one from the right). This will activate “teleport mode”.
- In the search bar in the upper left part of the window, enter the name of the desired location where you wish to teleport. Then click “Go”.

- A popup box will appear. Click “Move Here”.

- With that, the GPS location of your iPhone has been successfully changed and fixed. You can check it by clicking on the “Center On” icon or checking your iPhone’s location. Also, the location of the location-based app; you are currently using on your iPhone has been successfully changed too.


Conclusion
So, that was all about the article. We have discussed 3 simple tricks to get a free iSpoofer Pro Plan License Key. Then, compared with iSpoofer Pro which allows you to change the location of up to 3 iOS devices at once, Wondershare Dr.Fone - Virtual Location (iOS) allows you to change the location up to 5 iOS devices at once. Compared with iSpoofer Pro, it is safer and easier to use and comes with more features.
How To Use Special Features - Virtual Location On Lava Yuva 2?
Wondershare Dr.Fone - Virtual Location comes with multiple unique features that can be used to enhance the flow of spoofing location. With all these amazing features, you can easily change your iOS location without blinking an eye. Rather than making things complicated, Dr.Fone makes it easy for you to manage operations when you perform actions like changing Android locations.
Part 1: Circle Route (For Multi-Stop Route)
The circle route feature is under the multi-stop route mode. When your starting point is close to the ending point, a pop-up asks if you want to set up a circle route. Click Yes to create a circular path on the map.

Part 2: Realistic Mode (For One-Stop Route and Multi-Stop Route)
This particular feature makes the simulation look realistic with the ability to fluctuate the speed of the simulation. If you wish to turn on realistic mode for the one-stop or multi-stop route, look for the respective checkmark option in the panel on the left.

Part 3: Fluctuation Mode (For Teleport Mode)
Whenever you are teleporting your smartphone device to another location, you can try using the fluctuation mode feature offered against it. As you activate Teleport Mode from the top-right section and search for a location, you will discover the Fluctuation Mode toggle in the confirmation tab. Turn on the toggle to slightly switch the location from the selected point to show realistic motion.

Part 4: Cooldown Timer (For Teleport Mode and Jump Teleport Mode)
While teleporting the location of your smartphone to different places for playing games like Pokemon Go, you are bound to activate a cooldown timer within your location-changing app to show realistic movement. By locating the Cooldown Timer on the right pane of icons, activate it, and this feature will automatically calculate the cooling time by measuring the distance between your destination and the starting point.

It is recommended not to start the movement until the cooldown time is completed to avoid unnecessary bans. Moreover, you can also activate the Auto jump after cooldown in the Jump teleport mode after turning on the Cooldown Timer.
This option will automatically jump you to the next destination once the timer ends. It is helpful for games like Pokemon Go, where the game servers can detect frequent jumps with no cooldown time.
Part 5: Import/Export GPX File
You can also import and export specific navigated locations from Dr.Fone in the form of GPX files. While you can export GPX files for keeping a record of your location, you can also import such files for inserting specific locations to simulate or teleport to. Find out how you can import and export GPX files with this location-changing application:
Step 1Export the GPX File
If you have defined a proper location to simulate at a particular instant using Dr.Fone - Virtual Location, you can have this location exported by clicking the Export icon on the top of the left panel. This will open a window where you can set the location for saving the GPX file.

Step 2Import a GPX File
For importing a GPX file on the platform, click the Import button on the right pane. As this opens a window, select the GPX file you wish to import to the platform.

Step 3Wait for the File to be Read
Wait for a moment until Dr.Fone - Virtual Location recognizes the specific locations within the GPX file and displays them on the map.

Part 6: Historical Records
If you want to use a similar track record on your smartphone again, you can access the historical records saved on the platform for easy access.
Step 1Open Historical Records
Click the Historical Records button on the right pane to access the entire history involving the connected smartphone and the location spoofing platform.

Step 2Access Any Location from the History
Select the Go button adjacent to any particular historical record to re-launch a similar simulation for the Lava Yuva 2 device. You can also click Clear All to delete all historical records.

Part 7: Favorite List
You can also set up favorite locations within the platform to define quick accessibility to your favorite locations. To do that, you have to follow the guidelines shown next:
Step 1Favorite Specific Locations
While setting up locations in Jump Teleport Mode, One-Stop Route, or Multi-Stop Route, you can tap on the Favorite icon adjacent to every marked location or favorite an entire route with the Favorite icon on the top of the left panel.

Step 2Access your Favorite Section
To look for your favorite locations, look for the Favorite icon on the right pane to open a list containing all locations you have marked. You can choose the Move option to automatically move into a particular location in no time.

5 Hassle-Free Solutions to Fake Location on Find My Friends Of Lava Yuva 2
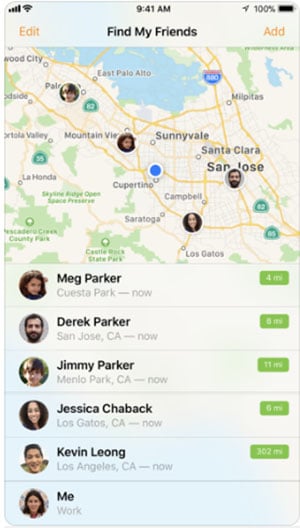
Find My Friends is an app developed for Android and iOS devices. You can say it as a location-sharing application. This app can be used to share the location of each other among the friends. When your contacts install the app on their device, the application makes everyone eligible to share their location with you and you can too share the location with your friends.
It is helpful if you are having a hang out plan with your friends. And if you friend is on the way, he or she can share their location. Or it is a great way to catch if someone is lying about their location.
Part 1: About Find My Friends app
When location sharing is enabled in the Lava Yuva 2 device, the map will show the current locations. The Find My Friends app also has an inbuilt chat option where you can contact your friend and interact about with them. It also automatically informs you when your friend reaches at the target location, leave a location etc. You can customize and configure the alerts as per your choice.
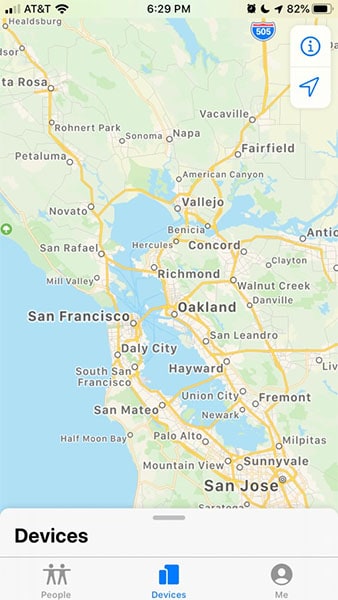
How it is different in iOS 13
You can find yourself confused if you are using iOS 13 and looking for Find My Friends app. You may not be able to find it on your device running on iOS 13. To your information, Apple has decided to combine the Find My iPhone and Find My Friends app into one. And they have named it as “Find My”. This new named app has everything what Find My Friends and Find My iPhone has. When you’ll open it, you will find the “People” tab on the bottom. Using this, you can get your friends as you used to get before.
Part 2: What Are the Against Voices of the Find My Friends App?
Look at some of the things we feel not beneficial about Find My Friends.
- No doubt you can have great advantage of an app that can tell you location of your friends, fiancée or spouse. However, the app is not free. You need to pay a small amount of 99 cents to use this.
- Another thing that might bother you is that there are a lot of people who will be knowing where you exactly are. And this could be a little annoying.
- Also, it is possible to get unnecessary requests from the unknown people. This can also be bothersome.
- Apart from this, the app if in wrong hands like an abuser can be used for wrong purposes and harmful for their partners.
- Not to forget, hackers are everywhere and the app is prone to get accessed by any of them.
In such cases, the need of hiding or faking Find My Friends location rises. This is because we are sharing some ways to fake location on Find My Friends on your iOS and Android.
Part 3: 4 Solutions to Fake Find My Friends Location on iOS
We know how important it is to trick your device deceiving with the location. You might be curious now to learn the methods that can meet the objective of yours. Let us begin with the section that introduces you four ways to fake Find My Friends location.
3.1 Use virtual location tool to fake Find My Friends location on iOS
One of the useful ways to learn faking location on Find My Friends is using a professional tool like dr.fone – Virtual Location (iOS) . This tool helps you to teleport your iOS device’s GPS anywhere. Also, with this, you can get your speed of movement customized easily. It is one of the trusted tools you can use. Here are the steps to be followed to fake location on Find My Friends.
Step 1: Follow the Installation Process
From the main page of dr.fone – Virtual Location (iOS), download it. After this, install the tool on your system and then launch it. Now, click on “Virtual Location” option.
Step 2: Set up Phone’s Connection
Now, take your iPhone and keep it connected with the system. After this is done, click on the “Get Started” button to move ahead.
Step 3: Look for Location
After following the second step, all you need is to look for your actual location. To make this happen, click on the “Center On” icon given at lower right of screen.
Step 4: Enable Teleport Mode
In this step, you should activate the teleport mode. This will be done by clicking the third icon in the upper right of the screen. You can now input the place you want to teleport.
Step 5: Fake Find My Friends Location
Now, the program will get your location and click on “Move Here” that comes in the next dialog box. The location will be changed now. You can see that in your iPhone and its location-based app.
3.2 Use a burner iPhone to fake location in Find My Friends
Using a burner can also be a good option to take help of when your goal is to fake GPS on Find My Friends. It is nothing but a secondary device where the Find My Friends app can be downloaded and used it to swindle the people you want. This will allow you to keep more privacy as no one will be able to peep into your matter or location.
- All you need is to log out of Find My Friends app on your main phone.
- Install the app on your burner phone and log in it with the same account as your iPhone.
- That is it! You can now plainly leave your burner phone on the location you want. In other words, you can create your own story. Simply put the Lava Yuva 2 device where you want the others to think about your visit.
In spite of the fact that this way is helpful, there could be some shortcomings associated with it. Firstly, your friend might try to connect with your through Find My Friends app’s chat feature. And since you have kept your burner device somewhere else and you don’t have it right now, you can miss the chat. This may make your friends a little doubtful.
Secondly, it could be perplexed and draining at the same time to keep checking that the entire settings are accurately set up.
3.3 Use FMFNotifier to help you on Find My Friends
If still you wonder how to fake your location on Find My Friends, FMFNotifier can help you. Before you use this, let us inform you that this application can run on a jailbroken iPhone. So, if you have a device that is old and you don’t mind jailbreaking it, you are good to go with this app to fake Find My Friends location. Moreover, you will need Cydia to get this app. Cydia can be said as the App Store alternative. It is a platform for installation of software or apps on jailbroken iOS devices. The apps that are not authorized by Apple can be found on Cydia’s package manager.
If you have done jailbreaking, you can have FMFNotifier. Jailbreaking will be worthy as FMFNotifier contains many great features.
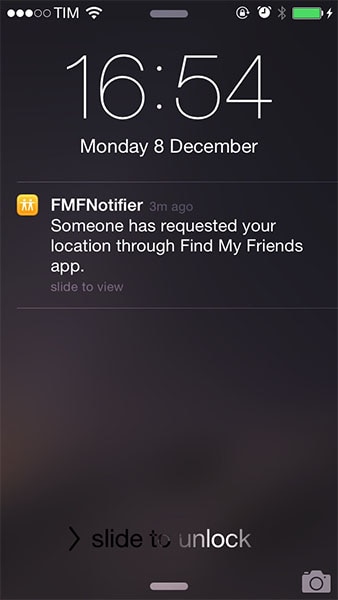
- One of the amazing things about this app to fake Find My Friends location is it sends you the notification each time when someone want to track your location. Whenever your friend attempts to ping your location, it will notify you as “Someone has requested your location through Find My Friends app”. And this is the moment where you can fake your location on Find My Friends. You can right away set a fake location when you know someone requires your location.
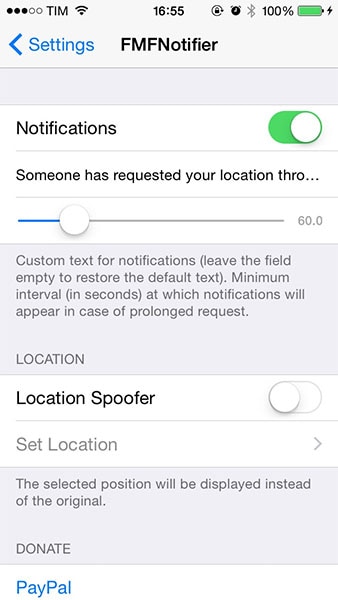
- Secondly, you can do configurations from the Settings app easily. Like, you can customize the text of the notification. Besides, the app allows you to set and save several false locations preset.
Guide on How to Use FMFNotifier
Step 1: Firstly, open Cydia and go to Sources.
Step 2: Look for FMFNotifier package which can be available on BigBoss repo.
Step 3: Lastly, install the package. Now, you can go to “Settings” on your device. Go to FMFNotifier and configure the settings as you want to fake location on Find My Friends.
3.4 Use AntiTracker to protect your location privacy
When privacy is everything for you, you cannot tolerate anyone peeping into your life, especially your location. Find My Friends lets people doing that. You can take help of AntiTracker which is another jailbreak tweak. With this, you will be helped by faking location on Find My Friends. Like the above app, this will also notify you when someone is going to know your location through Find My Friends.
You will get the notification no matter your screen is locked or not. A notification that is “You’re being tracked” along with the Find My Friends icon will appear when someone tries to track you.
![]()
Guide on How to Use AntiTracker
Step 1: It is available free on Cydia’s Bigboss repo to download. S, go to CYdia and look for AntiTracker.
Step 2: Download the package and the app icon will be added on your Home screen of iPhone. You can now configure the tweak from Settings. The settings allow you to:
- Turn on and off tweak whenever you want
- Hide the location
- Select the sound that will play when the notification comes
- Select the message to be appeared in notification
- Have a look on the location request logs i.e. each time when the location is pinged
![]()
Part 4: How to Fake Find My Friends location on Android
If you want to fake Find My Friends location on Android, you can easily configure Android devices to do it. For this, you can take help of an Android spoofer app. There are plenty of them available in Play Store. We will be using “Fake GPS GO Location Spoofer Free”. This is how to fake location on Find My Friends on Android.
Step 1: To use this, you don’t need to jailbreak or root your device until your Android is running on 6 and higher versions.
Step 2: Go to Play Store and search for the app. Install it after downloading.
When you install it rightly, this is how to do a little twisting to set it up with Find My Friends.
Step 1: To spoof people about the location, enable the developer settings in the first place. Simply head to “Settings” for this and go to “About Phone”.
Step 2: In the “Software Info”, you will see a build number. Tap on it nearly 6-7 times. The Developers options will be enabled now. This step is important because it will alter the security settings in your phone. As a result, tricking about the location will become easier.
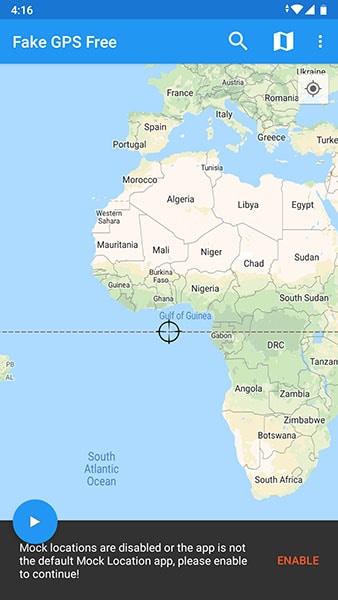
Step 3: When developer options are enabled, launch the app. You will see an “ENABLE” option at the bottom. Tap on it to turn on mock locations feature.
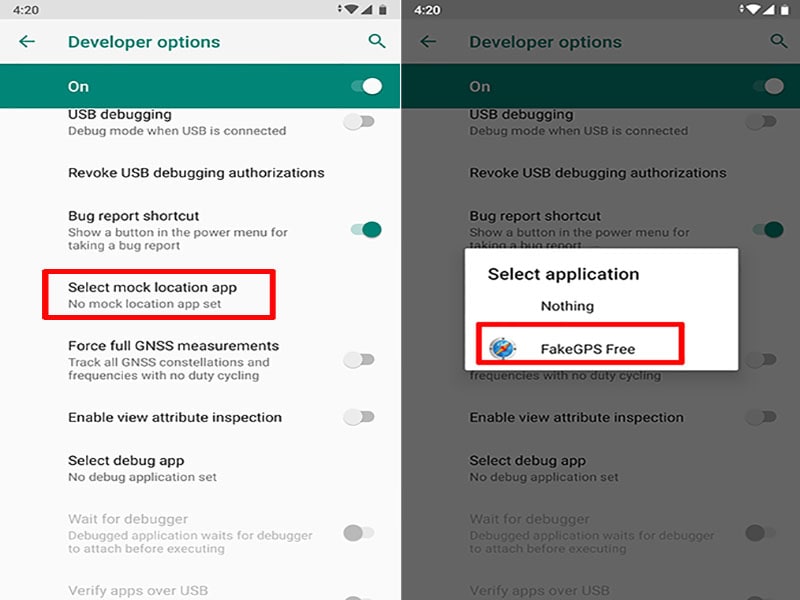
Step 4: Under the Developer options page, click on “Select mock location app”. Now, select “FakeGPS Free” from the list.
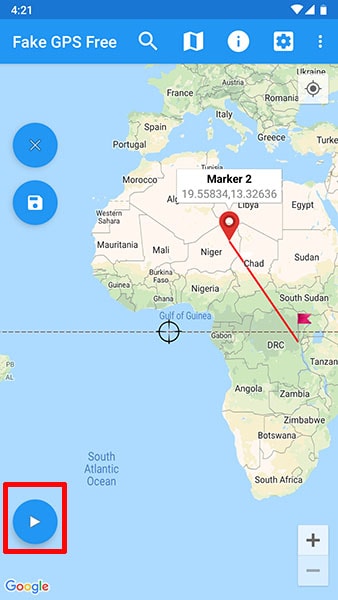
Step 5: Return to Fake GPS Free and long press the two spots on map to set the route. Take help of the play button given at the bottom. This will enable the location spoofing. You will see, “Fake location engaged…”. This will show your fake location on Find My Friends app.
Also read:
- [New] In 2024, Prodigious 8 Cameras Enhancing Video Quality in Broadcast
- Enhanced Site Analytics Through Cutting-Edge Session Data Tools
- Googleドライブから失われたデータを復元:3つの有効な方法をご紹介
- In 2024, How to Find iSpoofer Pro Activation Key On Vivo Y27s? | Dr.fone
- In 2024, How to Fix My Samsung Galaxy A15 5G Location Is Wrong | Dr.fone
- In 2024, How to Fix Vivo X Flip Find My Friends No Location Found? | Dr.fone
- In 2024, How to share/fake gps on Uber for Motorola Razr 40 | Dr.fone
- In 2024, The 10 Best Tools to Bypass iCloud Activation Lock From iPhone SE (2022) You Should Try Out
- Overcome Your Windows 10 Update Hiccups with These Simple Solutions
- Step-by-Step Strategies for Correcting Connectivity Problems with Your WiFi Adapter
- The Ultimate Ratio Reference for YouTube Videos & Ads for 2024
- Tips for Creating Stunning Slow Motion Content on Instagram
- Unbeatable Razer Blade 15 Promotion: $1,000 Cut Back for Limited Time Only – Rare Opportunity to Score
- Title: In 2024, How to Find iSpoofer Pro Activation Key On Lava Yuva 2? | Dr.fone
- Author: Vivienne
- Created at : 2024-11-10 18:10:07
- Updated at : 2024-11-16 19:01:48
- Link: https://review-topics.techidaily.com/in-2024-how-to-find-ispoofer-pro-activation-key-on-lava-yuva-2-drfone-by-drfone-virtual-android/
- License: This work is licensed under CC BY-NC-SA 4.0.