
In 2024, How to Change Google Play Location On Tecno Camon 20 | Dr.fone
How to Change Google Play Location On Tecno Camon 20
Google Account has unlimited advantages as it provides quick access to multiple platforms like Google Drive, Google Calendar, and Google Play Store. By accessing these platforms, users can increase their functionality to ease their daily tasks. For example, Google Play Store offers tons of apps and tools in every category that millions of people install on their devices.
However, some featured apps on the Play Store are restricted region-wise, and some users cannot download them. This article will guide you on how to change the country in Play Store to access all the apps.

Part 1: What Should We Know Before Changing Google Account Location?
By changing the country on Google Play Store, you can install some unavailable apps in your region. You can quickly enjoy the applications and services on your phone by simply changing the country’s location. Before knowing how to change location on Google, you should know some essential aspects.

Warnings About Changing your Location
- Often, users are deprived of some services and features apps if they are not available in the newly chosen region.
- Changing the Google Play Store location is easy, but you can only change the settings once a year. This depicts that you can change the location settings of your Google Account after 365 days.
- After changing the country’s location, you won’t be able to utilize the previous Google Play balance of the old country.
- Once you have changed your country’s server location in settings, the Google Play Store takes 48 hours to change the location.
Part 2: How to Change Google Account Location?
This section will offer easy ways to change play store country and location on Google in every circumstance. By doing so, you can easily install restricted applications in your region.
How to Change Location on Google on Android
Situation 1: How to Change Country in Google Play Store on Android
Through your Tecno Camon 20s, you can change the location on both Google Play Store and Google Account easily. To know more details about how to change the country in Google Play Store, read the following guidelines:
Step 1: Open your Google Play Store from your Tecno Camon 20. Navigate to the profile icon from the corner and select “Settings” from the displayed menu.
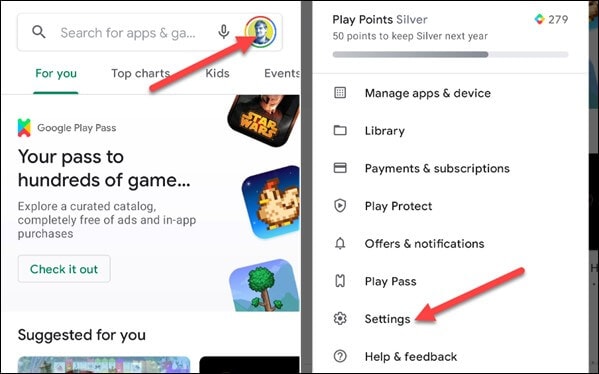
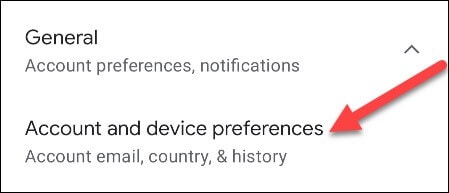
Step 2: Tap on the “General” section to locate the option of “Account and Device Preferences.” Afterward, find the “Country and Profiles” option by scrolling down. From there, you can see your current country location.
Step 3: Now click on “Switch to the Country Play Store” to change the location. For verification, click on “Continue” when a pop-up message appears on your screen asking if you want to change the location.

Step 4: Now, you will be automatically assisted in changing the payment methods of the new country. However, if you don’t come across the option to change the country, either you have already changed the country location within a year or your IP address is not synchronized with your new country.
Situation 2: How to Change Google Account Location on Android
In this particular situation, you don’t have to change the Play Store country; instead, you can only change the Google location on your Tecno Camon 20. We will recommend the VPN Proxy Master Lite , which works effortlessly to change Google‘s location. This tool flawlessly hides your IP address so that you can easily use any country’s location to access all the applications and services. Moreover, it’s highly secured and well-protected so that no virus can harm your Tecno Camon 20.
To use this powerful VPN tool, we have jotted down some basic steps through which you can change the location on your phone easily:
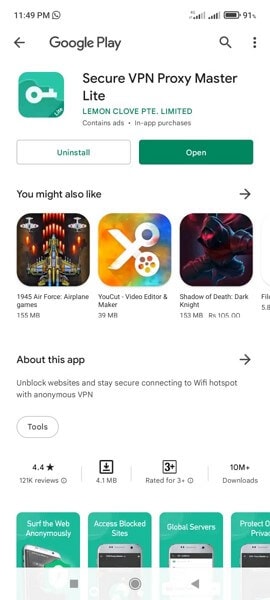
Step 1: Start installing VPN Proxy Master Lite on your Tecno Camon 20 from your Google Play Store. Once this app is successfully installed, open this app to proceed.
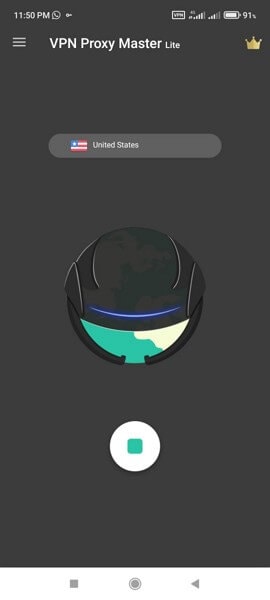
Step 2: After opening this app, tap on the country’s name list displayed above the picture of Earth. Tap on that list to view all the available countries.

Step 3: Select any country from the displayed list by tapping on it. Meanwhile, make sure that your phone is connected to a strong internet connection. This tool will automatically change your Google location by tapping on the country’s name.
How to Change Location on Computer
Situation 1: How to Change Country in Google Play Store on Computer
In this situation, we will help you change the country’s location on your Google Play Store through your computer. Just follow the below-given steps.
Step 1: Start by navigating to your PC’s browser and then open Google Play . Once done, click on the “Settings” displayed on top of your screen.
Step 2: After opening the settings menu, go to “Payments and Profile” and locate the option of “Country/Region.” Proceed by tapping the edit icon next to it.
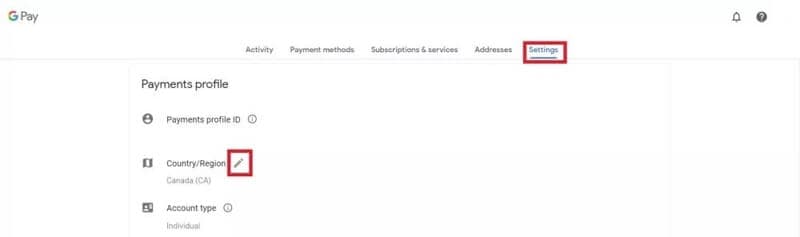
Step 3: To connect with the new country’s location, tap on the option “Create a new profile.” Afterward, you can see the on-screen instructions on your computer, so follow them to complete the process. Once done, Google Play will change the location after 48 hours, and you can search for the applications you want to install.

Situation 2: How to Change Google Account Location on Computer
If you want to change Google location on your computer without changing country on Google Play Store, use ExpressVPN by downloading it. This tool is a well-trusted platform and offers an instant way to change Google location easily. In addition, you can rely on its platform to connect with more than 94 countries worldwide by changing the location anytime you want.
Moreover, the process is fast and fully secured to protect your computer from unwanted bugs. To change the location using ExpressVPN, the steps are:
Step 1: Begin launching ExpressVPN on your computer and open its interface. Once done, turn on the VPN button and tap on the “Location Bar” to change the location.
Step 2: You can explore regions by either navigating to the “Recommended” or “All Locations” tab. Select the location you want to change with from the displayed list.
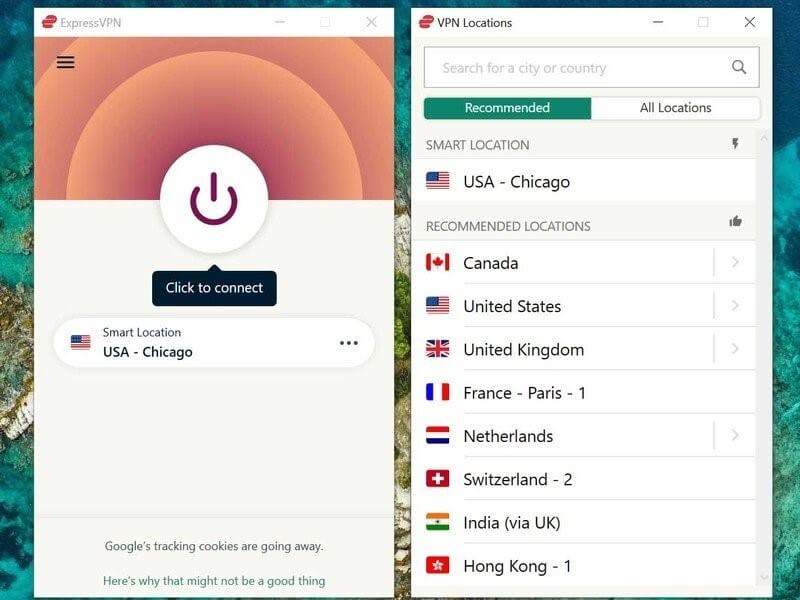
Step 3: After clicking on any country’s location, your computer’s Google Account location will be automatically changed.
Part 3: The Most Effective Way to Fake Location on iOS and Android
We have mentioned methods to change Play Store country manually and through VPN, but they still have a few limitations. Once you change the country’s location on Google Play manually, the Play Store requires 48 hours to accept this modification. Moreover, you can only change the country’s server location once a year. With VPN, many country servers are unreachable, and some servers can be reached only through a paid version. This makes the process expensive and time taking.
To avoid these hurdles and chaos, we recommend you to use Dr.Fone – Virtual Location to fake your location on both Android and iOS devices. This tool works in every situation and allows users to travel the globe through their phones free of cost. You can also travel with an exact GPS location just with a single click. Hence, this tool will work amazingly in faking your location without requiring you to change Google Play country’s location.
Dr.Fone - Virtual Location
1-Click Location Changer for both iOS and Android
- Teleport from one location to another across the world from the comfort of your home.
- Fake location on your phone with a few clicks.
- Support most mainstreaming apps and geo-based games, including Pokemon Go, Snapchat, Tinder, and so on.
- Compatible with both iOS and Android systems.
3981454 people have downloaded it
To change country Google Play using Dr.Fone - Virtual Location, here are the steps:
Step 1: Choose Virtual Location Feature
Begin with launching the tool of Dr.Fone on your computer. Open its interface and tap on the “Virtual Location” option from the home page.

Step 2: Connect your Phone
Now connect your smartphone to the phone with the help of a USB cable. Once done, click on “Get Started” to proceed further.
Step 3: Find your Current Location
After connecting your phone, you will be able to see your current location on the new window. If not, tap on the “Center On” icon displayed on the right side to find your current location.

Step 4: Enable Teleport Mode
Tap on the first icon displayed on the top right to enable the teleport mode. Now enter the location you want to navigate the search box and click on “Go” to continue.

Step 5: Change Location
A notification will pop up for confirmation once you have entered a new location. Tap on “Move here” to proceed. Once done, your new location will be set on your smartphone automatically. Now head back to Google Play Store and search for the applications you want to access.

 safe & secure
Conclusion
There are plenty of ways to execute Google One change location across various platforms to execute Google One change location. For example, people usually change Play Store country to access restricted applications in their region. This article will offer a detailed guide for changing Google location through manual and VPN means. However, to avoid any hassle, we recommend Dr.Fone - Virtual Location to change the location of your smartphone and Google Play instantly and conveniently.
How to Fix Life360 Shows Wrong Location On Tecno Camon 20?
Life360, the app for family and friends, allows you to see where your loved ones are when you open the app. The app shows the current location of your contacts and will tell you the last time they were seen and if they are in an emergency.
However, there’s a good chance that you’ve seen this message multiple times: “Your phone is missing from Life360. Please contact your cellular carrier and try again”. This message indicates that your phone is not connected to the internet.
As a result, your contacts, photos, and messages are not showing. Life360 may be using cellular data instead of Wi-Fi, but it’s not certain. To avoid this, let us read what we should know.
Part 1: Why is Life360 Location Wrong?
Interference From Nearby Devices/Networks
In some cases, Life360 may not be able to determine the location of your device because it is being interfered with by other nearby devices or networks. For example, if you have an iPhone or iPad, it may be using the same cell tower as your Tecno Camon 20.
The Life360 app has to use the closest available cell tower to determine your location. So if another device uses the closest tower, Life360 will use that instead.

Poor Signal
A poor signal in a particular region, particularly if you’re commuting, is the most common cause of Life360’s incorrect location. When your phone is in a poor signal area, the app will use the internet instead of cellular data to determine the location of your contacts.
Therefore, it is important to keep an eye on the network lines to determine whether or not this is indeed the source of the problem that prevents your Life360 from being found.
To get more information about how often does life360 update location, read about the Life360: Learn How Everything Works!
Part 2: How to Fix Life360 Shows Wrong Location Issue?
There are several ways to fix the Life360app problems that life360 not updating its location. Let’s check them out one by one.
Method 1: Review the Internet settings
The weak internet access contributes to the location display’s unreliability in life 360. If you notice that life360 is displaying the wrong location, you should examine your Internet connection settings to prevent life360 from displaying an inaccurate location.
Switch off the option that saves power and then turn on the wireless Internet connection.
You may turn off your smartphone’s power-saving mode by heading to the status bar and selecting the appropriate option.

Please note that this is just for Android users. Also, do not forget to consider that your Android smartphone’s settings may vary from those listed below.
The “switch off low power mode” option may be found in the “Settings”> “Battery” menu on an iOS device.
Android users should also follow this procedure if life360 displays an incorrect location. For battery conservation, numerous programs are disabled when the low power state is engaged.
Method 2: Double-check Your Current Location in the Settings
If life360 shows the incorrect location, the smartphone’s location services significantly come into play. The location settings must be activated to prevent the life360 location issue, and the current program must be updated accordingly.
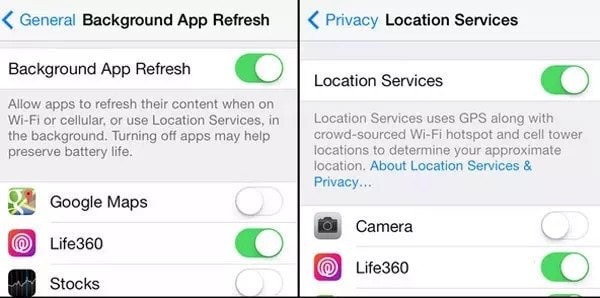
Scrolling horizontally on the status bar on an Android device is all that is required for consumers to visit the website. Of course, you can also run the software in the background, which may be accomplished in a variety of straightforward but distinct ways based on the Tecno Camon 20 device’s model.

You may access the Background App Refresh function by going to the settings menu on your iOS device and selecting “Settings,” followed by “General,” and then selecting “Background App Refresh.” Next, launch the location services function by navigating to “Settings”> “Privacy”> “location services” and selecting “Location Services” from the drop-down menu.
After that, touch on the symbol that represents Life360, as shown below; this will take you to a screen where you may change “Allow Location Access” to “Always” and “Enable Precise Location.”
Method 3: Connecting One Device at a Time
Only one device may be used to sign in to the Life 360 app at a time. To prevent the life360 false location problem, log out of all other devices and use just one. When many devices are logged into Life 360 simultaneously, the user’s location might be incorrectly determined.
If you want reliable results, you must be logged in from the same device. If you use numerous devices simultaneously to log in to Life360, it will report incorrect location errors for each one. Therefore, it is possible to get inaccurate data. Use a single device to log into life360 to prevent the issue of a wrong location showing up.
Part 3: How to Keep Your Location on Life360 in One Place?
Two of the most important and easy ways to keep your location on life360 in one place are:
1. Stopping both Wi-Fi and Cellular Data Transmissions
If you disconnect from the internet, Life360 will no longer work, and your last known position will be shown.
Because all other applications are disconnected, this solution has a significant drawback: it prevents alerts, instant messengers, and other applications from working properly. In addition to the fact that you’re unable to use the internet, people in your circle will notice something wrong. In addition, it may not be adequate to fake your location.

Those with an iPhone have the advantage of being able to disable the usage of cellular data directly inside the application’s settings. However, those with an Android device will need to resort to other approaches.
iPhone users may access the Cellular setting by going to the Settings app and tapping on it. This will switch off the cellular data for the Life360 app. Turn off Life360 by swiping the switch to the off position mentioned above. Life360 will not be able to provide an accurate location report for you so long as there is no Wi-Fi access.
Advantages:
- You can use only one device to connect to the internet.
- No need to manually switch between apps.
- You can easily manage all your data.
Disadvantages:
- You cannot use other devices at the same time.
- If you lose the connection, you need to reconnect.
2. Faking Your Location
It seems like everyone has their own way to try and fiddle with their location in real life. Some may use satellite images or even old maps and coordinates, while others will buy old phones and ship them to a random location. Whatever your method is, it’s probably not the best one out there.
However, a fast but secure option is the use of Dr.Fone - Virtual Location , which is the best virtual location application right now. You canuse it to change your location to any place on earth.
One of Wondershare’s most popular products, Dr. Fone, is a data management and recovery tool. It is compatible with both iOS and Android smartphones, and it comes packaged with a wide variety of control toolkits.
When it comes to faking a location on iOS devices, Dr. Fone- Virtual Location (iOS) is one of the most effective solutions currently available on the market. It is possible to use it to teleport the iOS device to any location in the globe with just one click, and all you have to do is input the address of the place to which you wish to be moved.
Simulating GPS movement from one place to another or along a predetermined course is also possible by simply picking locations on a map that you want to go through.
Using Dr. Fone-Virtual Location iOS, you can customize your route by selecting how many times you want to go through it and how fast you want to relocate it.
To free yourself from any hassle, consider using a third-party tool instead, such as Dr.Fone, which will make the entire process super easy and accurate.
Advantages:
- The application is easy to install and use.
- It doesn’t require you to go through a lot of settings.
Disadvantages:
- • It is not a mobile application.
Dr.Fone - Virtual Location
1-Click Location Changer for both iOS and Android
- Teleport from one location to another across the world from the comfort of your home.
- With just a few selections on your computer, you can make members of your circle believe you’re anywhere you want.
- Stimulate and imitate movement and set the speed and stops you take along the way.
- Compatible with both iOS and Android systems.
- Work with location-based apps, like Pokemon Go , Snapchat , Instagram , Facebook , etc.
3981454 people have downloaded it
Conclusion
Life360 has released a major update for Android and iPhone users, fixing the shows being sent to the wrong location. This has caused many problems for many users and is a rather annoying problem to fix. However, you can get help from Dr.Fone - Virtual Location (iOS/Android) application which is an absolute fix to all of your problems.
Prevent Cross-Site Tracking on Tecno Camon 20 and Browser
Have you ever wondered why you get the advertisements of the websites you visited a few minutes ago on your social media sites? Here comes to Cross-Site Tracking, also termed CST, and it is a process where third-party cookies and sites track your browser history.
![]()
The CST process is like invading your privacy by collecting your browser history and personal information. So, to prevent these services, there are several ways by which you can cross-site tracking on your system as well as Tecno Camon 20 phone browsers. Keep reading to learn how to stop cross-site tracking on both Tecno Camon 20 and browser.
Part 1: Why Do We Need to Stop Cross-site Tracking?
Cross-site Tracking is all about collecting your browsing data and other information for advertising purposes. Though the process can prove convenient for many as it provides additional information about the products and services you have searched for and offers tailor-made content, it is intrusive and about breaching your privacy.
Cross-site tracking collects information about your browsing history. The third-party cookies also monitor the content type you have visited and your personal information, which is risky.
Besides invading privacy, the CST also poses several other issues. Based on your browsing history, additional content you have not asked for is loaded on your visited sites, slows down the page loading process, and puts an extra burden on your battery. Moreover, too much-unwanted content can interfere with the basic information you are looking for.
So, it is always better to prevent cross-site tracking for all the above and more reasons.
Further reading: A detailed guide on faking location in Mozilla Firefox . Don’t worry about your location privacy anymore!
Part 2: Can Private Browsing be traced?
Yes, private browsing can be traced. When you work in private browsing mode, the web browser does not save the browsing history, which means that anyone who uses your system will not check your online activities. But websites and cookies can track your browsing history as well as other information.

Part 3: How to Disable Cross-website Tracking on Safari for iOS Devices?
Safari is the most commonly used platform by iOS users. So, to prevent CST for Safari on your iOS devices and Mac systems, below is a complete guide.
Deactivate Safari cross-website tracking for iPhone & iPad
Safari cross-site tracking can be prevented using the below steps on your iPhone and iPad.

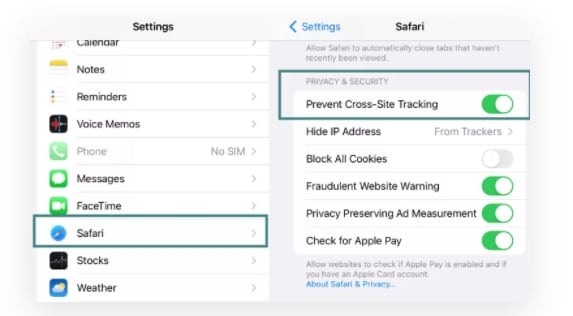
- Step 1. Launch the Settings app on your iOS device.
- Step 2. Find the Safari option by scrolling down the menu.
- Step 3. Move the slider to turn on “Prevent Cross-Site Tracking” under the PRIVACY & SECURITY option.
Deactivate Safari cross-website tracking for Mac
Use the steps below to turn off cross-site tracking on Safari on your Mac systems.
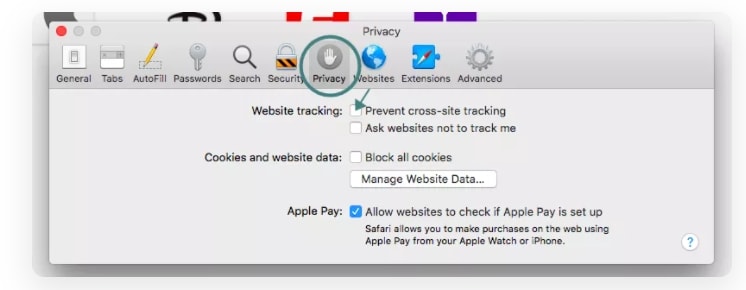
- Step 1. On your Mac system, open the Safari app.
- Step 2. Move to Safari > Preferences > Privacy
- Step 3. Enable the “Prevent cross tracking” option by clicking on the box next to it.
Part 4: How to Disable Cross-site Tracking on Google Chrome
Chrome is used widely on Windows systems and Android devices, and to prevent the CST from your browser, a detailed guide is given below.
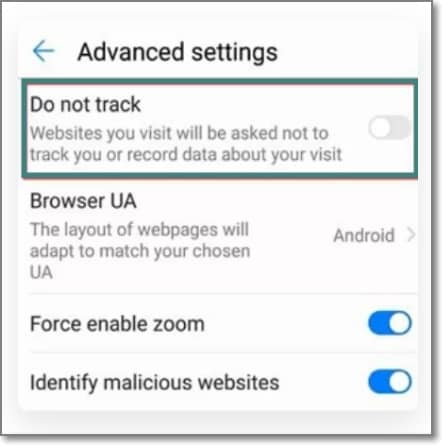
Enable “Do Not Track” on Google Chrome for Android
- Step 1. On your Tecno Camon 20, open the Chrome app.
- Step 2. At the right side of the address bar, click on the More option and choose Settings.
- Step 3. Choose the Privacy option from the Advanced tab.
- Step 4. Click on the “Do Not Track” option to turn on the feature.
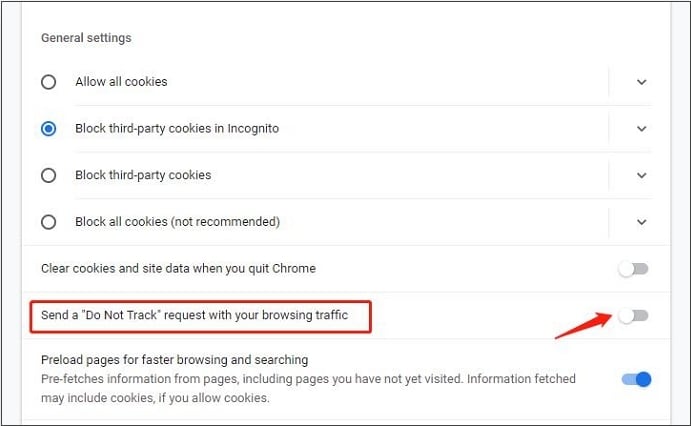
Enable “Do Not Track” on Google Chrome for Computer
- Step 1. Launch Chrome on your system, and from the menu at the upper-right corner, click on the Settings option.
- Step 2. From the “Privacy and Security” tab, choose the “Cookies and other site data” option.
- Step 3. Tap and enable the slider next to “Send a “Do not track” request with your browsing traffic.”
Part 5: Recommended Solution: Fake a Location to Stop Cross-Site Location Tracking Using Dr. Fone
What if you let the sites and cookies track your phone location without worrying about your privacy? Yes, it can be done by spoofing your location. So, if you set a fake location while browsing the internet, you will not have to worry about cross-site tracking, as anyways, the sites and cookies will get misled browsing information that cannot harm you in any manner.
Setting a fake location on your iOS devices, a professional tool is needed, for we recommend Wondershare Dr.Fone - Virtual Location as the best tool. Using this Android and iOS-based software, you can set any fake GPS location on your device. The tool is simple to use and does not require any mastery of technical know-how.
Key features
- Simple tool to teleport to any GPS location in a single click.
- Allows simulating GPS movement along the route.
- All popular models of Android and iOS devices are compatible.
- Compatible with all location-based apps on your phone.
- Compatible with Windows and Mac systems.
Here is a video tutorial for you to take an overview of how to use Dr.Fone - Virtual Location to fake location on your Android and iOS devices.
 safe & secure
Steps to set fake location on your Android and iOS devices using DrFone-Virtual Location
Step 1. Download, install and launch the software on your Windows or Mac systems. On the main software interface, choose the Virtual Location option.
Step 2. Connect your iPhone or Android device to your system using a USB cable and then tap on the Get Started option on your software interface.

Step 3. A new window on the software interface will open, showing your connected phone’s real and actual location. If the detected location is incorrect, click on the “Center On” icon to display the right device location.

Step 4. Next, you need to activate the “teleport mode” and click o the 3rd icon at the upper-right corner.
Step 5. Next, you have to enter now the fake location to which you wish to teleport to at the upper-left corner. Click on Go.
Step 6. Finally, tap on the Move Here button and the new fake location for your connected Android or iOS device at the pop-up box.
Check the new location of your phone from the app.

Wrap it up
Preventing Cross-site tracking can be done on different browsers and devices using the guides listed in the above parts of the article. Settings a fake location for your device using Dr. Fone-Virtual Location is another interesting way to prevent tracking your browsing history by spoofing the sites and cookies. Setting a fake place will not only avoid monitoring your browsing history but will also work with all location-based apps on your phone.
safe & secure
- Title: In 2024, How to Change Google Play Location On Tecno Camon 20 | Dr.fone
- Author: Vivienne
- Created at : 2024-07-17 06:17:40
- Updated at : 2024-07-18 06:17:40
- Link: https://review-topics.techidaily.com/in-2024-how-to-change-google-play-location-on-tecno-camon-20-drfone-by-drfone-virtual-android/
- License: This work is licensed under CC BY-NC-SA 4.0.