
In 2024, How to Change Google Play Location On Lava Yuva 2 | Dr.fone
How to Change Google Play Location On Lava Yuva 2
Google Account has unlimited advantages as it provides quick access to multiple platforms like Google Drive, Google Calendar, and Google Play Store. By accessing these platforms, users can increase their functionality to ease their daily tasks. For example, Google Play Store offers tons of apps and tools in every category that millions of people install on their devices.
However, some featured apps on the Play Store are restricted region-wise, and some users cannot download them. This article will guide you on how to change the country in Play Store to access all the apps.
Part 1: What Should We Know Before Changing Google Account Location?
By changing the country on Google Play Store, you can install some unavailable apps in your region. You can quickly enjoy the applications and services on your phone by simply changing the country’s location. Before knowing how to change location on Google, you should know some essential aspects.
Warnings About Changing your Location
- Often, users are deprived of some services and features apps if they are not available in the newly chosen region.
- Changing the Google Play Store location is easy, but you can only change the settings once a year. This depicts that you can change the location settings of your Google Account after 365 days.
- After changing the country’s location, you won’t be able to utilize the previous Google Play balance of the old country.
- Once you have changed your country’s server location in settings, the Google Play Store takes 48 hours to change the location.

Part 2: How to Change Google Account Location?
This section will offer easy ways to change play store country and location on Google in every circumstance. By doing so, you can easily install restricted applications in your region.
How to Change Location on Google on Android
Situation 1: How to Change Country in Google Play Store on Android
Through your Lava Yuva 2s, you can change the location on both Google Play Store and Google Account easily. To know more details about how to change the country in Google Play Store, read the following guidelines:
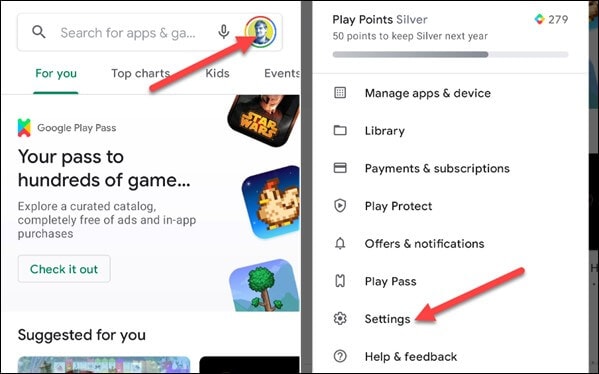
Step 1: Open your Google Play Store from your Lava Yuva 2. Navigate to the profile icon from the corner and select “Settings” from the displayed menu.

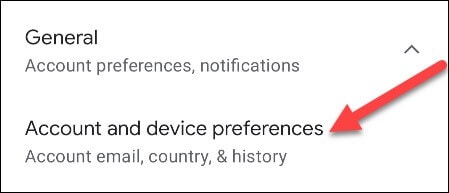
Step 2: Tap on the “General” section to locate the option of “Account and Device Preferences.” Afterward, find the “Country and Profiles” option by scrolling down. From there, you can see your current country location.
Step 3: Now click on “Switch to the Country Play Store” to change the location. For verification, click on “Continue” when a pop-up message appears on your screen asking if you want to change the location.

Step 4: Now, you will be automatically assisted in changing the payment methods of the new country. However, if you don’t come across the option to change the country, either you have already changed the country location within a year or your IP address is not synchronized with your new country.
Situation 2: How to Change Google Account Location on Android
In this particular situation, you don’t have to change the Play Store country; instead, you can only change the Google location on your Lava Yuva 2. We will recommend the VPN Proxy Master Lite , which works effortlessly to change Google‘s location. This tool flawlessly hides your IP address so that you can easily use any country’s location to access all the applications and services. Moreover, it’s highly secured and well-protected so that no virus can harm your Lava Yuva 2.
To use this powerful VPN tool, we have jotted down some basic steps through which you can change the location on your phone easily:
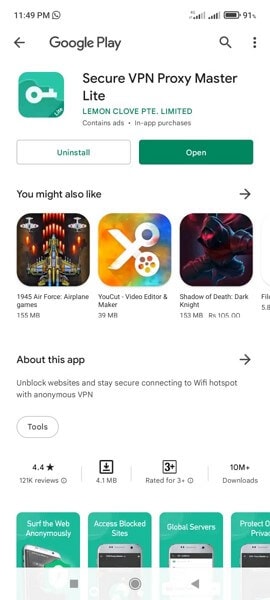
Step 1: Start installing VPN Proxy Master Lite on your Lava Yuva 2 from your Google Play Store. Once this app is successfully installed, open this app to proceed.
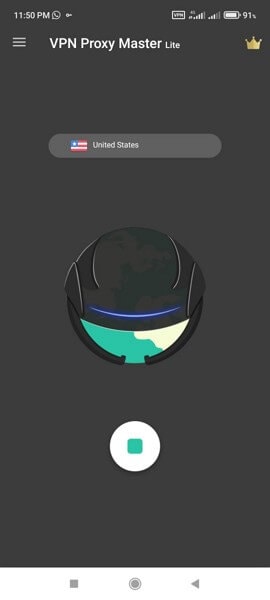
Step 2: After opening this app, tap on the country’s name list displayed above the picture of Earth. Tap on that list to view all the available countries.

Step 3: Select any country from the displayed list by tapping on it. Meanwhile, make sure that your phone is connected to a strong internet connection. This tool will automatically change your Google location by tapping on the country’s name.
How to Change Location on Computer
Situation 1: How to Change Country in Google Play Store on Computer
In this situation, we will help you change the country’s location on your Google Play Store through your computer. Just follow the below-given steps.
Step 1: Start by navigating to your PC’s browser and then open Google Play . Once done, click on the “Settings” displayed on top of your screen.
Step 2: After opening the settings menu, go to “Payments and Profile” and locate the option of “Country/Region.” Proceed by tapping the edit icon next to it.
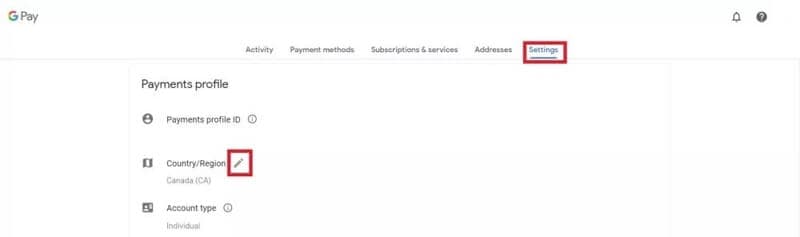
Step 3: To connect with the new country’s location, tap on the option “Create a new profile.” Afterward, you can see the on-screen instructions on your computer, so follow them to complete the process. Once done, Google Play will change the location after 48 hours, and you can search for the applications you want to install.

Situation 2: How to Change Google Account Location on Computer
If you want to change Google location on your computer without changing country on Google Play Store, use ExpressVPN by downloading it. This tool is a well-trusted platform and offers an instant way to change Google location easily. In addition, you can rely on its platform to connect with more than 94 countries worldwide by changing the location anytime you want.
Moreover, the process is fast and fully secured to protect your computer from unwanted bugs. To change the location using ExpressVPN, the steps are:
Step 1: Begin launching ExpressVPN on your computer and open its interface. Once done, turn on the VPN button and tap on the “Location Bar” to change the location.
Step 2: You can explore regions by either navigating to the “Recommended” or “All Locations” tab. Select the location you want to change with from the displayed list.
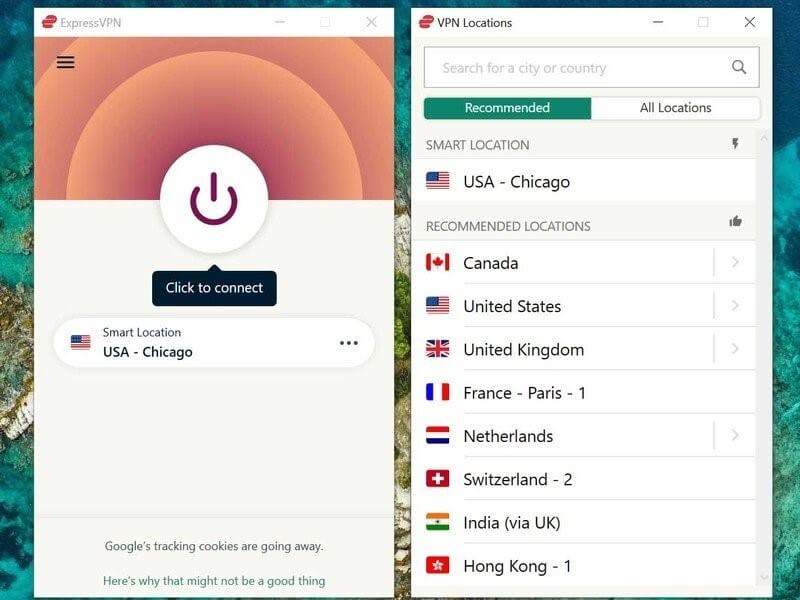
Step 3: After clicking on any country’s location, your computer’s Google Account location will be automatically changed.
Part 3: The Most Effective Way to Fake Location on iOS and Android
We have mentioned methods to change Play Store country manually and through VPN, but they still have a few limitations. Once you change the country’s location on Google Play manually, the Play Store requires 48 hours to accept this modification. Moreover, you can only change the country’s server location once a year. With VPN, many country servers are unreachable, and some servers can be reached only through a paid version. This makes the process expensive and time taking.
To avoid these hurdles and chaos, we recommend you to use Dr.Fone – Virtual Location to fake your location on both Android and iOS devices. This tool works in every situation and allows users to travel the globe through their phones free of cost. You can also travel with an exact GPS location just with a single click. Hence, this tool will work amazingly in faking your location without requiring you to change Google Play country’s location.
Dr.Fone - Virtual Location
1-Click Location Changer for both iOS and Android
- Teleport from one location to another across the world from the comfort of your home.
- Fake location on your phone with a few clicks.
- Support most mainstreaming apps and geo-based games, including Pokemon Go, Snapchat, Tinder, and so on.
- Compatible with both iOS and Android systems.
3981454 people have downloaded it
To change country Google Play using Dr.Fone - Virtual Location, here are the steps:
Step 1: Choose Virtual Location Feature
Begin with launching the tool of Dr.Fone on your computer. Open its interface and tap on the “Virtual Location” option from the home page.

Step 2: Connect your Phone
Now connect your smartphone to the phone with the help of a USB cable. Once done, click on “Get Started” to proceed further.

Step 3: Find your Current Location
After connecting your phone, you will be able to see your current location on the new window. If not, tap on the “Center On” icon displayed on the right side to find your current location.

Step 4: Enable Teleport Mode
Tap on the first icon displayed on the top right to enable the teleport mode. Now enter the location you want to navigate the search box and click on “Go” to continue.

Step 5: Change Location
A notification will pop up for confirmation once you have entered a new location. Tap on “Move here” to proceed. Once done, your new location will be set on your smartphone automatically. Now head back to Google Play Store and search for the applications you want to access.


 safe & secure
Conclusion
There are plenty of ways to execute Google One change location across various platforms to execute Google One change location. For example, people usually change Play Store country to access restricted applications in their region. This article will offer a detailed guide for changing Google location through manual and VPN means. However, to avoid any hassle, we recommend Dr.Fone - Virtual Location to change the location of your smartphone and Google Play instantly and conveniently.
8 Solutions to Fix ‘Find My Friends Location Not Available’ On Lava Yuva 2
There is no doubt that Find My Friends is an excellent application for location tracking. It allows users to track the location of their friends and family members through a variety of devices. So, when Find My Friends says the location is not available, it can be a frustrating situation. But don’t stress over this because we are here to assist you in Find My Friends not working. Go through this guide, and you’ll know what to do to take care of the problem.

Part 1: What Does “Location Not Available” Mean on Find My Friends?
When the “Location Not Available” message appears on Find My Friends, it means that you have disabled location sharing or have turned off your device’s location services. This message can also appear if your device is in an area with poor network coverage or if your device is turned off. In some cases, the message can indicate that you have logged out of your iCloud account or that there is an issue with the iCloud server.
Does “Location Not Available” mean that there is something wrong with Lava Yuva 2 ?
Not! This message does not necessarily mean that you have blocked yourself or there is something wrong with your device. If you frequently see the “Location Not Available” message, you may need to check your own device’s settings or contact your friends to confirm their location-sharing preferences.
How to distinguish “No Location Found” and “Location Not Available”?
“No Location Found” means that the Find My app is unable to locate the Lava Yuva 2 device being tracked. This can happen for a variety of reasons, such as if the Lava Yuva 2 device is turned off, not connected to the internet, or if location services are disabled.
“Location Not Available” means that the Lava Yuva 2 device is not currently sharing its location with the Find My app. This can happen if the Lava Yuva 2 device is in Airplane mode or if the user has turned off location sharing for the Find My app. It can also happen if there is a temporary issue with the iCloud servers.
In summary, “No Location Found” means the app could not locate the Lava Yuva 2 device, while “Location Not Available” means that the Lava Yuva 2 device is not currently sharing its location.
Part 2: Possible Reasons For Find My Friends Location Lava Yuva 2 Not Available
Why does Find My Friends say location not available? Before we get to the solutions, let’s explore the possible reasons behind this problem. It is apparent that when the location is not found on Find My Friends, there is an underlying problem. Here are the possible reasons that could cause this error:
- Your friend’s device has an inaccurate date
- The other device isn’t connected to a network, or it’s off
- Hide My Location feature is active on your friend’s phone
- The Location Services are also turned off on the friend’s device
- Your friend hasn’t signed in to the service
- The location of your friend is in a country or region where Apple doesn’t provide this feature
All these reasons can be the ones causing trouble on your Lava Yuva 2 and Android phones. Hence, you will have to look for some conventional methods to fix the unavailable location error.
Part 3: 8 Tips To Make “Find My Friends Location” Available
When the Find My Friends app location is not available, here are some more tips that can help get rid of this issue.
### Tip 1: Check if Find My Friends is Supported in Region/CountryThe foremost thing you should do when the Find My Friends location is not available is to check the region/country’s location. Apple Inc still hasn’t provided the Find My Friends feature in all countries and regions due to local laws and technical issues. So, the most plausible reason for the app not working properly is solely because it is not available in that particular country/region.
Tip 2: Quit and enable GPS or Location Services again
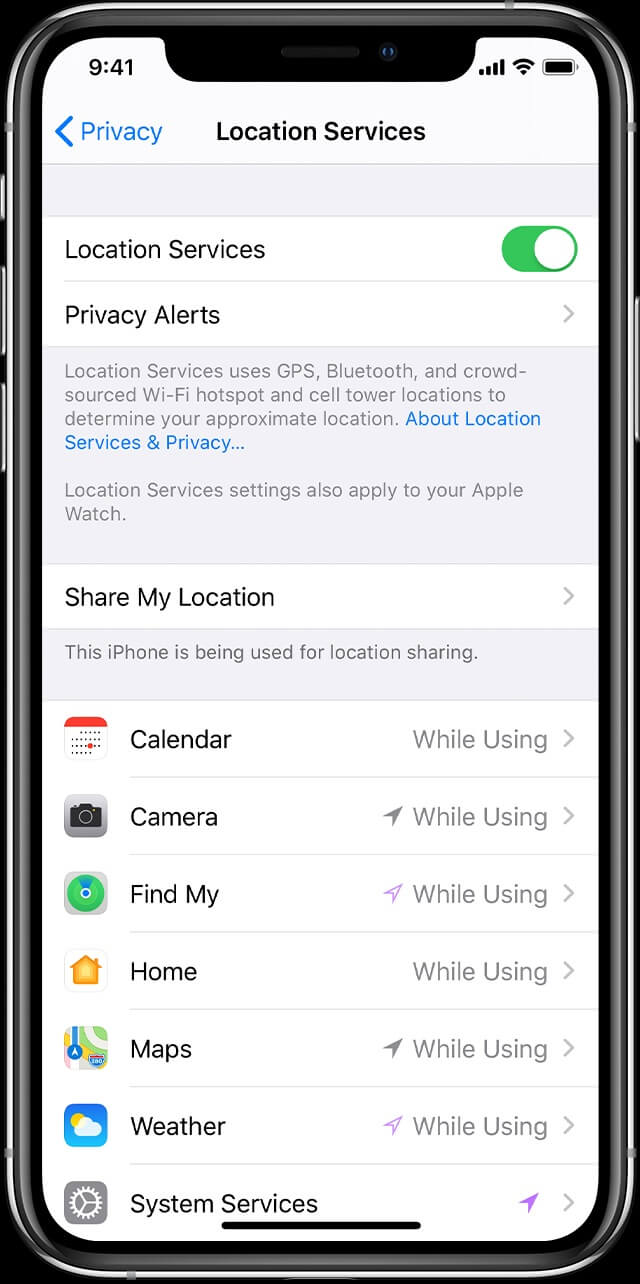
After verifying that the feature is available in your region, enable the GPS & Location Services. In case you’ve already enabled the feature, turn it off, quit the app, and again enable the service. It might fix the location not found on the Find My Friends issue you’ve been facing. Just open Settings > Privacy & Security > Location Services and toggle the bar to turn the feature on or off.
Tip 3: Adjust Lava Yuva 2 Date and Time
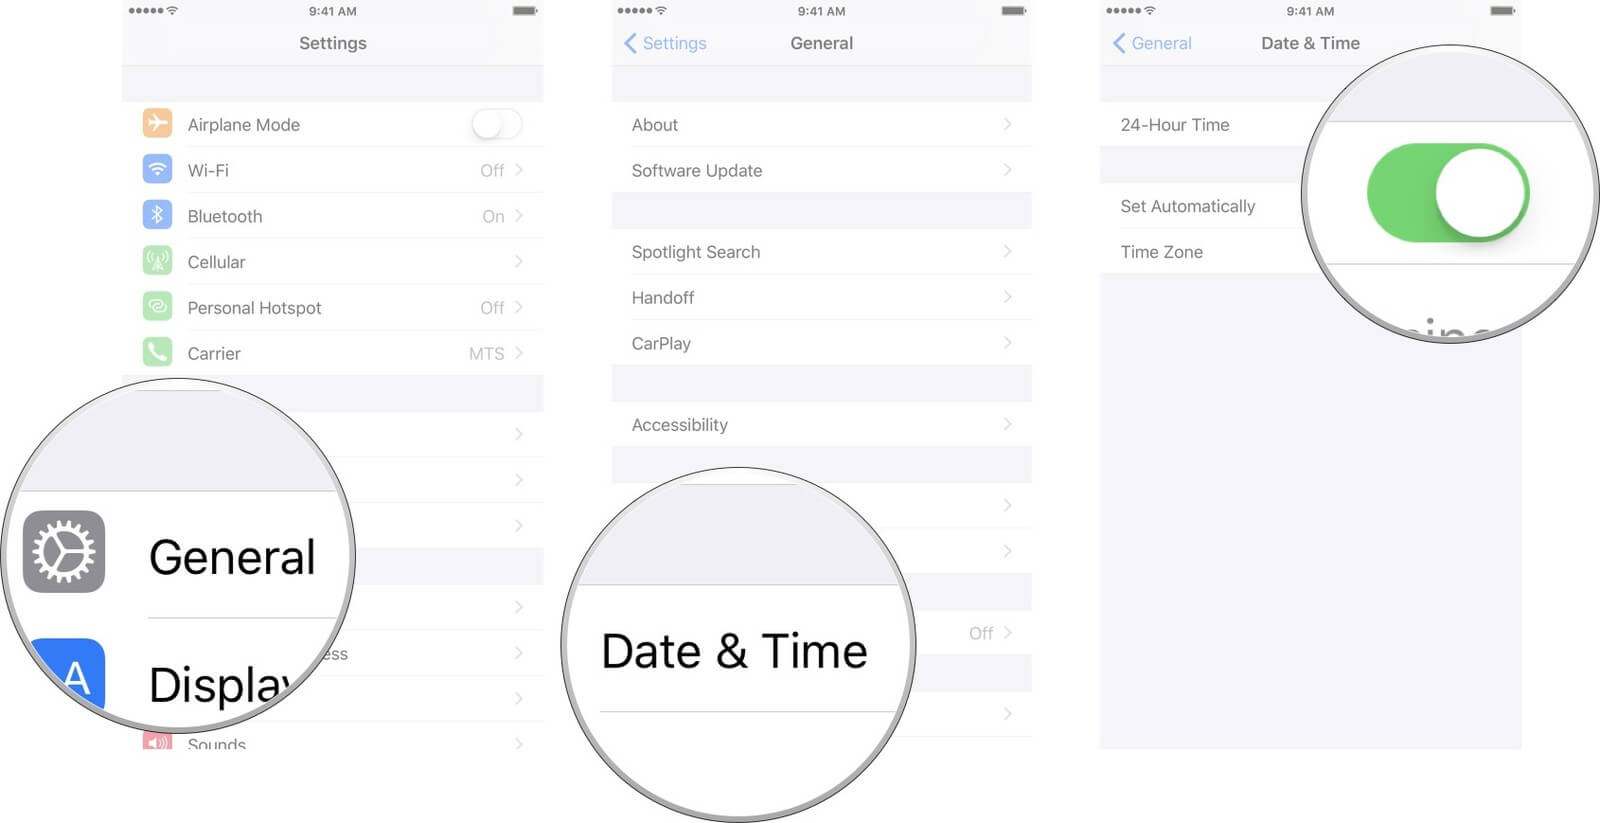
As we stated in the possible reasons, incorrect dates and times also result in this problem. If you have manually set the date and time, change the settings and set it to “Set Automatically” in General Settings. Hopefully, this will resolve the problem when the Find My Friends location is not available.

Tip 4: Check the Internet
Before you conclude that there is something wrong with the Find My Friends app, check your internet connection. There is a chance that location is not available on the Lava Yuva 2 because your device doesn’t have internet access. Try opening Settings > Mobile Data/Wi-Fi and turning it on and off. Alongside, make sure that you have signal strength, whether you are connecting to cellular data or a Wi-Fi network.
Tip 5: Enable Share My Location
Another tip to try out when your friend’s location is not available is to make certain that you’ve enabled Share My Location feature. To do this, follow the steps given below:
Step 1: For Lava Yuva 2 users: get to the “Settings” app and go to “Privacy & Security”. You will find the “Location Services” feature, click on it, and see the “Share My Location” feature.

Toggle on the option to enable it. Once the feature is enabled, your friends will see your location, and you can see theirs.
For Android users, go to “Settings” > “Additional settings” > “Privacy” > “Location”, and choose the location mode to enable it.
Tip 6: Restart the Lava Yuva 2 or Android Phones
The next tip to use when Find My Friends says location not available is restarting your phone. For most devices, the method is common. But for Lava Yuva 2 X and 11, the steps are slightly different. For other Lava Yuva 2 models, press the Power button and wait until the slider appears. For Lava Yuva 2 X and 11/12/13/14, you’ll have to hold the Volume button and the Power button together to make the slider appear on the screen.
Drag the Power slider to the right side and wait for the Lava Yuva 2 device to shut down. Wait for a minute before you restart the Lava Yuva 2 device, and hopefully, the feature will start working again as usual.

Tip 7: Check That Your Friend Has Signed into Find My Friends
Another tip that can help you resolve to Find My Friends location not available is checking that your friend has signed into the app. It is apparent that if your friend hasn’t logged into the feature, you won’t access his/her location.
Open the Find Friends app, log into it, and enable the location-sharing feature.
Tip 8: Quit Find My Friends App and Open It Again
Last but not least valuable tip to use when the Find Friends location is not available is to quit the app. There is a possibility that you’ve faced the problem only because of a momentary issue or some random glitch. Make sure that you also clear the cache memory before opening the app again. It might fix the problem entirely.
Extension: Can I send the fake location by Find Friends to others?
With Dr. Fone - Virtual Location software, you will be able to share a fake or any location you want with your friends and family. Alongside this, Dr. Fone will also pace up your movement to ensure that your friends and family members won’t find out that you share fake locations with them. The video below teaches you how to teleport your Lava Yuva 2 GPS location, and more tips and tricks can be found in the Wondershare Video Community .
Here is a video for you to learn how to fix Lava Yuva 2 Find My Friends location not available:
To use Dr.Fone - Virtual Location, here are the steps you need to follow:
Step 1: Download the virtual location app for both iOS and Android and install it on your system carefully. Then, launch the app and select the “Virtual Location” option from the toolkit.
Step 2: The next step is to set up the phone’s connection. Connect your Lava Yuva 2 and click on the “Get Started” button. Now, detect your current virtual location by clicking on the “Current Virtual Location” icon.
Step 3: Now go to the search box and type the location you want to switch to. Once the location gets detected, click on the “Move Here” option, and the location of your Lava Yuva 2 or Android phone will change to the one you specified.
As you can see, when you have Dr.Fone - Virtual Location software, you can share any location with just one click. And it would seem that your Find My Friends app is working fine.
FAQs You May Want to Know about Lava Yuva 2 Location
1. Is there a way to check if someone has stopped sharing their location with you on their Lava Yuva 2 ?
If someone stops sharing their location with you on their Lava Yuva 2 , you will see “Location Not Available” next to their name in the Find My app or Messages app. You can check the status of location sharing by tapping their name in the Find My app.
2. Can I track a stolen Lava Yuva 2 if it is turned off?
You may still be able to track a stolen Lava Yuva 2 if it is turned off using the Find My app or iCloud website. However, this depends on several factors, such as whether the Lava Yuva 2 device is connected to a Wi-Fi or cellular network, and whether the person who stole the Lava Yuva 2 device has turned off location services.
3. Can I track someone else’s Lava Yuva 2 location without their permission?
No, you cannot track someone else’s Lava Yuva 2 location without their permission. The Find My app only allows you to track the location of devices that are signed in with your Apple ID, and you need the other person’s permission to share their location with you.
4. Can I prevent someone from tracking my location?
Yes, you can take steps to prevent someone from tracking your phone’s location. Here are some measures you can consider:
- Turn off location services or GPS.
- Adjust app permissions.
- Use airplane mode.
- Use a VPN or professional location changer tool like Dr.Fone - Virtual Location to change your phone location .
- Check for spyware.
- Turn off Wi-Fi and Bluetooth.
- Review privacy settings.
- Be cautious with social media.
- Use encrypted messaging.
- Avoid public Wi-Fi.
- Clear location history.
Taking these precautions can help safeguard your phone’s location and enhance your privacy. It’s important to stay vigilant and be aware of the privacy settings and permissions on your device.
Dr.Fone - Virtual Location
1-Click Location Changer for both iOS and Android
- Teleport from one location to another across the world from the comfort of your home.
- With just a few selections on your computer, you can make members of your circle believe you’re anywhere you want.
- Stimulate and imitate movement and set the speed and stops you take along the way.
- Compatible with both iOS and Android systems.
- Work with location-based apps, like Pokemon Go , Snapchat , Instagram , Facebook , etc.
3981454 people have downloaded it
Conclusion
Hopefully, now you know “why is find my friends not working” and several ways to fix the Find Friends location not available. In this guide, we learned all these tips to make it easy for Lava Yuva 2 users to rectify the issues with the Find Friends app. Check all the tips carefully and implement them whenever you face issues like this.

Life360 Circle: Everything You Need to Know On Lava Yuva 2
In order to keep in touch with the persons that matter most to you, you may use circles to create private groups. There are a lot of different situations in which the Circle is useful. Please make sure everything is where it should be. Since Check-Ins, Location Sharing, and Messaging are all exclusive to each Circle, no one who does not need to view a particular piece of information will. You’ve got the upper hand here. You have complete control over who is and isn’t included in your Circle. Privacy is something we take very seriously.
Paying for a Life360 package gives you access to all the Circles. To ensure that everyone in your Circle is able to take advantage of the perks that come with a Life360 Membership, each paid plan for Life360 includes all members in your Circle.
Part 1: What Is Life360 Circle?
Life360 is a family safety service that offers a variety of services. Its primary focus is to enable families to communicate and stay in touch with each other.
For parents who want to monitor their children from a distance, Life360 is a valuable tool. It is a mapping system that allows your family members to know exactly where you or anybody else in the Family Circle, where Life 360 circle is located at any specified instant, regardless of whether they are in your house or elsewhere.
Since the technology was introduced in 2014, we can safely say that it is no longer considered revolutionary. But, aside from that, some people want to know more than simply where they are, such as how fast they’re going when driving.
Part 2: How Life360 Circle Works?
Life360 has been hailed as an essential tool when it comes to parents and careers. With the help of the Life360 Circle function, the mobile application will track your current position in a ring. Those inside that zone may gain insights about where their kid is heading and track any incoming calls or texts from those who may be concerned about their well-being.
As an added feature, the people concerned may determine whether automatic warnings would appear when someone gets to his location without monitoring him further than only displaying where he paused.
The app will notify you as soon as your beloved person comes or departs from a designated place. You may monitor their speed and position as they drive. In addition, the platform makes it simple to give them instructions by just pressing on their image with life360 circle names.
Part 3: What Is The Meaning Of Circle Colors In Life360?
Using the app, you may have observed colorful circles/bubbles. In addition, Life360 tells you about different issues depending on the Circle’s color. The app’s primary colors are purple, orange, and green.
It’s important to know what each color symbolizes before establishing its function. For example, what does the green dot on life360 mean? Members with green rings are more visible. The green dot shows whether driver monitoring is turned on. These also show where everyone in the group is and what they’ve been up to.
The purple Circle shows a Bluetooth-connected gadget. You may check a member’s recent location history using purple dots in the app. For example, to open Day Breakdown, click the purple dots.
The orange Circle denotes a criminal complaint. Instead of a recent crime location, this is a warning that a family member may be in a crime hotspot.
Part 4: What happens when you join a Circle on Life360?
As soon as you’ve set up your Circle, no one else will be on it. Select “Add a New Member” from the drop-down menu at the bottom of the page, and then forward the recipient a text or email with an invitation key. It will provide instructions to help them acquire the app and join your Circle.
After downloading the app, you’ll receive an alert that they have joined your Circle. You’ll be able to monitor their activities from then on.
Part 5: How to Fake Your Circle Location on Life360
Dr.Fone - Virtual Location
1-Click Location Changer for both iOS and Android
- Teleport from one location to another across the world from the comfort of your home.
- With just a few selections on your computer, you can make members of your circle believe you’re anywhere you want.
- Stimulate and imitate movement and set the speed and stops you take along the way.
- Compatible with both iOS and Android systems.
- Work with location-based apps, like Pokemon Go , Snapchat , Instagram , Facebook , etc.
3981454 people have downloaded it
Dr.Fone - Virtual Location is the finest choice for learning how to fool Life360 on iOS (iOS). Changing your iOS location while protecting your privacy is easy with this app.
With simply the push of a button, the Dr.Fone - Virtual Location location switcher software may let you fool others into thinking they are in a different place than you really are. iOS and Android users can get it. A virtual private network (VPN) may also be used for location faking. However, any place will be able to tell whether you’re using a location spoofer since it’s so obvious. That’s why this program has so many special features.
The gadget is entirely safe to use and has a superb record for doing its job well. As a result, you shouldn’t obsess about your performance or your level of achievement. Step-by- Here are the step instructions for faking your location with Dr.Fone – Virtual Location (iOS).
Step 1: Download and install Dr.Fone – Virtual Location on your computer.
Step 2: Now would be an excellent time to take your iPhone and connect it to the pc. Upon successful connection, press the “Get Started” icon.

Step 3: Following that, you’ll see an area map. You’ll be able to know where you are right now if you use this feature. The “Center On” symbol may be found in the bottom right of the screen if the location isn’t appropriately shown.
Step 4: The three life360 symbols at the upper right of the screen are visible. Activating the Teleport Mode requires you to tap on the third icon. Click “Go” when ready to go to your desired location.
Step 5: When you input a new location, the application monitors and assesses it. A new box will immediately emerge at the location where the distance is specified. Choosing “Move Here” will cause your current location to be updated to reflect the new place you’ve picked.
Part 6: How to Delete/Leave a Life360 Circle?
Getting rid of a Circle is a cinch! To begin, you need to:
- Log in as an Admin account and exclude everyone from the Circle.
- After everyone else in the Circle has departed, the person who is now in the center should also exit the Circle.
- It will be removed when nobody remains in the Circle since there is no use in having it otherwise.
Conclusion
Life360 has become one of the most popular applications on the App Store. It’s designed to help people stay connected with friends and family. However, if you’re interested in learning how to fake your location on Life360, we recommend using Dr.Fone - Virtual Location . It’s a more safe and effective way to get around the restrictions that Life360 puts in place.
- Title: In 2024, How to Change Google Play Location On Lava Yuva 2 | Dr.fone
- Author: Vivienne
- Created at : 2024-07-17 06:13:48
- Updated at : 2024-07-18 06:13:48
- Link: https://review-topics.techidaily.com/in-2024-how-to-change-google-play-location-on-lava-yuva-2-drfone-by-drfone-virtual-android/
- License: This work is licensed under CC BY-NC-SA 4.0.