
In 2024, How to Change Google Play Location On Google Pixel 7a | Dr.fone
How to Change Google Play Location On Google Pixel 7a
Google Account has unlimited advantages as it provides quick access to multiple platforms like Google Drive, Google Calendar, and Google Play Store. By accessing these platforms, users can increase their functionality to ease their daily tasks. For example, Google Play Store offers tons of apps and tools in every category that millions of people install on their devices.
However, some featured apps on the Play Store are restricted region-wise, and some users cannot download them. This article will guide you on how to change the country in Play Store to access all the apps.

Part 1: What Should We Know Before Changing Google Account Location?
By changing the country on Google Play Store, you can install some unavailable apps in your region. You can quickly enjoy the applications and services on your phone by simply changing the country’s location. Before knowing how to change location on Google, you should know some essential aspects.
Warnings About Changing your Location
- Often, users are deprived of some services and features apps if they are not available in the newly chosen region.
- Changing the Google Play Store location is easy, but you can only change the settings once a year. This depicts that you can change the location settings of your Google Account after 365 days.
- After changing the country’s location, you won’t be able to utilize the previous Google Play balance of the old country.
- Once you have changed your country’s server location in settings, the Google Play Store takes 48 hours to change the location.

Part 2: How to Change Google Account Location?
This section will offer easy ways to change play store country and location on Google in every circumstance. By doing so, you can easily install restricted applications in your region.
How to Change Location on Google on Android
Situation 1: How to Change Country in Google Play Store on Android
Through your Google Pixel 7as, you can change the location on both Google Play Store and Google Account easily. To know more details about how to change the country in Google Play Store, read the following guidelines:
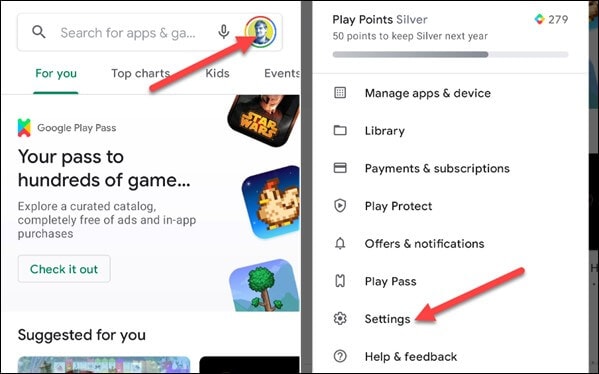
Step 1: Open your Google Play Store from your Google Pixel 7a. Navigate to the profile icon from the corner and select “Settings” from the displayed menu.
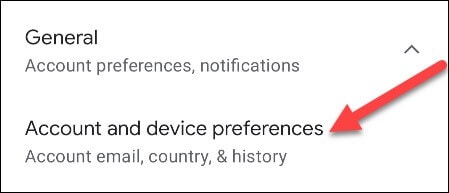
Step 2: Tap on the “General” section to locate the option of “Account and Device Preferences.” Afterward, find the “Country and Profiles” option by scrolling down. From there, you can see your current country location.
Step 3: Now click on “Switch to the Country Play Store” to change the location. For verification, click on “Continue” when a pop-up message appears on your screen asking if you want to change the location.

Step 4: Now, you will be automatically assisted in changing the payment methods of the new country. However, if you don’t come across the option to change the country, either you have already changed the country location within a year or your IP address is not synchronized with your new country.
Situation 2: How to Change Google Account Location on Android
In this particular situation, you don’t have to change the Play Store country; instead, you can only change the Google location on your Google Pixel 7a. We will recommend the VPN Proxy Master Lite , which works effortlessly to change Google‘s location. This tool flawlessly hides your IP address so that you can easily use any country’s location to access all the applications and services. Moreover, it’s highly secured and well-protected so that no virus can harm your Google Pixel 7a.
To use this powerful VPN tool, we have jotted down some basic steps through which you can change the location on your phone easily:
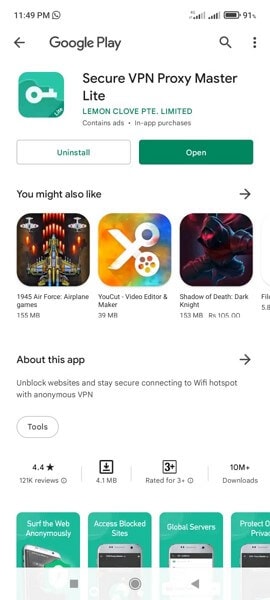
Step 1: Start installing VPN Proxy Master Lite on your Google Pixel 7a from your Google Play Store. Once this app is successfully installed, open this app to proceed.
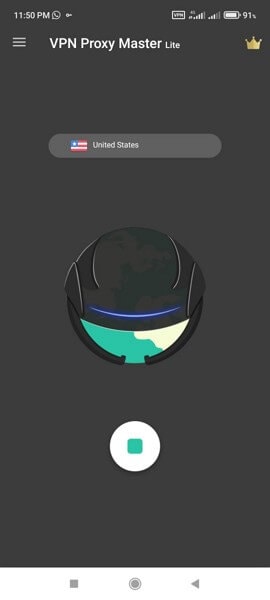
Step 2: After opening this app, tap on the country’s name list displayed above the picture of Earth. Tap on that list to view all the available countries.

Step 3: Select any country from the displayed list by tapping on it. Meanwhile, make sure that your phone is connected to a strong internet connection. This tool will automatically change your Google location by tapping on the country’s name.
How to Change Location on Computer
Situation 1: How to Change Country in Google Play Store on Computer
In this situation, we will help you change the country’s location on your Google Play Store through your computer. Just follow the below-given steps.
Step 1: Start by navigating to your PC’s browser and then open Google Play . Once done, click on the “Settings” displayed on top of your screen.
Step 2: After opening the settings menu, go to “Payments and Profile” and locate the option of “Country/Region.” Proceed by tapping the edit icon next to it.
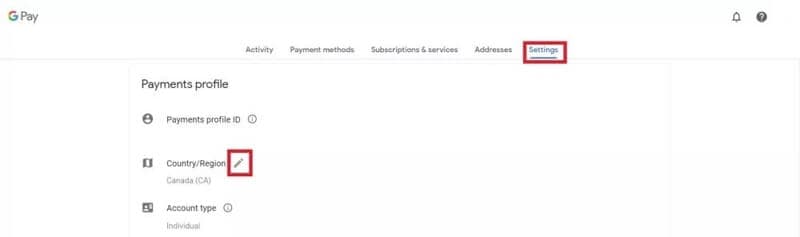
Step 3: To connect with the new country’s location, tap on the option “Create a new profile.” Afterward, you can see the on-screen instructions on your computer, so follow them to complete the process. Once done, Google Play will change the location after 48 hours, and you can search for the applications you want to install.

Situation 2: How to Change Google Account Location on Computer
If you want to change Google location on your computer without changing country on Google Play Store, use ExpressVPN by downloading it. This tool is a well-trusted platform and offers an instant way to change Google location easily. In addition, you can rely on its platform to connect with more than 94 countries worldwide by changing the location anytime you want.
Moreover, the process is fast and fully secured to protect your computer from unwanted bugs. To change the location using ExpressVPN, the steps are:
Step 1: Begin launching ExpressVPN on your computer and open its interface. Once done, turn on the VPN button and tap on the “Location Bar” to change the location.
Step 2: You can explore regions by either navigating to the “Recommended” or “All Locations” tab. Select the location you want to change with from the displayed list.
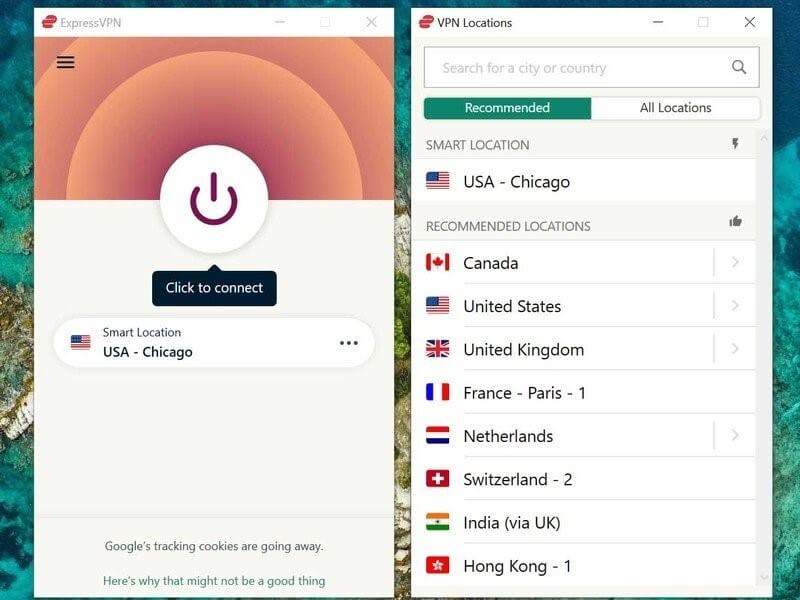
Step 3: After clicking on any country’s location, your computer’s Google Account location will be automatically changed.
Part 3: The Most Effective Way to Fake Location on iOS and Android
We have mentioned methods to change Play Store country manually and through VPN, but they still have a few limitations. Once you change the country’s location on Google Play manually, the Play Store requires 48 hours to accept this modification. Moreover, you can only change the country’s server location once a year. With VPN, many country servers are unreachable, and some servers can be reached only through a paid version. This makes the process expensive and time taking.
To avoid these hurdles and chaos, we recommend you to use Dr.Fone – Virtual Location to fake your location on both Android and iOS devices. This tool works in every situation and allows users to travel the globe through their phones free of cost. You can also travel with an exact GPS location just with a single click. Hence, this tool will work amazingly in faking your location without requiring you to change Google Play country’s location.
Dr.Fone - Virtual Location
1-Click Location Changer for both iOS and Android
- Teleport from one location to another across the world from the comfort of your home.
- Fake location on your phone with a few clicks.
- Support most mainstreaming apps and geo-based games, including Pokemon Go, Snapchat, Tinder, and so on.
- Compatible with both iOS and Android systems.
3981454 people have downloaded it
To change country Google Play using Dr.Fone - Virtual Location, here are the steps:
Step 1: Choose Virtual Location Feature
Begin with launching the tool of Dr.Fone on your computer. Open its interface and tap on the “Virtual Location” option from the home page.

Step 2: Connect your Phone
Now connect your smartphone to the phone with the help of a USB cable. Once done, click on “Get Started” to proceed further.

Step 3: Find your Current Location
After connecting your phone, you will be able to see your current location on the new window. If not, tap on the “Center On” icon displayed on the right side to find your current location.

Step 4: Enable Teleport Mode
Tap on the first icon displayed on the top right to enable the teleport mode. Now enter the location you want to navigate the search box and click on “Go” to continue.

Step 5: Change Location
A notification will pop up for confirmation once you have entered a new location. Tap on “Move here” to proceed. Once done, your new location will be set on your smartphone automatically. Now head back to Google Play Store and search for the applications you want to access.

 safe & secure
Conclusion
There are plenty of ways to execute Google One change location across various platforms to execute Google One change location. For example, people usually change Play Store country to access restricted applications in their region. This article will offer a detailed guide for changing Google location through manual and VPN means. However, to avoid any hassle, we recommend Dr.Fone - Virtual Location to change the location of your smartphone and Google Play instantly and conveniently.
How to Use Life360 on Windows PC For Google Pixel 7a?
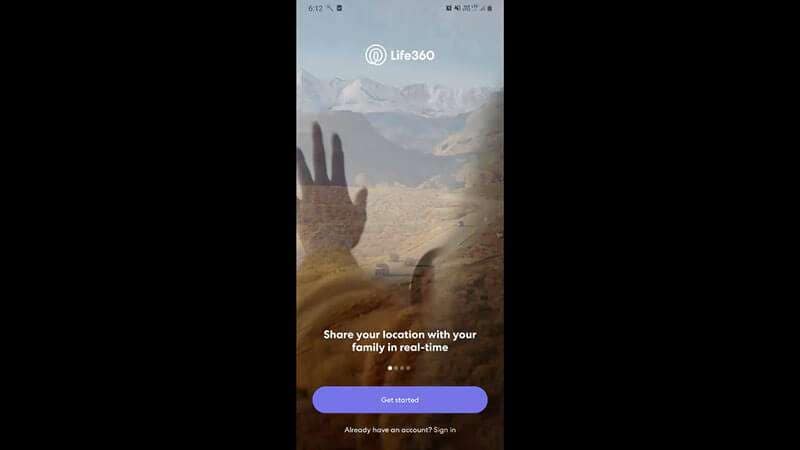
Life360 is an online platform that utilizes geo-location services to help users share their real-time location with friends and family. The app allows people to create a family group and stay connected to each other through features like chatting, sharing location, sending safety alerts, etc.
As of now, you cannot run Life360 on computer as it is only available for Android and iOS. Why? Because as opposed to a PC, one can easily carry their device everywhere! It means whether your kid is stuck in traffic and needs your help or your parents have lost their way back home, Life360 will instantly send you an alert on your device.
However, that doesn’t mean you cannot use Life360 on a PC. While it may seem a bit odd, there are a couple of methods that’ll allow you to get the Life360 app for Windows. In today’s guide, we are going to share some of these methods that’ll help you run the Life360 app on Windows.
So, without wasting another second, let’s dive straight into the guide.

Part 1: Why people seek to use Life360 on PC?
First things first; why would anyone want to use a family locator app like Life360 on their PC? Well, the truth is everyone has their own reason to get Life360 for PC. For instance, let’s say you are in the middle of an important project and don’t want to be bothered by alerts on your smartphone. However, you still don’t want to compromise with the safety of your family members.
In this situation, you can simply run the Life360 app on PC. This will allow you to directly keep track of the whereabouts of family members on your Windows system and you won’t have to constantly check your phone.
Life360 can also be used on a computer when your phone’s battery has completely drained and there’s no power outlet nearby. In this case, you can simply power-on your laptop, start the Life360 app and send your current whereabouts to family members.
Part 2: Is it possible to use Life360 on Windows PC?
Life360 is an extremely useful app for people who are always concerned about their closed ones. The app is basically designed with a vision to keep family members connected and safe. In addition to location sharing, the app also provides exclusive features like crash detection, place alerts, speed alerts, battery monitoring, etc.
The app also makes it easier for parents to monitor their child’s movement. Using the app, you can always know that your kids have safely reached school and back home. For any parent, knowing whether the kids are safe, is one less thing to worry about.
However, as we mentioned earlier, Life360 hasn’t been released for Windows yet. So, there’s no direct way to install and run the app on a Windows PC. While Life360 may release a dedicated Windows software in the future, as of now, you can only run it using the alternative methods.
These methods include:
Part 3: Use Life360 on Windows PC with Android emulator
The first and the most convenient way to run Life360 on computer is to use an Android Emulator. An emulator is basically a software that creates a virtual Android system on your computer. As a result, you’ll be able to run Android apps on your computer.
While there are dozens of Android emulators, Bluestacks seems to be the most popular and user-friendly option among all. Unlike other emulators, Bluestacks is easy to set up and use.
Here’s how you can run Life360 on a computer using Bluestacks Android emulator./
Step 1: Head over to Bluestacks official website and tap the download button.
Step 2: Open the installer and tap the “download” button. This will initiate the download process on your System.
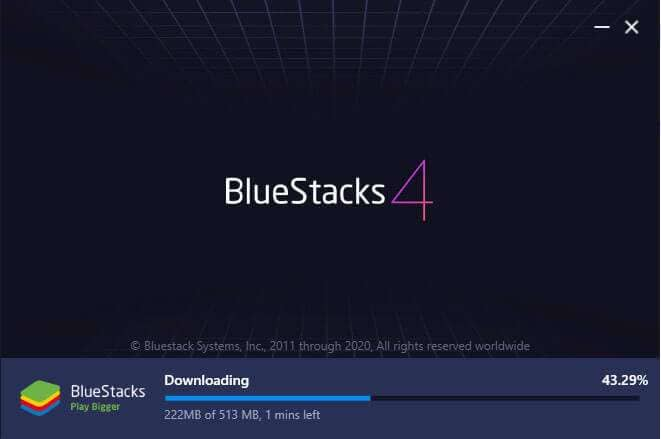
Step 3: Once the installation process completes, Bluestacks will start to boot. Keep in mind that the first boot may take some time, depending on your system configurations.

Step 4: In the home screen, tap the “Google Play Store” icon. You’ll be asked to sign-in with your Google account. Enter the right credentials and log-in to the Google Play Store.

Step 5: In the top search bar, type-in Life360 and tap the “install” button to download the app.

Step 6: Life360 is now installed on your computer. Open the app and enter your login details. You’ll now be able to run Life360 on your PC.

Part 4: Use Life360 by mirroring Android to Windows PC
While running an emulator is a great way to get Life360 on PC, it has its own set of challenges. For instance, running an Android emulator is not easy when you have a low-configuration PC. Emulators like Bluestacks requires high system configuration otherwise they take forever to load.
In this situation, we have another alternative for you to run Life360 on PC. You can simply mirror your Android to your Windows system. Mirroring the Android device will allow you to see its content on the PC itself.
Here’s how you can mirror the Android device on your PC.
Step 1: Make sure that Bluetooth is activated on both devices.
Step 2: On your Windows PC, open “Settings” and select the “Systems” tab.

Step 3: Choose the “Projecting to this PC” option in the left menu-bar and make sure that “Available Everywhere” is selected.

Step 4: If you’re running Android Pie or above on your device, scroll down to open notification drawer and select “Smart View” (or “Cast” in some devices). You’ll see your PC listed here. Tap the button to start Android mirroring.

Step 5: It may take some while for the connection to establish. Once it does, you’ll be able to cast your device screen onto your computer and you’ll be able to run life360 on your system.
Keep in mind that you’ll still require your device to navigate through the content on your computer. Any action that you perform on your device will be replicated on your computer screen as well.

Final Verdict
Life360 is probably among the top family locators for Android users. Apart from its extensive range of features, the app provides a user-friendly interface, which allows it easier for even elders to use the app without any issues. Even though there isn’t a dedicated Life360 software for Windows, you can follow the above-mentioned methods to run the Life360 on PC.
You Might Also Like
Location-based apps
GPS spoof for dating apps
GPS spoof for social apps
Pokemon Go on PC
AR game tricks

Change Phone GPS Location Easily
- ● Teleport GPS location to anywhere
- ● Play AR games without moving
- ● Spoof Location on the popular Apps
3 Ways to Change Location on Facebook Marketplace for Google Pixel 7a
Facebook Marketplace is a hub designed within Facebook that enables Facebook users to buy and sell stuff online. This marketplace has optimized the chances of buying and selling legit stuff, including household appliances, clothes, and electronic devices. You must enter the pictures of that product and write a good description.
All the potential buyers from the nearest locations will access it. Moreover, you can look up stuff on the marketplace and order your favorite product with just simple clicks. It is also possible if you want to change the location of marketplace listings to attract buyers and sellers of your nearby areas.
The following discussed points in the article will teach you how to change location on the Facebook marketplace:
Part 1: How to Change Location on the Facebook Marketplace on iOS and Android Devices
The Facebook Marketplace is a feature that finishes the gap between social media and digital marketplaces. With this helpful feature, you can now buy and sell items on your Facebook account to other Facebook users. In addition, you can filter the listings and see the buyers from a specific location by changing to a location.
Here, we will teach you the steps involved in changing the FB Marketplace location on your Android and iOS devices:
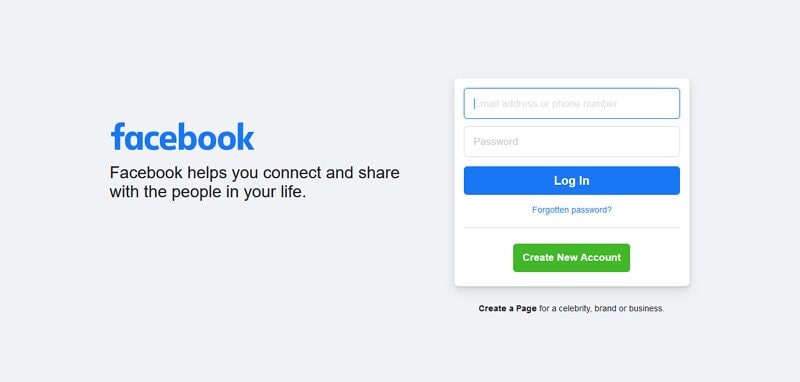
Step 1: The first step requires you to open the Facebook app on your Google Pixel 7a or iPhone. Login to your Facebook account to initiate the procedure.

Step 2: If you have an Android device, you will see a hamburger icon situated at the top-right corner. You have to click on it to access the Facebook menu. Or, if you have an iPhone, click on the three dots on the bottom side of the application.

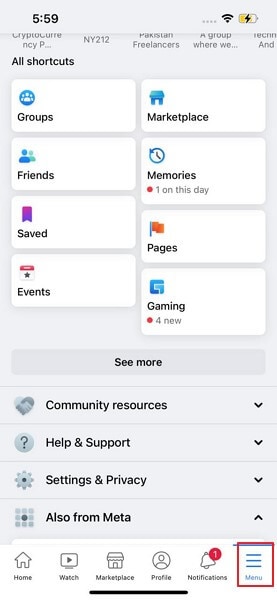
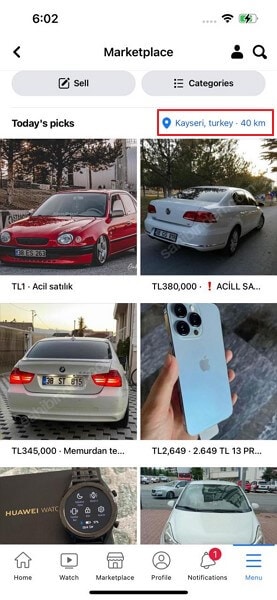
Step 3; After doing the prior step, you will now access the “Facebook Marketplace” feature. Your current location will be written in blue on the upper-right side of the existing Marketplace listings. You should click it to change your Marketplace location.

Step 4: Use the “Search Bar’ at the top of the screen to search and select the new location. After entering the target place, tap on the “Apply” button. You can also adjust the distance slider below “Custom radius” to change the location.

Step 5: Now, the Facebook Marketplace will refresh. You will now be able to see new listings for the selected location.
Part 2: How to Change Facebook Marketplace Location on Facebook Website
If you are using Facebook from a browser, it is also achievable to change the location and control the listings yourself. To perform this process on a browser, follow the given steps and achieve the Facebook marketplace change location:
Step 1: Access Facebook through the browser of your choice and sign in to your Facebook account.
Step 2: There will be a “Marketplace” icon; click on it. Now, the current location will be displayed on the screen. You have to tap on your current location to fake the location of your marketplace.

Step 3: Enter the desired location and hit the “Apply” button. The listing search radius can also be changed with the help of the dropdown button.

Step 4: Facebook marketplace will be refreshed, and your new listings for the selected location will be visible.

Part 3: Facebook Marketplace Location Won’t Change? One-Click to Solve It
Dr.Fone – Virtual Location is an application that allows users to change their device location virtually. You can quickly teleport the GPS location to places of your choice. It is now super-easy and secure to virtually change your current location, bypass all the restrictions, and filter the listings on your Facebook marketplace.
What Makes Dr.Fone – Virtual Location the Best Solution?
The application holds a wide range of uses and characteristics, so it is considered the best way to change location. The following key points are mentioned why it is the best location changing solution available:
Dr.Fone - Virtual Location
1-Click Location Changer for both iOS and Android
- Teleport from one place to another across the world from the comfort of your home.
- With just a few selections on your computer, you can change the location on your Facebook marketplace.
- Stimulate and imitate movement and set the speed and stops you take along the way.
- Compatible with both iOS and Android systems.
- Work with location-based apps, like Pokemon Go , Snapchat , Instagram , Facebook , etc.
3981454 people have downloaded it
Simple Steps to Fake your Location on Facebook Marketplace
The following step guide will assist you in changing the location of the marketplace listing to get targeted buyers or sellers for the Facebook marketplace:
Step 1: Install the Program
The first step requires downloading Dr.Fone- Virtual Location (iOS/Android). Now, install it and launch the software on your PC.
Step 2: Connect your Phone
Click on “Virtual Location” from the available options and connect your phone to the computer with a USB cable. IPhone users, once connected, can link the software with Wi-Fi without any USB cable. Now, press the “Get Started” button.
Step 3: Provide your Desired Location
Now, activate the “Teleport Mode” by clicking the first icon on the upper-right side. Next, enter the target place you want to teleport to and click on the “Go” button.
Step 4: Change your Location
Now, click on “Move Here” in the popup box, and your location will be changed. Your Android or iOS device location will be shifted to the added location now. Then, you can open Facebook and see the buyers and sellers of the given location in the Marketplace.
Part 4: FAQs about Facebook Marketplace
- What are the extra services for me after changing my location on Facebook Marketplace?
There are no extra services given on the Facebook Marketplace after changing the location. You will be able to access the audience of the selected location.
- Is it secure if I give my address on the Facebook marketplace?
You must not offer your full name and your contact details. Meet in a safe and public place such as a park, restaurant, shopping mall, or police station. However, you still should not give your details to the buyer.
- Why is my Facebook marketplace displaying the wrong address?
You might have used a VPN service in the past, which affected your actual address on the Facebook Marketplace. Don’t worry, as you can change the current location with a mere click.
- How to change the Facebook marketplace plan?
There is no plan required to use the Facebook Marketplace. This feature is entirely free for all Facebook users.
- How to maximize sales on the Facebook marketplace?
There are various methods to attract more buyers to you. First, try to optimize the Facebook listing by adding more keywords in the description and title. Also, write a longer description and explain more details about the item. You can also hire a photographer who will take good pictures of your product.
Conclusion
The article concludes with how to change location on the Facebook Marketplace to perceive buyers and sellers of your nearby areas. This way, you will be able to meet the buyer or seller yourself and discuss the product peacefully. With Dr.Fone - Virtual Location , you can change the location of the marketplace listing and teleport to a place you want to sell/buy in.
safe & secure
- Title: In 2024, How to Change Google Play Location On Google Pixel 7a | Dr.fone
- Author: Vivienne
- Created at : 2024-07-17 06:12:06
- Updated at : 2024-07-18 06:12:06
- Link: https://review-topics.techidaily.com/in-2024-how-to-change-google-play-location-on-google-pixel-7a-drfone-by-drfone-virtual-android/
- License: This work is licensed under CC BY-NC-SA 4.0.