
How to Wipe iPhone 12 Data Permanently? | Stellar
How to Wipe iPhone Data Permanently?
Summary: Do you want to erase everything on your iPhone? But fear that it could be recovered. Learn about the best tool that wipes iPhone data permanently and makes it unrecoverable by any recovery software.


Your iPhone is a trove of personal data — photos, videos, passwords, ID proofs, bank details, chats, messages, contacts, and a lot more— which, naturally, you don’t want to fall into other hands. That’s why you prefer to delete all the information on your iPhone before selling it to others.
But several iPhone recovery software can easily restore deleted data from an old or discarded iPhone. So there’s always a fear that someone could recover your iPhone’s data and misuse it.
Here’s a solution — permanently wipe iPhone data beyond the scope of recovery by any software.
How do you permanently erase data from your iPhone?
Manual deletion is one of the ways to remove data. But it can be easily recovered by iPhone features like restoring ‘Recently Deleted’ or recovery software.
Then, Apple suggests resetting the content and settings of the iOS device. It’s effective as the deleted data is not accessible directly on your iPhone. But this also does not completely erase your data from iPhone storage.
So to wipe iPhones permanently, specialized erasure software should be used. The iPhone data erasure tool destroys all information on your storage by overwriting, thus rendering it unrecoverable.
Methods to erase everything on iPhone
- Reset content and settings on iPhone (data gets inaccessible but recoverable)
- Use iPhone data erasure software – Stellar Toolkit for iPhone (permanently wipes iPhone’s data, unrecoverable)
Method 1: Reset content and settings on iPhone
Apple provides a factory reset feature in iPhone with the ‘Erase All Content and Settings’ option. This method lets you bring your device to default settings by erasing iPhone data.
Apple’s factory reset will delete all settings, passcodes, photos, videos, notes, contacts, call history, messages, search history, app history, and other data on your iPhone.
However, erasing your iPhone with the ‘Erase All Content and Settings’ option does not delete your data permanently. All the personal data on iPhone is still recoverable with the help of advanced iPhone data recovery software.
Steps to Factory Reset iPhone:
- Open Settings on your iPhone.
- Tap and follow General > Reset.
- Tap on Erase All Content and Settings.
- A dialog box appears; click Erase Now.
- Enter your Passcode and your Apple ID password when prompted. This will wipe iPhone completely and turn off the device.
Now your device is ready to use as new without any personal photos, videos, or other information.
Note: Back up your iPhone data on iCloud or iTunes before performing a factory reset. Even when you want to sell the iPhone, the old data remains in iCloud and iTunes. And you can access it anytime on your computer or new iPhone.
Method 2: Erase data permanently using Stellar Toolkit for iPhone
When you want to delete iPhone data permanently beyond the scope of any recovery software, use an iPhone erasure tool – Stellar Toolkit for iPhone.
The factory reset option by Apple does leave a chance of iPhone data recovery by using the software. But, Stellar Toolkit for iPhone software permanently resets iPhone. The software erases iPhone data from the storage drive by overwriting and setting it to the original default settings. The software leaves no possibility of recovering data by any means.
You can quickly remove iPhone’s settings, photos, videos, audio, music, contacts, messages, chats, installed apps, call history, reminders, search history, and other data.
The software works with all iPhones and iPads. It can wipe off data from iPhone 15, 14, 14 Pro, 14 Pro Max, 13, 13 Pro, 13 Pro Max, 12, 12 Pro, 12 Pro Max, 11 Pro, 11, XS MAX, XS, XR, X, 8, 7, 7s, 6s, 6 Plus, 6, 5s, 5c, 5, 4s, and 4. It supports iOS 6.0 and up to iOS 16.x.
Stellar iPhone erasure lets you completely wipe data from an unlimited number of iPhones with the software.
Additionally, the Toolkit can also recover lost, or deleted data from iPhone, iCloud, and iTunes in various data lost cases such as water-damaged iPhones , broken iPhones , stuck at Apple logos , and so on.
Key benefits
- Wipes complete iPhone data permanently
- Erases data from multiple unique iPhones
- Easy-to-use
- Compatible with all iPhones and iPads
![]()
Steps to erase iPhone data permanently with software:
Step 1: Download and run Stellar Toolkit for iPhone on your computer.
Step 2: Select Erase Data.

Step 3: Erase the iPhone Data screen appears. Click Next.

Step 4: Plug your iPhone into the computer when prompted.

Step 5: Click Erase.
Step 6: An Erase Process dialog box appears. Select Yes to start the erasing process on iPhone. Next, you can view the process progress bar.

Step 7: Once the process finishes, the ‘Data Erase Completes’ message box appears. Click OK.
Your iPhone is now reset as new without any personal information, passwords, or settings.
When should you erase iPhone data with software?
Your data is sensitive and can be easily exploited by someone. So before giving away your iOS device to its next owner, it is better to wipe it off completely so that no one can recover it.
You can use iPhone erasure software when you are-
- Selling an old iPhone
- Exchanging an old iPhone with a new one
- Donating an iPhone to someone
- Fixing technical malfunctions in your iPhone
Final Words
Stellar Toolkit for iPhone comes to the rescue when you want to be sure about your iPhone data privacy.
If you have to use your iOS device as new, give it away, donate, or resell, you must use the erasure software to wipe iPhone data permanently. It’s 100% secure and easy to use.
![]()
A free trial is available for Stellar Toolkit for iPhone; you may try it yourself.
How to Reset iPhone without Losing Data?
Summary: Sometimes, resetting an iPhone is essential to fix minor issues like iPhone crashing, freezing, or getting stuck at the Apple logo. But the iPhone reset process can delete important data and settings on your device. Read this post to learn smart ways to reset your iPhone without data loss. Moreover, you can also download this quick tool to reset your iPhone without losing data.


“Yesterday, my iPhone stopped working suddenly. I have been trying multiple ways to fix it since then; even tried the force reboot method. Should I simply reset my iPhone? How do I do it without losing my device data?”
Resetting an iPhone can sometimes become a necessity, whether due to sudden freezing up of your device, software glitches, or slow performance. Often, when your iPhone gets stuck on the Apple logo or suddenly crashes, you can reset your iPhone to fix this minor issue.
A factory reset is also necessary if you want to sell your iPhone and want to start fresh. When resetting your iPhone, it will become an empty slate with no pictures, contacts, videos, downloaded applications, playlists, or anything else. An iPhone reset restores your iPhone to its initial configuration and original factory settings.
However, be careful with this method as resetting your iPhone deletes all files & settings on the device. For those looking to reset iPhone without losing their precious data, this blog is the answer. Let’s read on to find some simple ways to do so while keeping our data intact.
How to reset your iPhone without Losing Data?
Before starting, it’s crucial to back up your iPhone data to avoid losing important files and folders. You can back up your iPhone using iCloud, iTunes, or Finder on Mac or PC.
Next, follow the step-by-step instructions on resetting an iPhone using iPhone Settings, iPhone erasure software, and iTunes.
Method 1: Reset iPhone Without Losing Data via Settings
To reset iPhone without losing data, you need to use the ‘Reset’ feature in your iPhone. This feature has different options on how you would like to reset- whether through the ‘Reset All Settings’ or the ‘Reset Network Settings’ option.
The Reset All Settings option will remove or reset privacy settings, keyword dictionary, location settings, etc., to default. At the same time, Reset Network Settings will remove previously used networks and VPN settings. Resetting the Network Settings will turn off the cellular data roaming and remove previously used Wi-Fi settings of your iPhone.
Moreover, no data or media is deleted from iPhone when choosing the Reset All Settings or Reset Network Settings option.
Steps to Reset iPhone Using the ‘Reset All Settings’ option
- On the iPhone, navigate to Settings > General.
- Tap on Transfer or Reset iPhone.
- Click Reset options.

- Next, click the Reset All Settings option.
- Then enter the iPhone passcode.
- Now, click Reset All Settings. This process will take a couple of minutes to reset the privacy settings, keyword dictionary, location settings to default, but will keep the rest of your data fully secure.
Method 2: Reset iPhone via Stellar Toolkit for iPhone Tool
Sometimes, the ‘Reset All Settings’ option doesn’t solve your iPhone issue. In such a case, try resetting the iPhone with the help of trusted software. Stellar Toolkit for iPhone is a secure and professional tool that can help you reset your iPhone to fix various iOS issues without losing data.
Also, you can also use Stellar Toolkit for iPhone to fix iOS related issues like- iPhone crashing, stuck at the Apple logo, etc.
This tool’s ‘Repair iPhone’ feature will first download the fresh copy of the iOS version present in your device from the official website. Then it will install the freshly downloaded iOS version on your iPhone after removing the existing one from your device. The software will reset your iPhone, making it seem new without removing or deleting your data.
Stellar Toolkit for iPhone is compatible with the latest iPhone 14, 13, 12, and below series and even all iPad versions, such as iPad Air, iPad Mini, and others.


Step-by-Step: How to reset iPhone with Stellar Toolkit for iPhone:
Step 1: Download Stellar Toolkit for iPhone on your Mac or Windows PC and connect your iPhone to the system using a USB cable.
Step 2: Select Repair iPhone module from the launch screen of the software.

Step 3: On the Repair iPhone screen, click the Next button.


Step 4: Click on the iPhone icon.
Step 5: Click the Download button to download the latest iOS or iPadOS version of the firmware file. If you have already downloaded the firmware before, select Import.

Step 6: After downloading the firmware file, click the Repair button to start repairing.

Step 7: Once you receive the message —The repairing process of the selected iOS device is completed, click OK.

Restart your iPhone to see if the iOS issues are resolved.
Method 3: Reset iPhone Without Losing Data via Recovery Mode
To reset your iPhone, you can use iTunes or Finder app. You need to use Mac or Windows PC to access the recovery mode of your iPhone and reset the device. This method will erase all your device data, so take a backup of your iPhone before proceeding.
Steps to reset iPhone via Recovery
- Open iTunes on your Mac or Windows system.
- Connect your iPhone to the computer and then put your iPhone into Recovery Mode .
- Once your device has entered the Recovery Mode, a message ‘you’re in Recovery Mode’ will pop up. Click OK.

- Click on your iPhone when it appears in iTunes, then click Summary.
- Now, select the “Restore iPhone” option on the right pane.

- Click Restore to confirm. It might take a while for your iPhone to reset; don’t disconnect your device from the computer until the reset process is completed.

- Once the restore process is complete, set up your iPhone as new or restore it from a backup.
Conclusion
You can factory reset your iPhone without fearing data loss by trying different methods mentioned in this blog. Reset All Settings/ Reset Network Settings feature of iPhone can reset your device; however, it may not always work. You can even use iTunes to reset your iPhone, but you will lose all your device data.
Or use the ‘Repair iPhone’ feature of Stellar Toolkit for iPhone software to permanently reset your iPhone without losing data. This tool can repair iOS issues like iPhone crashing, Black Screen of Death, and iPhone stuck at the Apple logo.
Download the free trial version to evaluate the features of the software.
FAQs
How to remotely erase iPhone data?
If your iPhone is lost or stolen, you can protect your iPhone data from misuse by remotely erasing its data using the iCloud website.
How to restore or set up your iPhone after reset?
Use an iCloud backup to restore your iPhone after a factory reset.
Why Stellar Data Recovery for iPhone takes time in scanning my iPhone?
Stellar Data Recovery for iPhone thoroughly scans your iOS device, computer, and iCloud to retrieve every bit of data. However, the scanning time of the software depends upon the following:
- The amount of data in your iOS device: Greater the amount of data on your iPhone more time it will take to scan.
- The size of RAM on your iPhone: Greater the RAM more will be the scanning time. For instance, the software will take more time to thoroughly scan an iPhone 12 with 6GB RAM compared to iPhone 11 that has 4GB RAM.
- RAM of your computer: The recommended system requirement of Stellar Data Recovery for iPhone is 8GB. Although it can scan and recover from 4GB RAM computer, but you may experience slow speed.
Apple will delete your photos in July. Here’s what you should do
Apple has recently announced that it will permanently delete photos from its users’ ‘My Photo Stream’ this month. This news has come as a surprise to the Apple community, as users struggle to understand the implications of this announcement and what necessary precautions can be taken. In this blog post, we will get into the details of this new move by Apple, explore the reasons behind it, and provide tips on how iPhone/iPad/Mac users can safeguard their precious photos.
The Announcement
_”_My Photo Stream is scheduled to be shut down on July 26, 2023. As part of this transition, new photo uploads to My Photo Stream from your devices will stop one month before, on June 26, 2023.
The photos in My Photo Stream are already stored on at least one of your devices, so as long as you have the device with your originals, you won’t lose any photos as part of this process. If a photo you want isn’t already in your Library on a particular iPhone, iPad, or Mac, make sure that you save it to your Library on that device…” Read more
What is Apple’s My Photo Stream?
My Photo Stream, launched in 2011, was designed to sync photos across multiple Apple devices such as iPhone, iPad, or Mac.
This feature automatically stores your most recent pictures (up to 1000) for approx. 30 days so you can view and download them easily from other Apple devices. After this period, photos are removed from My Photo Stream but remain in your device’s Photos app. However, this only shows photos and not your live images or videos.
How to Protect Your ‘My Photo Stream’ Pictures?
Apple, known for its commitment to user privacy and data security, has recommended several preventive measures to mitigate the risk of losing any important photo due to this update.
1. Move My Photo Stream images to your Library
Even if the pictures in My Photo Stream are already there on at least one of your Apple devices, you must save these pictures to your Photo Library to avoid losing them**.** Here’s how to copy My Photo Stream pictures to your Photo Library:
On your iPhone, iPad, or iPod Touch:
- Open the Photos app and tap Albums.
- Tap on My Photo Stream > Select.
- Select all the photos you want to save, then tap the Share button > Save Image.
On your Mac:
- Open the Photos app and then open the My Photo Stream
- Select the photos you want to save which aren’t currently in your photo library.
- Drag and drop them from the My Photo Stream album into your Library.
2. Move to iCloud Photos
To preserve your My Photo Stream images in their original and high-resolution version, you can transfer them to iCloud Photos.
If you already have an iCloud account, just enable iCloud Photos to automatically upload & sync every photo and video you capture on the device, making them accessible from anywhere.
To use the iCloud Photos service, you will require the following:
- iPhone running iOS 8.3 or later version.
- iPad with iPadOS 8.3 or later version.
- Mac running OS X Yosemite or later version.
How to set up iCloud Photos on your iPhone, iPad, or iPod touch?
- On your iPhone, iPad, or iPod touch, go to Settings.
- Next, click on [Your Name] > iCloud.
- Tap on Photos and do the following:
For iOS 16, iPadOS 16, or later versions: Toggle on the ‘Sync this [device]‘ option.
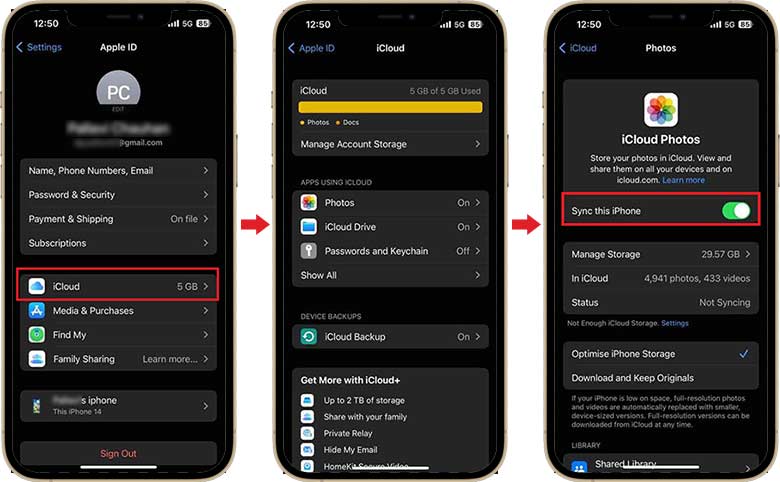
For iOS 15, iPadOS 15, or earlier versions: Turn on the iCloud Photos
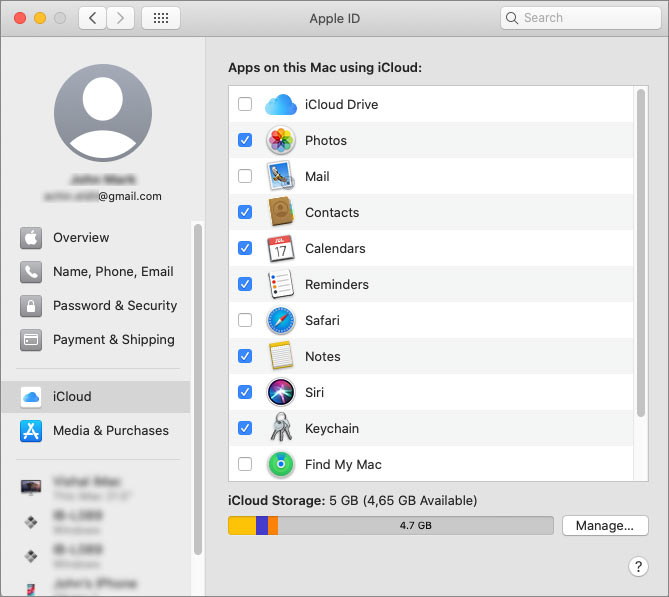
How to set up iCloud Photos on your Mac?
- On your Mac, go to Apple Menu and click on System Preferences.
- Click Apple ID and then select iCloud in the sidebar.
- Now, select Photos and turn on the switch next to Sync this Mac.
**
**
Don’t want to use iCloud Photos?
While iCloud Photos is a convenient option for many Apple users, it’s important to acknowledge that it is not the best fit for everyone. Limited free storage of 5GB or lack of cross-platform compatibility can compel Apple users to look for other alternatives.
Storage options, such as Google Photos, Microsoft OneDrive, Dropbox, external hard drives, etc., are available to ensure your iPhone Photos are safe and easily accessible.
The Bottom Line
Apple’s announcement of the potential discontinuation of My Photo Stream has understandably caused worry among its users. While a specific reason for this action remains undisclosed, they are actively addressing the issue to prevent data loss. In the meantime, iPhone users must take precautionary measures to safeguard their photos. They can simply move the My Photo Stream images to the Photo Library, iCloud Photos, or other backup folders.
- Title: How to Wipe iPhone 12 Data Permanently? | Stellar
- Author: Vivienne
- Created at : 2024-07-17 03:47:07
- Updated at : 2024-07-18 03:47:07
- Link: https://review-topics.techidaily.com/how-to-wipe-iphone-12-data-permanently-stellar-by-stellar-data-recovery-ios-iphone-data-recovery/
- License: This work is licensed under CC BY-NC-SA 4.0.