
How To Transfer Data From iPhone XS Max To Other iPhone 15 devices? | Dr.fone
How To Transfer Data From iPhone XS Max to Android/iOS?
Transferring data between iPhone XS Max] and other smartphones is a process that has not yet been acknowledged as an easy process. Despite the introduction of many services and procedures, device-to-device transfer remains a challenge. Amidst the confusion, Dr.Fone - Phone Transfer came as a savior to all the problems by providing a comprehensive phone transferring system.
Upgrade to the Newest Dr.Fone Manage Your Phone Wherever You Go
Part 1: Transfer Data From iOS To Android
- Step 1 Launch Phone Transfer Tool
Initiate the process by launching Wondershare Dr.Fone on the computer. Continue from Toolbox > Phone Transfer to redirect towards opening the particular tool.

The Dr.Fone Mac version still has the old interface, but it does not affect the use of the Dr.Fone function. We will update it as soon as possible.
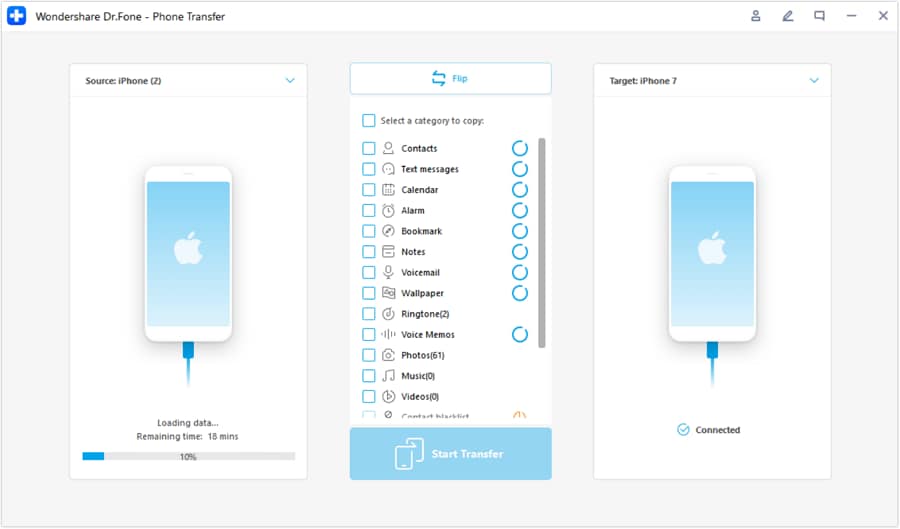
- Step 2 Select Device As Source and Destination
When it opens in a new window, the platform will detect the connected iOS and Android devices. As they are detected, the data is loaded onto the platform and displayed at the bottom of the iPhone XS Max device. However, it is important for you to define the path of transfer, thus, the selection of Source and Destination. Use the Flip button if needed to change the direction of the transfer.

- Step 3 Select Data Types to Transfer
After the selection of Source and Destination, continue to select the categories of data that you want to transfer. Checkmark all the required data types and proceed to tap the Start Transfer button. You can choose the Clear data before copy option to remove existing data from the destination device.

Support Data: Photos, Music, Videos, Contacts, Contacts Blacklist, Text Messages, Calendar, Reminders, Alarm, Bookmark, Voicemail, Ringtone, Voice Memos.
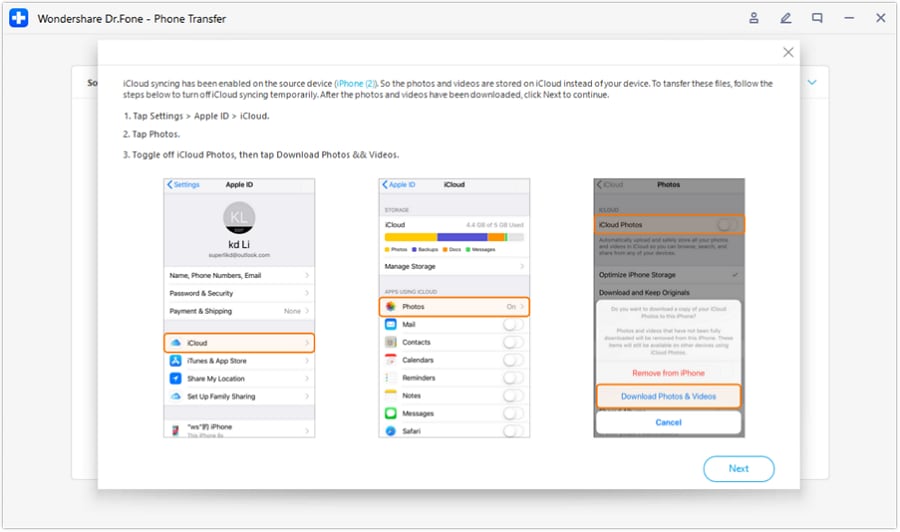
- Step 4 Turn Off iCloud Syncing
Following this, Dr.Fone - Phone Transfer displays to perform a specific operation, as shown by the prompt on the window. As it asks to turn off iCloud syncing, open the Settings of your iDevice and continue to select your name from the top.
Proceed from iCloud > Photos and continue to turn off the toggle of iCloud Photos on the screen. When a pop-up appears, click the Download Photos & Videos option.
- Step 5 Observe Progress of Data Transfer
Once done, the pop-up window on the front shows the progress of the data transfer. Click Cancel if you wish to stop the transfer.


- Step 6 Data Transfer Completes
As the data is transferred successfully, the complete details are displayed related to its completion. Click OK to close down the process.

Part 2: Transfer Data From iOS To iOS
- Step 1 Set Data Transfer Path
On accessing the Phone Transfer tool, continue to connect your iOS devices and let them load their data on the next screen. Here, define the Source and Destination of the transfer to specify the direction of the phone transfer. To change locations, use the Flip button on the top.

Support Data: Photos, Music, Videos, Contacts, Text Messages, Calendar, Alarm, Bookmark, Notes, Voicemail, Wallpaper, Ringtone, Voice Memos.
- Step 2 Choose Data Types
After successfully determining the source and destination, select the specific data types you want to transfer. Checkmark all data and select Start Transfer to proceed with the operations.

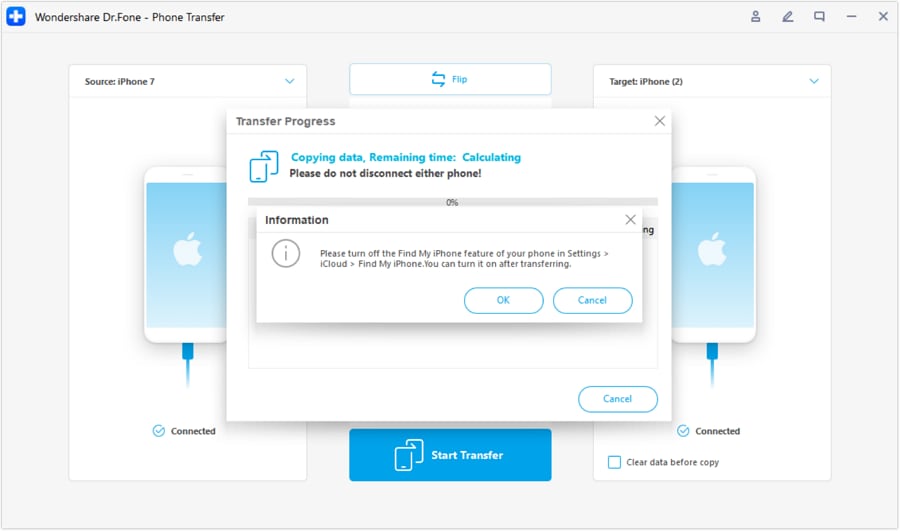
- Step 3 Turn Off Find My Feature
Once done, a prompt appears on the front asking to turn off the Find My feature on iOS devices. Open the Settings of the iOS device and proceed further by tapping on the name at the top. Continue from iCloud > Find My feature and turn it off.
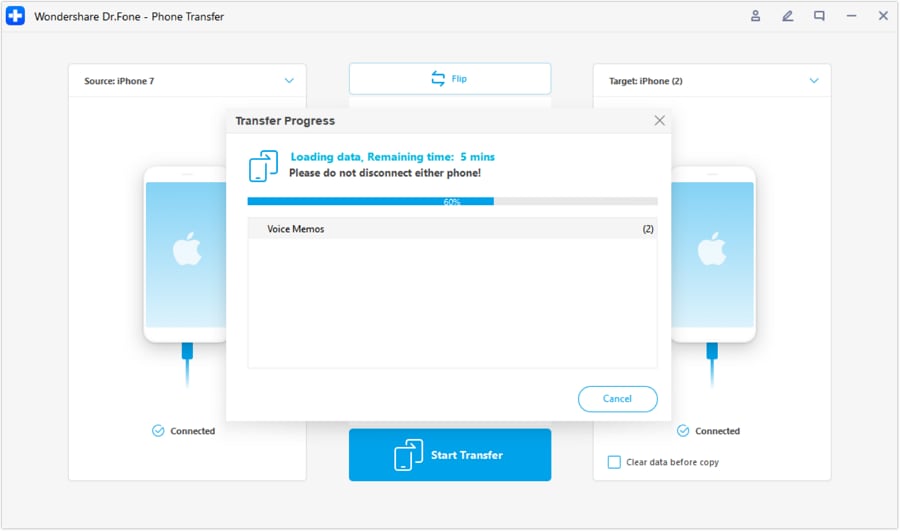
- Step 4 Observe Phone Transfer Progress
As you turn off the feature, the data transfer initiates, and the progress bar displays the completion of the process.
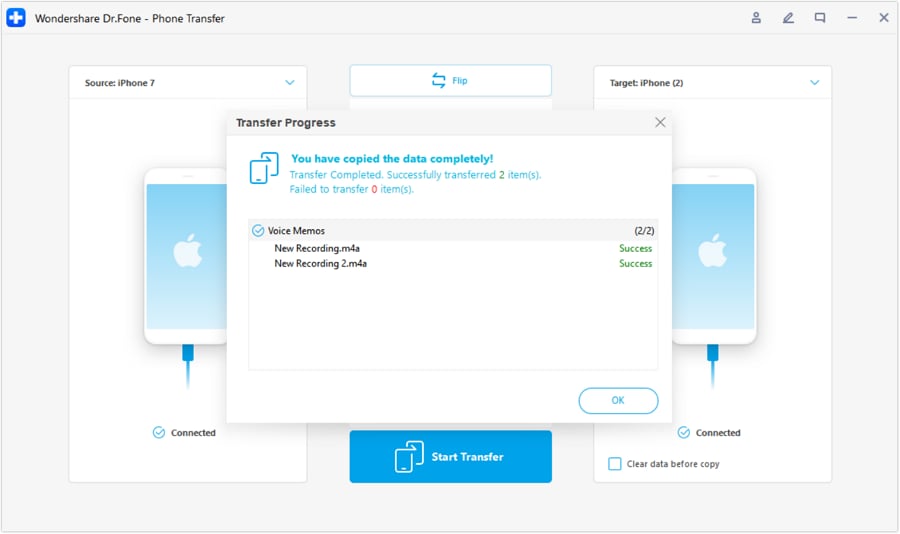
- Step 5 Complete iOS to iOS Phone Transfer
Once done, the window in the front shows the completed phone transfer. Click OK to conclude the process entirely.
How To Transfer Data From iPhone XS Max to Android/iOS?
Transferring data between iPhone XS Max] and other smartphones is a process that has not yet been acknowledged as an easy process. Despite the introduction of many services and procedures, device-to-device transfer remains a challenge. Amidst the confusion, Dr.Fone - Phone Transfer came as a savior to all the problems by providing a comprehensive phone transferring system.
Upgrade to the Newest Dr.Fone Manage Your Phone Wherever You Go
Part 1: Transfer Data From iOS To Android
- Step 1 Launch Phone Transfer Tool
Initiate the process by launching Wondershare Dr.Fone on the computer. Continue from Toolbox > Phone Transfer to redirect towards opening the particular tool.
The Dr.Fone Mac version still has the old interface, but it does not affect the use of the Dr.Fone function. We will update it as soon as possible.
- Step 2 Select Device As Source and Destination
When it opens in a new window, the platform will detect the connected iOS and Android devices. As they are detected, the data is loaded onto the platform and displayed at the bottom of the iPhone XS Max device. However, it is important for you to define the path of transfer, thus, the selection of Source and Destination. Use the Flip button if needed to change the direction of the transfer.
- Step 3 Select Data Types to Transfer
After the selection of Source and Destination, continue to select the categories of data that you want to transfer. Checkmark all the required data types and proceed to tap the Start Transfer button. You can choose the Clear data before copy option to remove existing data from the destination device.
Support Data: Photos, Music, Videos, Contacts, Contacts Blacklist, Text Messages, Calendar, Reminders, Alarm, Bookmark, Voicemail, Ringtone, Voice Memos.
- Step 4 Turn Off iCloud Syncing
Following this, Dr.Fone - Phone Transfer displays to perform a specific operation, as shown by the prompt on the window. As it asks to turn off iCloud syncing, open the Settings of your iDevice and continue to select your name from the top.
Proceed from iCloud > Photos and continue to turn off the toggle of iCloud Photos on the screen. When a pop-up appears, click the Download Photos & Videos option.

- Step 5 Observe Progress of Data Transfer
Once done, the pop-up window on the front shows the progress of the data transfer. Click Cancel if you wish to stop the transfer.
- Step 6 Data Transfer Completes
As the data is transferred successfully, the complete details are displayed related to its completion. Click OK to close down the process.
Part 2: Transfer Data From iOS To iOS
- Step 1 Set Data Transfer Path
On accessing the Phone Transfer tool, continue to connect your iOS devices and let them load their data on the next screen. Here, define the Source and Destination of the transfer to specify the direction of the phone transfer. To change locations, use the Flip button on the top.
Support Data: Photos, Music, Videos, Contacts, Text Messages, Calendar, Alarm, Bookmark, Notes, Voicemail, Wallpaper, Ringtone, Voice Memos.
- Step 2 Choose Data Types
After successfully determining the source and destination, select the specific data types you want to transfer. Checkmark all data and select Start Transfer to proceed with the operations.
- Step 3 Turn Off Find My Feature
Once done, a prompt appears on the front asking to turn off the Find My feature on iOS devices. Open the Settings of the iOS device and proceed further by tapping on the name at the top. Continue from iCloud > Find My feature and turn it off.
- Step 4 Observe Phone Transfer Progress
As you turn off the feature, the data transfer initiates, and the progress bar displays the completion of the process.
- Step 5 Complete iOS to iOS Phone Transfer
Once done, the window in the front shows the completed phone transfer. Click OK to conclude the process entirely.
- Title: How To Transfer Data From iPhone XS Max To Other iPhone 15 devices? | Dr.fone
- Author: Vivienne
- Created at : 2024-07-17 02:51:09
- Updated at : 2024-07-18 02:51:09
- Link: https://review-topics.techidaily.com/how-to-transfer-data-from-iphone-xs-max-to-other-iphone-15-devices-drfone-by-drfone-transfer-data-from-ios-transfer-data-from-ios/
- License: This work is licensed under CC BY-NC-SA 4.0.