
:max_bytes(150000):strip_icc():format(webp)/how-to-use-remote-access-on-your-samsung-smart-tv-4688935-01-29c7de5dc77e4747a8070d12f0c3d84c.jpg)
How To Pause Life360 Location Sharing For Xiaomi Redmi Note 12 Pro+ 5G | Dr.fone
How To Pause Life360 Location Sharing For Xiaomi Redmi Note 12 Pro+ 5G
Life360 has become a household name in location-sharing apps, renowned for its ability to connect family and friends seamlessly across Android and iOS platforms. This app enhances safety and fosters a sense of closeness among its users.
However, there are moments when you might crave a bit of privacy or a break from constant connectivity. Whether for a surprise, personal space, or a digital detox, the need to discreetly pause Life360 arises. This article delves into the nuances of how to pause Life360. It will also provide insightful tips on how to do it without alerting others.
Part 1: What Is Life360 and How To Pause Life360 From the App
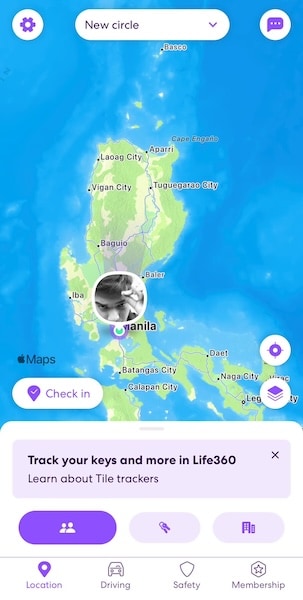
Life360 is not just an app; it’s a digital lifeline connecting people with their loved ones. It’s primarily designed for family and close friends. By offering real-time location sharing, it ensures that members of your “Circle” (a group within the app) know where you are at any given moment. This feature is handy for parents monitoring their children’s whereabouts or friends coordinating meet-ups.
The Purpose of Life360
At its core, Life360 is about safety and connectivity. The app includes features like location history, driving reports, and even crash detection, making it a versatile tool for modern families. It provides several benefits, like:
- Safety assurance. Knowing the whereabouts of your loved ones, especially in emergencies, can be invaluable.
- Convenience. Planning gatherings or ensuring a family member has arrived safely at a destination becomes more manageable.
- Emergency response. The app can alert users to potential emergencies involving Circle members.
Reasons of Pausing Life360
However, there are instances where learning how to pause Life360 becomes necessary:
- Battery health. Constant GPS tracking can drain your phone’s battery significantly. Temporarily pausing the app can help conserve battery life.
- Privacy. Sometimes, you might want some privacy about your location. Thus, some people would like to pause their Life360 location sharing.
Methods To Pause Life360 From the App
Now, the question is, can you pause your location on Life360? Pausing Life360 can be done for a specific circle or the entire app. This section will show you some general steps to pause your location for the app. You can do it only for a specific circle or the whole app. Here’s how you can do those.
Pausing Location for a Specific Circle
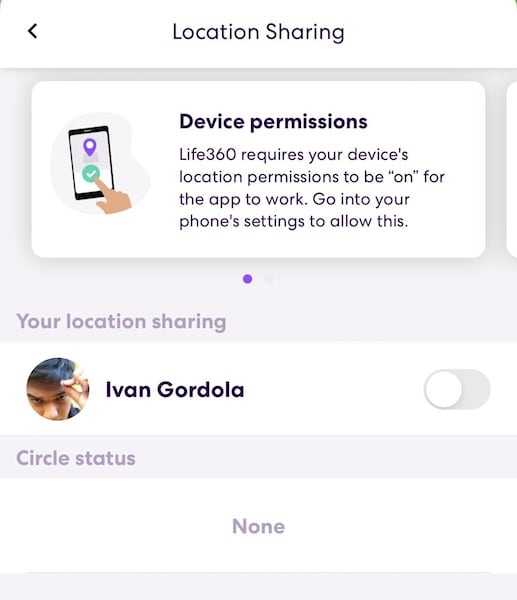
Open Life360 and go to the main screen. Select the Circle you want to pause. Then, tap on Settings (usually represented by a gear icon) in the upper-right corner. Look for an option like Location Sharing and toggle it off. This action pauses your location sharing only for the selected Circle.
Pausing the Whole App
Regarding this method, pausing the location sharing for all your circles usually involves going through your phone’s S ettings and disabling location services for Life360. If you don’t want to do that, you can turn off location sharing for all your circles through the steps provided above.
By understanding and utilizing these features wisely, you can maintain your connection with your loved ones while managing your digital boundaries and battery health effectively. Remember, the aim is to balance connectivity with personal needs.
Part 2: How To Pause Life360 From Settings
Life360 offers flexibility within its app and through your device’s settings. Understanding how to use these options can provide additional control over location sharing. Explore the various ways how to pause Life360 outside the app itself.
Pause Life360 From Android Settings
First, navigate to your Xiaomi Redmi Note 12 Pro+ 5G’s Settings. Then, look for the section listing all installed apps. This is usually named as “Apps.” Locate Life360 on the list of apps and open it. You should be able to see a Force Stop button at the bottom of the screen.
By selecting Force Stop, you temporarily halt the app’s function without uninstalling it. This operation stops location sharing until you open the app again.
Pause Life360 From iOS Settings
To pause the Life360 location on iOS, you’ll have to open the Settings app on your iOS device. Browse through your apps and select Life360. Alternatively, you can use the search bar and type “Life360”. Once in the app’s menu, change location services to While Using the App. Thus, it will not share your location unless you open the app.

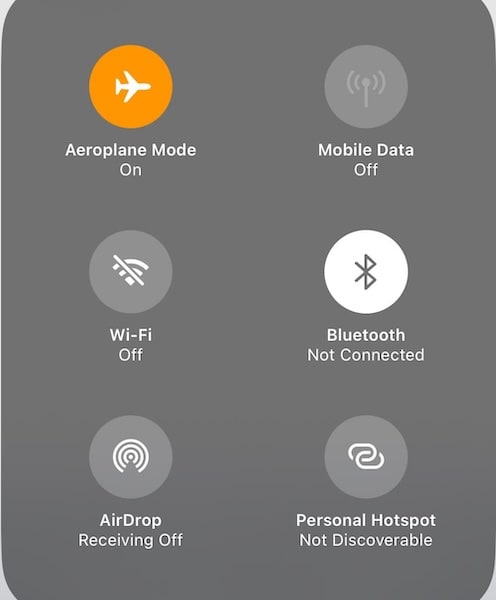
Pause by Using Airplane Mode
This can be done from the quick settings panel on both Android and iOS devices. Turning on Airplane Mode disables all wireless connections, including cellular data and GPS, effectively pausing Life360. The great thing is that Life360 will only show your last known location to your circles. It will not say that “location services are off,” unlike the first two methods.
Pause by Uninstalling
Removing the app from your device will stop it from sharing your location. The beauty of this method is that it won’t automatically notify your circles or remove you from them. However, some members might notice that your location updates are unavailable.
Each method serves a different purpose and offers varying levels of discretion. Whether conserving battery, seeking privacy, or temporarily disconnecting, these methods provide a way to pause Life360 location without drawing unwanted attention. Remember, communicating with your Circle members about your need for privacy to maintain trust is always a good idea.
Part 3: How To Pause Life360 With a Virtual Location Spoofer
Sometimes, pausing your location sharing on Life360 may raise questions or concerns among your circle members, particularly if they are close family or friends. If you’re planning a surprise or need private time without arousing suspicion, a virtual location spoofer can be handy. This method will teach you how to pause your location on Life360 without them knowing.
Wondershare’s Dr.Fone toolkit is more than just a data recovery solution. Among its various features, the Virtual Location changer is particularly useful for those looking to spoof their location. This feature allows you to simulate being in a specific location without actually being there. It’s a clever way to maintain privacy or plan a surprise without giving away your real whereabouts.
How To Use Dr.Fone To Spoof Your Location on Life360
To learn how to pause location on Life360 without them knowing using Dr.Fone, follow the steps below:
- Step 1: Download and install the Dr.Fone on your device. Connect your phone to your PC to begin the process. After launching the software, access Virtual Location from the Toolbox interface. Then, click Get Started to continue.
- Step 2: After launching the function, you’ll notice the One-Stop Route function at the top-right section. This feature is crucial for setting up your virtual movement.

- Step 3: To define how your virtual location behaves, you can decide how often the app simulates a Round trip or Loop trip. Once you’ve set parameters like Speed, click Move Here to start the simulation.

Note: TheRound trip and Loop trip are particularly useful for creating the impression of movement in a specific area. Parameters can make your virtual movement more believable.
Conclusion
This article explored various methods of pausing location sharing on Life360. Life360 is essential for many who share their locations with friends and family. The options are diverse, from simple app-based methods to more advanced settings adjustments and even a virtual location spoofer like Dr.Fone.
While it’s always recommended to maintain open communication with your Circle about pausing location sharing, there are times when privacy or surprise plans necessitate discretion. For those moments, Dr.Fone - Virtual Location emerges as a reliable solution for location spoofing and other phone management needs. Remember, using these tools responsibly is key to maintaining trust in your relationships.
How to Send and Fake Live Location on Facebook Messenger Of your Xiaomi Redmi Note 12 Pro+ 5G
Do you want to learn how to fake a live location on Messenger? Here’s the perfect learning spot. These days, many situations can compel you to spoof location on Facebook Messenger. But as simple as it sounds, you might need to invest in a costly VPN. Facebook requests permission to track your actual GPS location when installing the app or creating an account. But fret not because you don’t even need a VPN service to change your Facebook location. This post will show you several shortcuts on how to send a fake location on Messenger.
Part 1: The Benefits of Changing Location on Facebook Messenger
There are numerous reasons to learn how to send fake locations on Messenger, just as initially said. Here are some of them:
- Business awareness
Sometimes, you might want your customers to believe that your products or offices are in a specific location. In that case, spoofing your live location on Messenger is a great idea.
- Prank friends and have fun
There’s nothing wrong with fooling your Facebook friends about your location. You can show them that you’re in a unique spot when you’re just around them.
- Hide identity
Your online security is paramount. And one way to protect yourself from online sniffers is by spoofing live locations on Facebook Messenger.
- Make new friends
Often, Facebook will tailor its friend suggestions to people close to your proximity, thanks to the “Nearby Friends” feature. But you can start getting new and refreshing tips from people in your new location.
Part 2: How to Change Location on Facebook Messenger
After learning some reasons to fake location on Messenger, let’s now know how to do that with easy steps. You don’t need third-party help to mock live locations on Messenger on Android or iPhone. That’s because the app boasts its inbuilt location feature. Follow me:
Step 1. Open Facebook Messenger and launch the conversation with which you want to share the fake location.
Step 2. Click the “four dots” at the bottom-left corner and tap Location.

Step 3. Now tap Allow Location and choose a new location on the world map that appears.
Step 4. After choosing a location, tap Send Location to share it with your selected friend. It’s that easy!
Part 3: How to Change a Live Location on Facebook Messenger [iOS & Android]
As you can see, sending a pinned location directly on Messenger is only good if you want to share the place with a specific contact. In other words, you can’t natively spoof the location of multiple contacts on Messenger. So, if you want to fake live location on Messenger on iOS and Android, using a robust option like Wondershare Dr.Fone is a good idea.
With this virtual location tool, you can change your GPS location anywhere. That makes it helpful if you want to brag about your actual location with some tangible proof. Another thing, you can simulate location movements by choosing a particular route or transport. In addition to Facebook, Dr.Fone also works with apps like Pokemon Go , Instagram , Facebook , etc., etc.
You can check out the this video for further instruction.
Here’s how to fake live location on Messenger with Dr.Fone:
Step 1. Download Dr.Fone and fire it up.

Start by downloading and installing Dr.Fone from the official website and launch the software on your Mac or Windows PC. Then, connect your smartphone to the PC using a USB wire. Please ensure to select the “Transfer Files” option.
Step 2. Launch the Virtual Location tool and enable USB debugging.

On Dr.Fone’s home page, press the Virtual Location tab and click Get Started. Now enable USB debugging to connect your phone to Dr.Fone. On Android, click Additional Settings > Developer options >USB debugging. Also, remember to set Dr.Fone as the mock location app.
Step 3. Launch the map and choose a fake location for Messenger.

Once USB debugging is enabled, press Next to launch the map. Now enter your new location’s address or GPS coordinates and tap Move Here. And there is that!

Bonus tip: How to make your new Messenger location more believable
Want to make your new location more believable? Simple, Dr.Fone will help you with that. Just enter the new coordinates or location on Dr.Fone and take a screenshot of the new area. Of course, you can find dozens of free location pictures on Google. After that, open the image on Facebook and tap the “location” icon. Now search and select your new location and post the picture.
Up to this point, you shouldn’t have any qualms spoofing your live location on Facebook Messenger. For example, if you want to send a pinned GPS coordinate to a single contact on Messenger, then simply use the inbuilt function to change location. However, your new location might not be believable since your actual device location will remain the same. In other words, there’s no proof that you’re actually in that particular location.
So, use Dr.Fone to fake location on Messenger with unreal precision. This third-party location changer allows you to teleport your location to anywhere. You can even change Messenger location by walking, driving, or cycling. Then to make it more believable, you can share a post with a screenshot of your new location. Remember, your new location will be visible to all your Facebook friends.
Part 5. FAQ: What People Also Ask about Facebook Location Services
1. Why is my Facebook Messenger location wrong?
The issue of the wrong Facebook location is commonplace these days. Fortunately, it’s nothing complicated as it’s mainly about the incorrect GPS settings on your phone. So, go ahead and enable GPS tracking on your device.
Open Settings > Privacy > Location Services for iPhone users and then enable Location Services. On the other hand, Android users should click Settings > Security and Location > Locations > and enable Use Locations.
2. Can I fake my location on Facebook?
In a typical scenario, it’s impossible to lie about your location on Facebook. That’s because the app asks for permission to track your GPS location before you can use it. But as you’ve seen, Wondershare Dr.Fone makes it a cakewalk to a fake live location on Messenger.
3. How can I hide my location on Facebook?
As said earlier, the reason why Facebook gives the wrong location is because of disabled location settings. It’s the reverse! So, use this Settings feature to hide your actual location on Facebook.
Conclusion
Any queries regarding how to send a fake location on Messenger? Let us know if you have any. Meanwhile, use Messenger’s inbuilt location feature to share an artificial place with a friend or contact. But because this method only allows you to share fake locations with a single chat, use Wondershare Dr.Fone - Virtual Location instead. It’s simple, fast, and effective. Are you ready?
 safe & secure
How to Change/Fake Your Xiaomi Redmi Note 12 Pro+ 5G Location on Viber
Viber is one of the most commonly used messenger apps. It allows you to send short messages like texts, videos, images, audio, and documents. Viber also has another exciting feature that will enable you to share your location. But sometimes, you might want to change location on Viber to prank your friends or for security purposes. So, read on to learn how to fake location on Viber with some simple solutions.
Part 1: What is the My Location feature on Viber?
If you’ve used WhatsApp’s location feature before, you’ll know what Viber’s “My Location” is all about. With this feature, you can share your live location for whatever reasons you may have. For example, you may want to share your live location with your kids or vice-versa. Or, you might simply want to share a fake location on Viber with your nosy friends.
But as good as it sounds, this live location feature is enabled by default on your Xiaomi Redmi Note 12 Pro+ 5G/Android browser. Therefore, you can send a location on Viber without knowing. This can be advantageous to stalkers or even cause misunderstanding in your relationship. What’s worse, it shares your actual location with every text you send. But fret not because this post will help you disable or enable My Location on Viber according to your needs.
Part 2: How to disable or enable My Location on Viber?
So, without wasting too much time, let’s find out the steps to disable/enable Viber location-sharing feature. It’s straightforward.
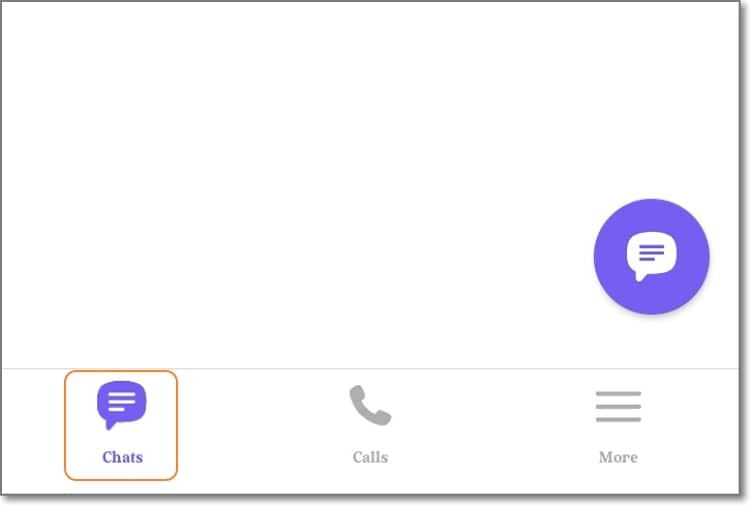
Step 1. Fire up your Viber app on mobile or PC and tap the Chats button. Here, proceed to open a chat that you want to enable/disable location sharing.
Step 2. Next, tap the Ellipsis (three dots) icon at the top-right corner of the screen and choose Chat Info. Alternatively, simply swipe the screen to the left.
Step 3. On the Chat Info window, simply enable or disable the Attach location always toggle. It’s done!

Pro tip: You might be wondering how to share your actual Viber location with a chat or group. Again, this is very straightforward. Simply open the conversation and tap the three dots on the text field. Then, click the Share Location button and choose your location on the Google map. Lastly, tap Send location to share the Viber location with your selected contact.

Part 3: Can I send a fake location on Viber, and How?
So, is it possible to Viber’s fake location? Unfortunately, Viber doesn’t allow users to share a different place from the real one. That’s because the app asks to automatically access your actual location data using Wi-Fi or GPS while signing up. Therefore, based on the permission you set yourself, the answer is NO.
But nothing is impossible in the tech world. You can easily instruct Viber to share a different location using a third-party app or service like Dr.Fone - Virtual Location . With this professional GPS tool, you teleport your Viber location to anywhere in the world with a simple mouse click.
It’s compatible with Android/iOS devices and boasts a simple-to-understand map. Interestingly, you can walk or drive to your new location and even stop between destinations to make it more believable. It’s nothing complex!
You can check out the this video for further instruction.
Key features of Dr.Fone - Virtual Location:
- Compatible with all Android and iOS versions.
- Teleport Viber location to anywhere in the world.
- Walk or drive to your new Viber location.
- Simulate Viber movements with custom speed.
- Works with Pokemon Go , Facebook, Instagram , Snapchat , Viber, etc.
Steps to change Viber location with Dr.Fone:
Step 1. Launch Dr.Fone Virtual Location.

Install and run Wondershare Dr.Fone on your Windows/Mac computer, and then tap the Virtual Location tab on the Home page.
Step 2. Connect your phone to Dr.Fone with a USB cable.
Connect your smartphone to your PC using a USB wire and tap Get Started on the new Dr.Fone pop-up window. Remember to enable the “File Transfer” option on your smartphone instead of “Charging.”
Step 3. Link your phone to Dr.Fone via USB debugging
Press the Next button to begin connecting your phone to Dr.Fone. If the connection fails, enable USB debugging on your phone by following the on-screen instructions. On Android phones, tap Settings > Additional settings > Developer options > USB debugging. In addition, set Dr.Fone as the mock location app on your phone.
Step 4. Enter the GPS coordinates or location address.
If the connection is successful, the Virtual Location map will launch automatically on Dr.Fone. Now enter the coordinates or address in the location field at the top-left corner. After finding the exact location that you want, simply tap Move Here before sharing your new location on Viber. That is easy, right?
Dr.Fone - Virtual Location
1-Click Location Changer for both iOS and Android
- Teleport from one location to another across the world from the comfort of your home.
- With just a few selections on your computer, you can make members of your circle believe you’re anywhere you want.
- Stimulate and imitate movement and set the speed and stops you take along the way.
- Compatible with both iOS and Android systems.
- Work with location-based apps, like Pokemon Go , Snapchat , Instagram , Facebook , etc.
3981454 people have downloaded it
Part 4: Why send fake location on Viber?
Now that you know how to spoof location on Viber. Let’s discuss some reasons to spoof location on this messaging app. Below are some common ones:
- Protect your privacy
Many people don’t want other online users to have a clue of their actual whereabouts. If you’re one of them, use a third-party tool to spoof your Viber location on your Xiaomi Redmi Note 12 Pro+ 5G or Android.
- Prank your friends
Do you want to show your friends that you’re in London or New York when you’re in some remote village/town somewhere in reality? Yes, that sounds cool!
- Improve sales
If you’re a digital marketer, you might want to convince your potential clients that the goods are from a specific region or city close to them. Believe it or not, this can lead to more sales closures.
Wrap it Up
You can share your live location on Viber just like you would on Facebook, WhatsApp, and other social media apps. But because most of these apps don’t allow you to share fake locations, I recommend Dr.Fone - Virtual Location change your area to anywhere in the world. Give it a try!
Also read:
- Remove Google FRP Lock on Galaxy S23
- Remove FRP Lock on C110
- How To Upgrade or Downgrade iPhone X Without Losing Anything? | Dr.fone
- In 2024, Fixing Foneazy MockGo Not Working On Realme 11 Pro | Dr.fone
- How to Unlock the Lock Screen on my 13T
- Recover lost data from Infinix Note 30 VIP Racing Edition
- Recover your pictures after Honor X8b has been deleted.
- In 2024, How to Change Netflix Location to Get More Country Version On Apple iPhone XR | Dr.fone
- Remove FRP Lock on 13 Ultra
- Recover your pictures after S17t has been deleted.
- How to Update iPhone 12 mini without iTunes? | Dr.fone
- How To Update or Downgrade iPhone 15 Pro Without iTunes? | Dr.fone
- Oppo Data Recovery – recover lost data from Oppo
- In 2024, Does Life360 Notify When You Log Out On Tecno Camon 30 Pro 5G? | Dr.fone
- In 2024, Complete Tutorial to Use GPS Joystick to Fake GPS Location On Poco F5 5G | Dr.fone
- How To Update or Downgrade iPhone SE Without Losing Anything? | Dr.fone
- In 2024, Complete Tutorial to Use VPNa to Fake GPS Location On Tecno Camon 20 Premier 5G | Dr.fone
- Quickly Remove Google FRP Lock on Find N3 Flip
- How to Unlock Tecno Spark 10 5G Phone Forgot Password
- In 2024, How Can I Use a Fake GPS Without Mock Location On Honor X9a? | Dr.fone
- How To Transfer WhatsApp From iPhone 6s Plus to others devices? | Dr.fone
- In 2024, Fixing Foneazy MockGo Not Working On Vivo Y17s | Dr.fone
- In 2024, Fake the Location to Get Around the MLB Blackouts on Vivo Y200 | Dr.fone
- How to unlock a disable iPhone 8 without itunes
- In 2024, Complete Tutorial to Use VPNa to Fake GPS Location On Vivo X Fold 2 | Dr.fone
- How To Update or Downgrade iPhone 6 Plus Without iTunes? | Dr.fone
- Possible solutions to restore deleted contacts from Oppo F23 5G.
- Possible solutions to restore deleted call logs from Poco X6 Pro
- Recover iPhone SE Data From iOS iTunes | Dr.fone
- Recover lost data from Vivo Y78t
- In 2024, Dose Life360 Notify Me When Someone Checks My Location On Honor X50 GT? | Dr.fone
- How to unlock iPhone 7 Plus screen lock without Passcode?
- How To Transfer WhatsApp From iPhone XR to other iPhone 11 Pro Max devices? | Dr.fone
- In 2024, Does Airplane Mode Turn off GPS Location On Xiaomi Redmi 12? | Dr.fone
- In 2024, Fixing Foneazy MockGo Not Working On Infinix Note 30 Pro | Dr.fone
- Possible ways to recover deleted files from Oppo A2
- Play MOV movies on Xiaomi Redmi K70 Pro, is it possible?
- Recover lost data from Nokia C300
- In 2024, Does Airplane Mode Turn off GPS Location On Samsung Galaxy A54 5G? | Dr.fone
- In 2024, How Can I Use a Fake GPS Without Mock Location On Apple iPhone 14? | Dr.fone
- How to Update iPhone 6s Plus without Losing Any Data? | Dr.fone
- Possible solutions to restore deleted messages from Motorola Moto G Stylus (2023)
- In 2024, Dose Life360 Notify Me When Someone Checks My Location On Samsung Galaxy A24? | Dr.fone
- In 2024, Complete Tutorial to Use GPS Joystick to Fake GPS Location On Lava Yuva 3 Pro | Dr.fone
- How to Unlock Apple iPhone 15 Pro with IMEI Code?
- In 2024, Detailed guide of ispoofer for pogo installation On OnePlus 11R | Dr.fone
- Which Pokémon can Evolve with a Moon Stone For Google Pixel Fold? | Dr.fone
- In 2024, Here are Some of the Best Pokemon Discord Servers to Join On Honor X8b | Dr.fone
- In 2024, How To Change Vivo Y100 Lock Screen Password?
- How to Change Netflix Location to Get More Country Version On Vivo V29e | Dr.fone
- In 2024, How to Remove iPhone 15 Pro Max Activation Lock
- In 2024, FRP Hijacker by Hagard Download and Bypass your Tecno Spark Go (2023) FRP Locks
- In 2024, Full Guide to Bypass Xiaomi Redmi Note 12R FRP
- In 2024, How To Remove or Bypass Knox Enrollment Service On Vivo V30 Lite 5G
- Get Rid of corrupt Excel 2010 File
- Top 10 Telegram Spy Tools On Xiaomi Redmi Note 12 Pro 4G for Parents | Dr.fone
- In 2024, How to Fake Snapchat Location on Oppo Reno 11 5G | Dr.fone
- Why Does My Realme 11 5G Keep Turning Off By Itself? 6 Fixes Are Here | Dr.fone
- How to Transfer Photos from Realme GT 5 Pro to New Android? | Dr.fone
- In 2024, How Samsung Galaxy XCover 7 Mirror Screen to PC? | Dr.fone
- Can I use iTools gpx file to catch the rare Pokemon On Poco M6 Pro 4G | Dr.fone
- How to Change your Vivo S17e Location on Twitter | Dr.fone
- In 2024, How to Change Motorola Moto G04 Location on Skout | Dr.fone
- Is GSM Flasher ADB Legit? Full Review To Bypass Your Sony Xperia 1 V Phone FRP Lock
- Gmail Not Working on Nokia G310 7 Common Problems & Fixes | Dr.fone
- 7 Fixes for Unfortunately, Phone Has Stopped on Infinix Note 30i | Dr.fone
- Proven Ways in How To Hide Location on Life360 For Motorola G24 Power | Dr.fone
- Android Call History Recovery - recover deleted call logs from Huawei P60
- In 2024, How to Transfer Contacts from Poco X6 Pro To Phone | Dr.fone
- Spoofing Life360 How to Do it on Vivo Y100 5G? | Dr.fone
- Things You Dont Know About Nokia C12 Pro Reset Code | Dr.fone
- Complete Review & Guide to Techeligible FRP Bypass and More For Tecno Spark 10C
- The Best 8 VPN Hardware Devices Reviewed On Oppo Reno 8T | Dr.fone
- Today I will Share Your Winning Forex Trades With Friends and Family on Local Trade Copier™ Together
- In 2024, 5 Easy Ways to Copy Contacts from Oppo Find N3 Flip to iPhone 14 and 15 | Dr.fone
- Did Your Apple iPhone 12 Pro Passcode Change Itself? Unlock It Now | Dr.fone
- Title: How To Pause Life360 Location Sharing For Xiaomi Redmi Note 12 Pro+ 5G | Dr.fone
- Author: Vivienne
- Created at : 2024-04-12 01:38:08
- Updated at : 2024-04-13 01:38:08
- Link: https://review-topics.techidaily.com/how-to-pause-life360-location-sharing-for-xiaomi-redmi-note-12-proplus-5g-drfone-by-drfone-virtual-android/
- License: This work is licensed under CC BY-NC-SA 4.0.
