
Does Xiaomi Redmi Note 13 5G Have Find My Friends? | Dr.fone
Does Xiaomi Redmi Note 13 5G Have Find My Friends?
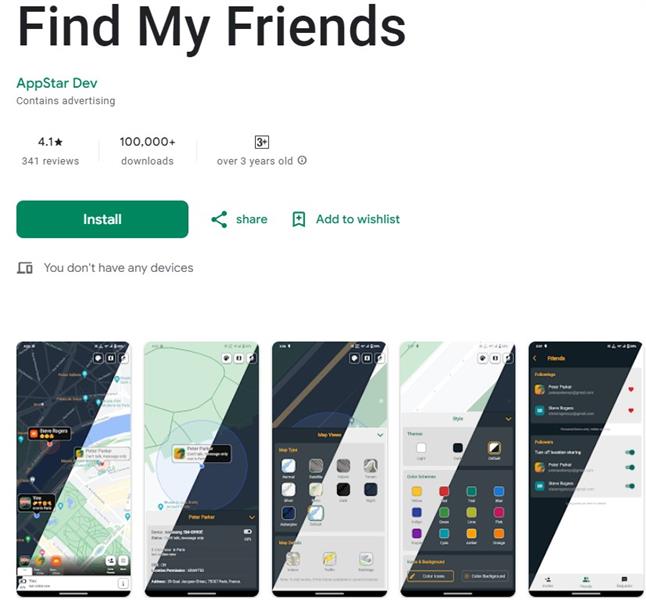
Yes, Find My Friends App is compatible with Xiaomi smartphones. This tracker App is exclusive for iPhone users and Android devices. Free for iPhone, iPad, and iPod Touch. When installed on your friends or one of our family member’s smartphone you can stay in touch with them and keep a tab on his/her location. All you require is to request- with whom you want to stay connected- to save your number as a contact on the Find My Friends app, and then you’ll be given access to their real-time geographical location. You can also find Xiaomi version of Find My Friends app if you are particularly looking for it.
There are several privacy controls with Find My Friend Xiaomi and iPhone App. This means if there are times when you don’t want family or friends to know your location, you can simply mute it with a few clicks. Find My Friends application is quite popular among families who worry about the safety of their loved ones.
Download from Google Play Store - https://play.google.com/store/apps/details?id=in.appstar.findfriends
Download from Apple Store - http://apps.apple.com/us/app/find-my-friends/id466122094

Part 1: Best Alternatives to Find My Friends App
Glympse

Glympse is amongst the most popular location Apps available on the Google Play Store. The central feature of this application is to quickly share your GPS location with family, friends, and employers. What makes this App unique from Find My Friends is that the recipient need not sign up to receive your real-time location. All they need is Internet connectivity.
This location sharing App also has a safety feature – all “Glympses” sending your whereabouts to your contacts, however, this automatically expires after a period of time. This means, accidentally you won’t end up broadcasting your location for hours. You can download the
Glympse App from Play Store for Free http://play.google.com/store/apps/details?id=com.glympse.android.glympse&hl=en_IN

Sygic Family Locator

Sygic is another top-rated application in the list of best alternatives to Xiaomi Find My Friends App for Android. This application is quite popular among moms those who want to keep abreast of their child’s whereabouts all the time.
Using this Xiaomi find friend App, you can see the real-time location of anyone in your family or friend circle. Sygic Family Locator App also has the in-built chat functionality that lets you contact all the other users like that of WhatsApp.
Most importantly, from a parent’s perspective, this app comes with an SOS button for guardians. When that button is pressed, this App will immediately locate your kid on the map. It’s a useful App to keep if your kid is prone to wander around on the streets or for family trips in large public spaces.
Further, the parents can easily add notifications when their kid reaches particular locations such as school or the guitar classes. And, not to mention, this family locator has the feature of setting up an unsafe zone, which means if your kid crosses that barrier, you’ll receive a notification.
Unlike the Glympse App, others must have this find my friends for Xiaomi and iPhone app installed on their smartphone to know their real-time whereabouts. You can download this Free application with in-App purchases from the
Google Play Store. http://play.google.com/store/apps/details?id=com.sygic.familywhere.android&hl=en_IN
GeoZilla

While, GeoZilla has all the features a typical location sharing has such as real-time tracking, geofencing, safety alerts, but it also compromises certain unique functionalities that help it to stand out in the crowd. This includes location-based errands, location history and sharing history.
You can easily set up a reminder when a friend or family member enters a specific area, such as a push notification telling them to pick-up French Fries when they are in proximity to a McDonald’s outlet.
With GeoZilla App, you have the freedom to keep an eye on the daily activities of the user you want to track via the location history. It’s also possible to easily check updates from Facebook so you’ll have a complete idea of what’s going on in the life of your kid or best pal.
This App is for free which you can download from the Google Play Store. http://play.google.com/store/apps/details?id=com.geozilla.family&hl=en_US
Part 2: The Find My Friends Lets You


- Find, chat and share your location on MapShare with your friends
- You can easily recommend and share updates on any news about a great restaurant opening or a store sale etc. for them to check out.
- Get Info on Eta, Exact Location, and directions for easy navigation.
- Supports 3D Touch
- You can use either your phone number or your email id to share exact location and can even invite your friends to share back.
- You can choose to share your location temporarily or permanently
- You can even hide your location to safeguard your privacy.
Requirements
Find My Friends Version 7.0 needs iOS 11 or later & iCloud. Create a free Apple ID to use with iCloud on your Mac, iPhone, iPod touch or iPad.
Here’s How to Set-Up Find My Friends App on Your iPhone Device
If your Xiaomi Redmi Note 13 5G or iPod using iOS via 12, the Find My Friends is already installed. On the other hand, if your Xiaomi Redmi Note 13 5G device is running on the iOS 8 version, then you can install this location tracker from the Apple Play Store for Free.
When you’ve signed in iCloud on your Xiaomi Redmi Note 13 5G device, you already have an ID on Find My Friends. You can also receive the Find My Friends notifications on your Apple watch, just need to do a little setting on the Apple Watch app on your Xiaomi Redmi Note 13 5G.
To track or share location with your friend or family member, make sure he/she has the Find My Friends App installed on their device.
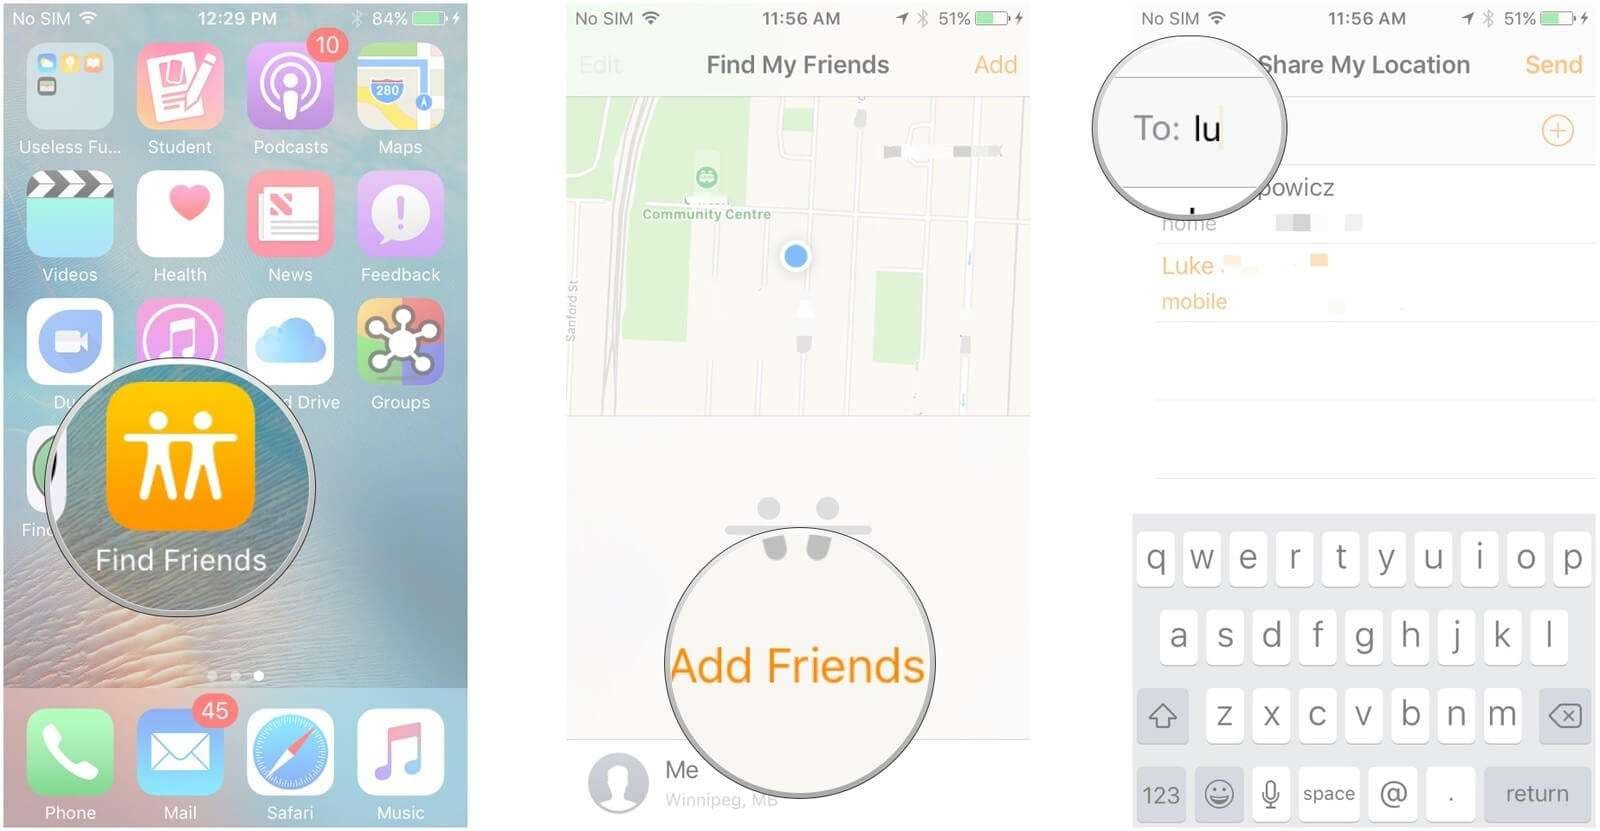
3 Simple Steps
Step 1: Open the Find My Friends App
Step 2: There’s an Option Tab Add Click It
Step 3: Select a Friend or Enter His/her Email ID, then Tap Send/Done to Send the Request
Once your friend agrees to share his/her real-time location, you can see their current whereabouts in a list or on a map in this location sharing App or over iCloud.com.
Bonus Tip: What Do I Do If I Want to Fake a Location on Find My Friends?
Do you want to spoof your location so your friends can’t find you? For this purpose, you should use Wondershare Dr.Fone - Virtual Location to ensure privacy by spoofing location. With this tool, you can easily change location on your devices with just a blink of an eye. It can teleport your location and stimulate GPS movement with a route that you draw.
Thus, you can fake location with flexible GPS movement on the Find My Friends app. Moreover, with this location spoofer, you can fake your location on almost any app, such as Snapchat, Instagram, Tinder, and Find My iPhone. If you want to know more about this virtual location changer, delve into the details below.
Notable Features of Dr.Fone - Virtual Location
- This GPS location changer can spoof your location across apps to protect your privacy. You can even prank your friends on social media platforms and mock locations on dating apps.
- You can manually pick your favorite routes to access later in a single click. Besides, this software saves your visited location for quick re-selection and re-visit.
- It supports location spoofing on up to 5 iOS devices simultaneously on 1 PC/Mac. For this, you don’t need to jailbreak your Xiaomi Redmi Note 13 5G or face any other device complications.
Simplified Steps to Spoof Location on Find My Friends Using Dr.Fone - Virtual Location
While faking location across apps, you can move at different speeds, such as cycling, walking, or driving. As Dr.Fone - Virtual Location keeps you amazed, let’s learn how to use it to change location without hustle.
Step 1: Launch Dr.Fone and Set Up to Initiate the Process
Head to the main interface of Dr.Fone - Virtual Location by launching it on your Windows PC or MacBook. Connect your smartphone to the system and tap the “Get Started” button to proceed.

Step 2: Enable the Teleport Mode and Start Spoofing Your Location
Following this, confirm your actual location and move to activate the teleport mode. For this, move your cursor to the top right side and click the third icon of “Teleport Mode.” Now, set the location and hit the “Move Here” button so the system can start spoofing the location on the Find My Friends app.

Conclusion
Would you like to add an App to the above-mentioned list? Or want to share your first-hand experience with Find My Friends App? Have your say in the comment section of this blog post!
How to Hide/Fake Snapchat Location on Your Xiaomi Redmi Note 13 5G
The GPS functionality is very prominent these days. Especially when various apps or websites are making use of your geological location to deliver more relevant content. Be it, social networking apps or gaming apps, for instance, Snapchat, and Pokemon Go respectively.

Talking about Snapchat, this app offers you different badges and filters depending upon your Geographical location. It actually utilizes the GPS feature of your device to determine where you are located. This can sometimes be annoying as you may wish to access a filter or badge that is not available at your Geological location. Now, this is where you need the Snapchat spoof location app. You not only can hide your actual location from Snapchat. Instead, cast a fake location on Snapchat map, and eventually, you can easily access the badges/filters at your convenience!
Sounds interesting, right? Let’s understand more about the tutorials on how to hide/fake location on Snapchat map.
Part 1. What Snapchat is using your location for?
Snapchat basically utilizes your location for the SnapMap feature that furnishes the location-based filters etc. over your device. This SnapMap feature was unveiled in 2017. If you haven’t deliberately enabled it yet or you’re unaware of this feature, implies that you’re still “off the grid”. If you wish to enable this feature, you literally need to authorize Snapchat “3x times” and the last, fourth one to authorize your device.
With the SnapMap feature enabled, you can easily get to know about the whereabouts of your friends, and in turn, there’re allowed to know yours. As long as the Snapchat app is running over your screen, the SnapMap location of your Bitmoji gets updated dynamically. But as soon as you quit the app, the last known location of your Bitmoji is displayed over the SnapMap.

Part 2. Why people want to hide/fake location on Snapchat?
When it comes to fake Snapchat location there can be several reasons behind that. Here are some scenarios where people do wish to hide/fake location on Snapchat. Let’s explore.
- Sometimes, you may wish to utilize the cute filter that you saw your favorite celebrity putting up when he/she was in Sydney, Australia (or any other location).
- Or, you may wish to simply spoof location Snapchat for fun and be popular among your friends that you know some really cool tricks.
- Perhaps, you wish to stay ahead one step ahead in the dating game. For instance, you’re planning to move to a location a hundred miles away, and wish to have a person to spend quality time with when you reach there.
- Another reason is that is absolutely fun to trick people into believing that you’re spending your leisure time on an expensive tour. For instance, you can check in to a classy restaurant (you’ve never been to in real) in Dubai by mocking the GPS location.
- Even better for the kids who wish to fake GPS location to hide their real location over the location-sharing SnapMap feature from their parents, family, or friends.
Part 3. How to hide location on Snapchat
When it comes to disabling or hiding the location on Snapchat, the tutorial is extremely easy. Snapchat itself offers you a setting called Ghost mode. You just need to enable it. Here’s how to get it done.
- First, get into the Snapchat app and then visit either the Discover screen or the Camera or Friends. Next, tap on the magnifying glass and hit on Map.
- As soon as the SnapMap screen loads up, you need to access the settings by hitting the Gear icon on the top right corner.
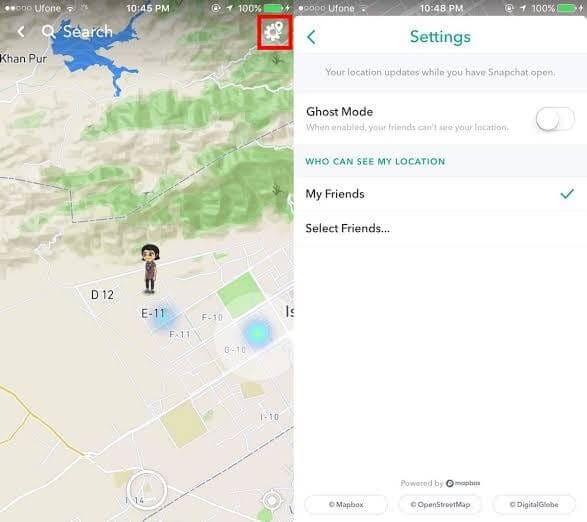
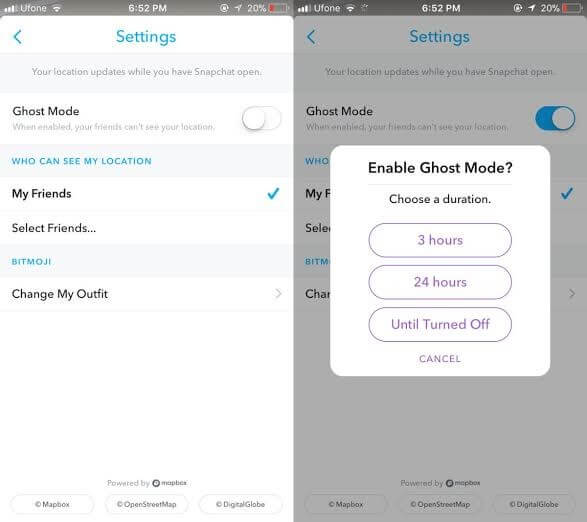
- Then, make use of the settings to set up your privacy and hit on the “Ghost Mode” toggle switch to turn it on. A pop-up window will appear with 3 different settings:
- 3 hours : Ghost mode is turned on for 3 straight hours.
- 24 hours : Ghost mode is turned on for 24 straight hours.
- Until Turned Off : Ghost mode is turned on until you manually turn it off.
Selecting either of the aforementioned settings will hide your location from SnapMap. Implies, other than you no one will be able to locate you over SnapMap.
Part 4. How to fake Snapchat location on iPhone
4.1. Change Snapchat location to anywhere using a Smart Tool (easy)
You can easily spoof location on Snapchat using the tool Dr.Fone - Virtual Location (iOS) . This tool is easy to operate and works perfectly when it comes to spoofing any location. Here is how to fake GPS Snapchat iPhone without jailbreak.
Step 1: To begin with this Snapchat location spoofer, simply head to the official website of Dr.Fone – Virtual Location (iOS). Download the software package from there and then install it afterwards.

Step 2: After successful downloading, open the tool. Now, you need to opt for the “Virtual Location” module from the main interface. Post doing this, click on the “Get Started” button.
Step 3: You can notice your current virtual location on the map in the next window. If you can’t, simply go to the “Current Virtual Location” icon available on the lower right side of the screen. Click on it and it will show your current virtual location.

Step 4: It’s time to activate the “Teleport Mode”. To do this, all you need is to click on the first icon given on the upper right side. After this, you need to enter the location where you desire to teleport in the blank field given on the upper left. Hit on “Go” when you’re done.

Step 5: A few moments later, the system will perceive the desired location you have entered. A pop-up box will come up where the distance will be shown. Click on the “Move Here” option in the box.
Step 6: This is it! The location has been changed to the desired one now. Now, whenever you click the “Current Virtual Location” icon, you will see the new location.

Also, on your iOS device, you can now Fake Snapchat location or in any other location-based app.
4.2. Change Snapchat Location using Xcode (complex)
Now, if we talk about fake location for Snapchat map on iPhone, it’s not as easy as it looks. You need to be an extremely tech-savvy person to fake Snapchat location without jailbreaking your Xiaomi Redmi Note 13 5G. You simply can’t download a Snapchat location spoofer app over your Xiaomi Redmi Note 13 5G and fake it. But fret not, we’re glad to bring you a detailed tutorial with which you can easily perform location spoofing on Snapchat and that too, without jailbreaking your Xiaomi Redmi Note 13 5G.
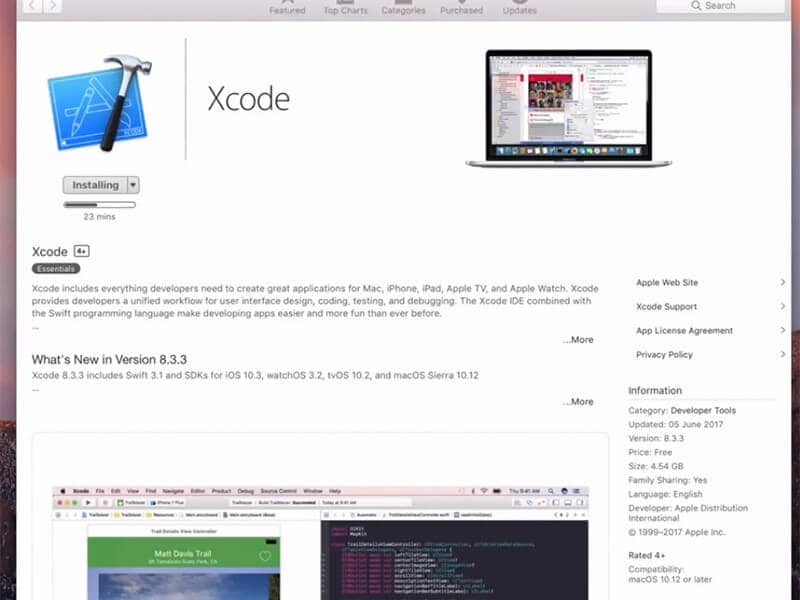
Step 1: Install Xcode and Set up a Dummy app
- Grab your Mac computer first and then head over to the App Store. Now, look for the Xcode application and get it installed on your computer.
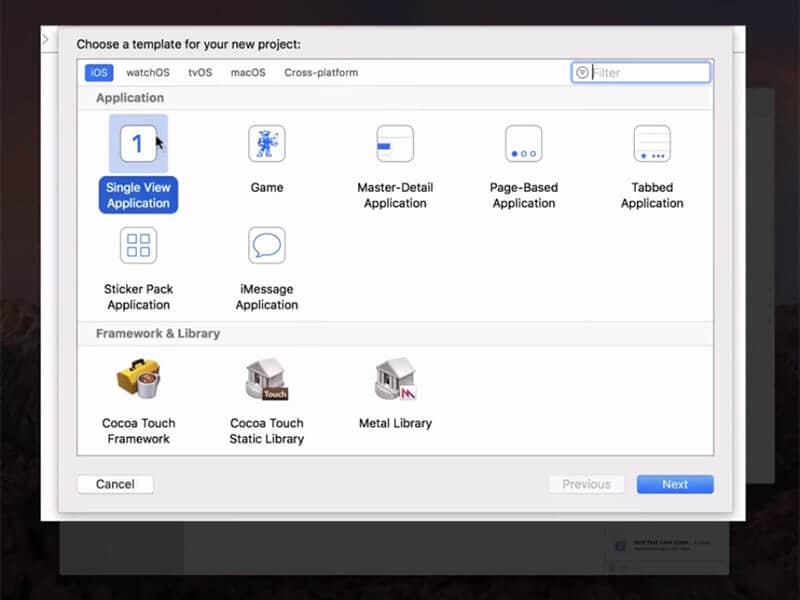
- Once the application is installed, launch it over. The Xcode window will come up over your screen. Now, set up a new project and select “single view application” followed by hitting “Next”.
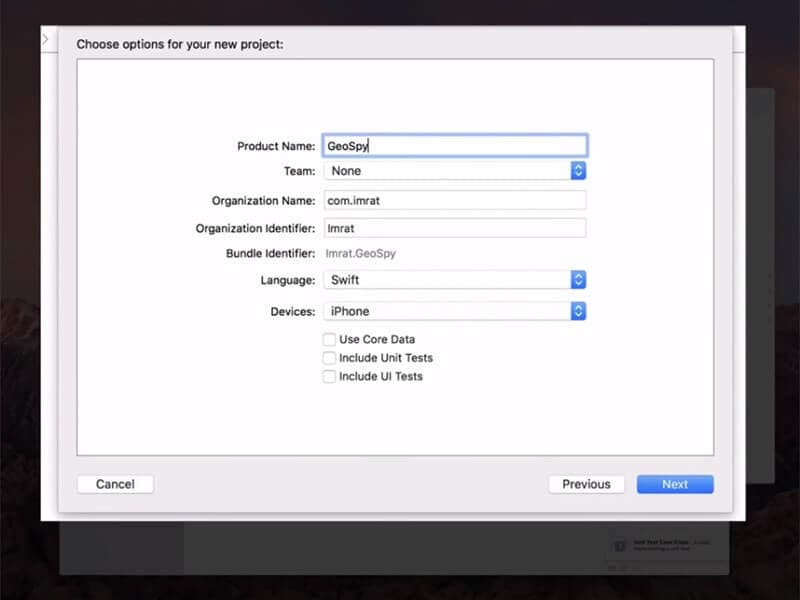
- Then, give a name to your project, for instance, “GeoSpy” and hit on the “Next” button.
Step 2: Setup GIT on Xcode
On the upcoming screen, Xcode will throw up a pop-up message stating “Please tell me who you are” and some GIT commands that you need to execute.
For this, fire up the “Terminal”over your Mac and then execute the commands as follows:
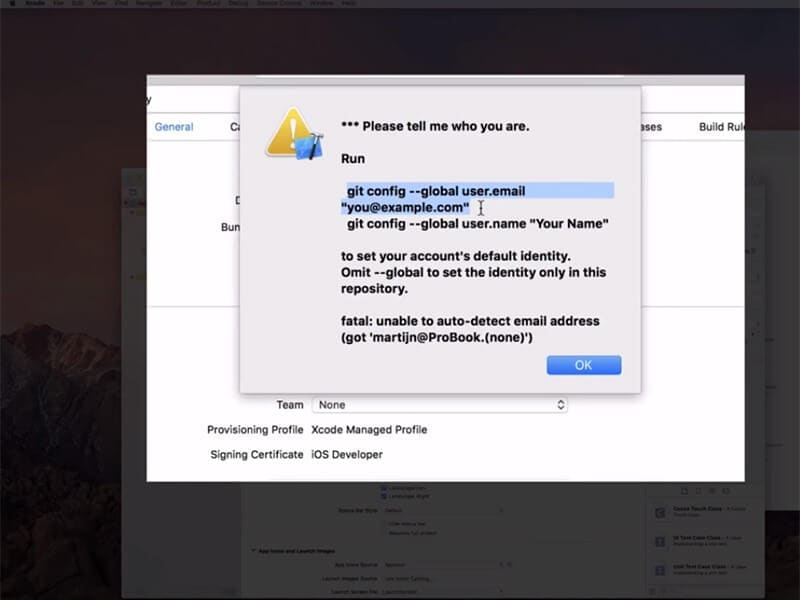
- git config –global user.email “you@example.com “
- git config –global user.name “your name”
Note: Change the values for “you@example.com ”and “your name” with your information.

Next, you need to make sure that to set up a development team and meanwhile, connect your Xiaomi Redmi Note 13 5G to your Mac computer.
Once done, opt it in as the build device and while you do it, ensure to keep it unlocked.
Lastly, if everything is performed correctly, Xcode will now process some symbol files, please be patient and wait for it to complete.
Step 3: Move Bitmoji
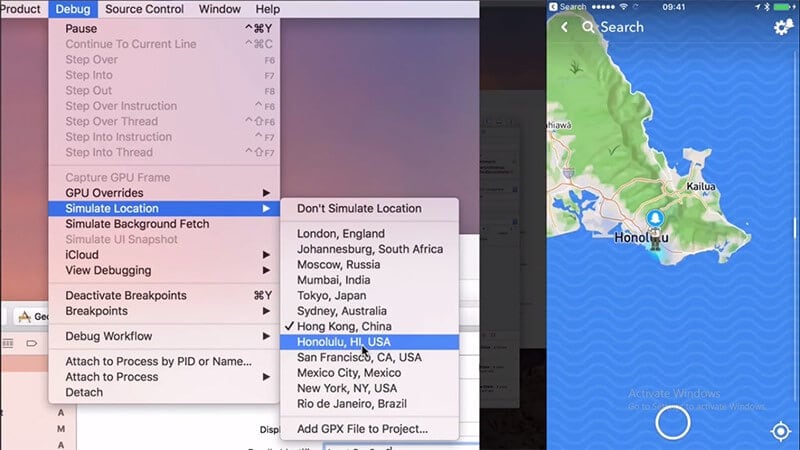
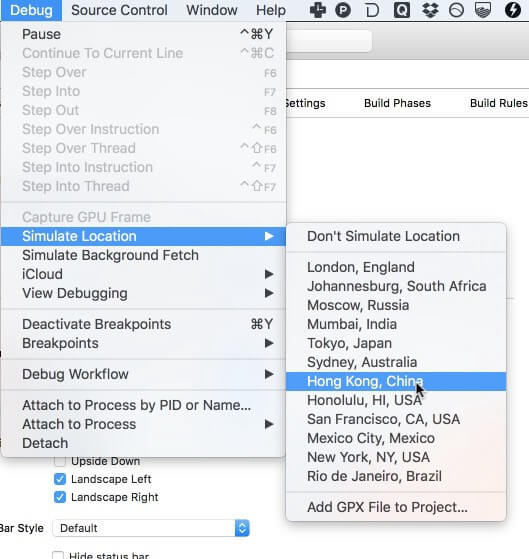
Now, you’re all set to fake location for Snapchat map. For this, simply hit on the “Debug” menu and then opt for “Simulate Location” from the drop-down window. Lastly, select the location from the list as per your preference and you’re done.

Part 5. How to fake Snapchat location on Android
Last but not least, the next method to fake Snapchat location is for Android devices. For this, you need to download a Snapchat spoof app (easily available over Google Play Store) on your Xiaomi Redmi Note 13 5G. Here’s all that you need to do.
Head to the Google Play Store and then look for the “fake GPS” app. You may be provided with several similar options, be it free or paid. If you get along with any other app, it may require your Xiaomi Redmi Note 13 5G to be rooted.
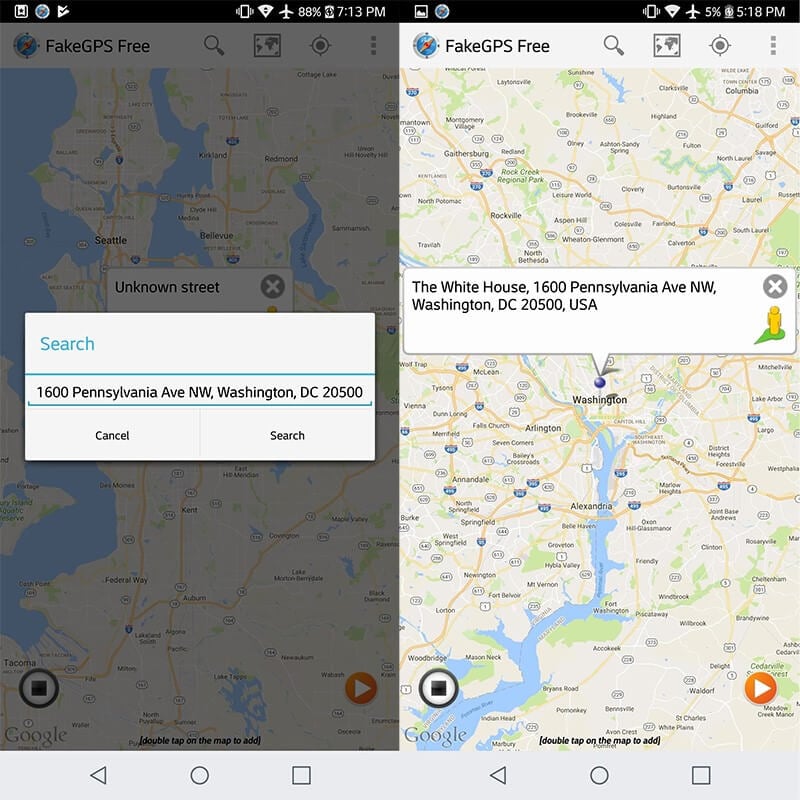
You need to opt for the “Fakegps free” app for Snapchat. This app doesn’t require you to root your Android. But ensure that you are running on Android version 6.0 or higher.
Install the Fake GPS Free app for Snapchat and then launch it afterwards. On the main screen, you’ll be asked to“ENABLE MOCK LOCATIONS”. Hit on it and you’ll be redirected to the“Developer options” screen.
Here, you need to simply tap on the “Select Mock Location App” option and opt for “FakeGPS Free” from the list of options appearing.

Note: You may need to enable the “Developer options” first to access these settings. For this, head to the “Settings”>“About Phone”> hit on “Build Number” – x7 times.
Once done with enabling mock location, hit the back button on your touch screen to retreat back to the Fake GPS Free app.
Now, hit on the “Search” icon over the top to find the desired location. Or, simply double tap over the map on your desired location to drop the pin.
Lastly, hit the “play” button available over the right bottom of your screen to activate the fake GPS location for Snapchat.
Final Words
While reaching towards the end of the article, we are pretty sure that you now fully understand what it takes to fake Snapchat location on Android or iPhone. The aforementioned ways are fully tested and work even without rooting or jailbreaking your devices respectively. Happy Spoofing!
How to Fake Snapchat Location without Jailbreak On Xiaomi Redmi Note 13 5G
Snapchat users are very fond of using custom filters when sharing content on the app. It is a great way to ensure that your images and videos are only viewed by the people that you target. However, a new feature called Geo-filters has brought a lot of mixed feelings amongst Snachatters.
The filter is location-based, which makes any content that you share to be seen by people who are within your geographic fence.
Imagine that you are standing at the Niagara Falls and want to share with people who are in Europe; you will not be able to do this and this is why the filters are problematic to people in the Snapchat community.
Thankfully, there are ways in which you can spoof our device, allowing you to access Geofilters anywhere in the world. Today, you learn several ways in which you can achieve this objective with ease.
Part 1: Benefits that faking Snapchat brings to us
Snapchat comes with a lot of filters, both sponsored and crowdsourced, which you can use to interact with different people. When Geofilters was introduced, it meant that you could only access filters that were designed for specific locations.
Sponsored filters generally tend to target people in certain areas, and this can limit how you disseminate your content on Snapchat.
The main benefit that you get from faking Snapchat is getting access to these filters without even moving an inch.
When you spoof your device, Snapchat thinks that you are actually in the area that you have spoofed to. This virtual location will then allow you to access the filters that are available in that area.
Part 2: A free but complicated way to fake Snapchat location no jailbreak
One of the best ways to fake Snapchat without jailbreak is to use XCode. This is an app on your Xiaomi Redmi Note 13 5G that allows you to tweak certain aspects of the apps that you have on your device, including Snapchat.
Get XCode on your device and then launch it. Start by using the locations that are found to setup XCode. You can download XCode from Apple App Store. You will need your Apple ID and password to use XCode.

Here are the steps that you have to follow:
Step 1: Start by creating a basic single-view application
Launch XCode and then create a new project
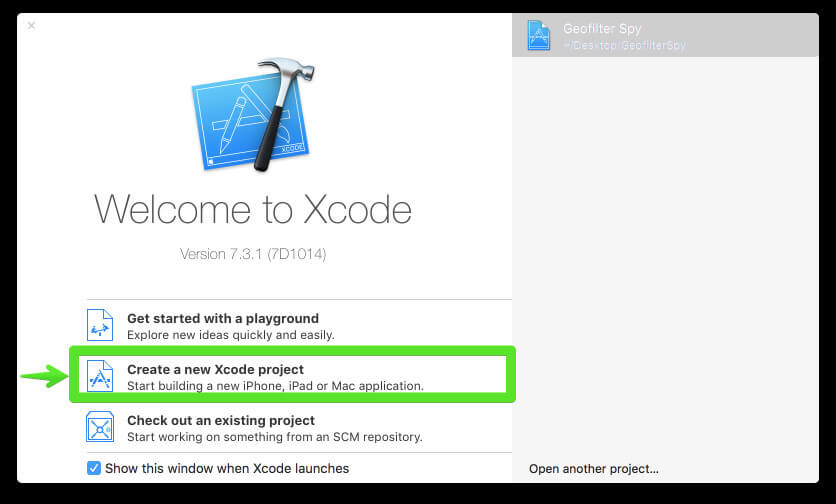
Then choose the option marked “Single View iOS application.
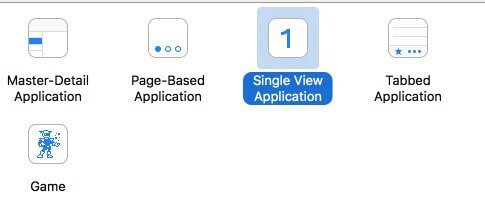
Now customize the project options and give it any name that you desire.

Now proceed and customize the Organization Name and the Identifier. The identifier works like a reverse domain name so you can use anything you desire.
Proceed and select swift as your preferred language and then click on “iPhone” as your device so the app will be small.
Any other options below this should be left in their default states.
Now go ahead and save the project to a location on your computer. Since the version control does not apply in this case, make sure that you uncheck the option before you save the app.

Step 2: transfer and run the created app on your iOS device
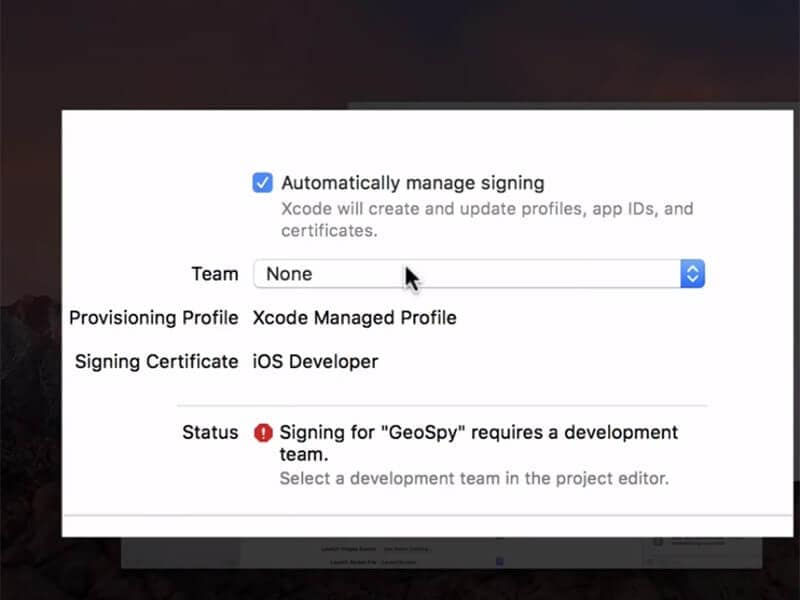
People who do not have the latest version of XCode will run into the error shown below.
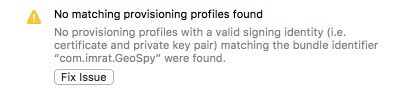
IMPORTANT: do NOT click on “Fix Issue” until you do the following tasks:
- Access the preferences on your XCode
- Choose the accounts tab
- Click on the add (+) icon at the bottom left side of your screen
- Now choose “Add Apple ID”.
- Type in your Apple ID and password
You should now have an accounts screen similar to the one shown in the image below.
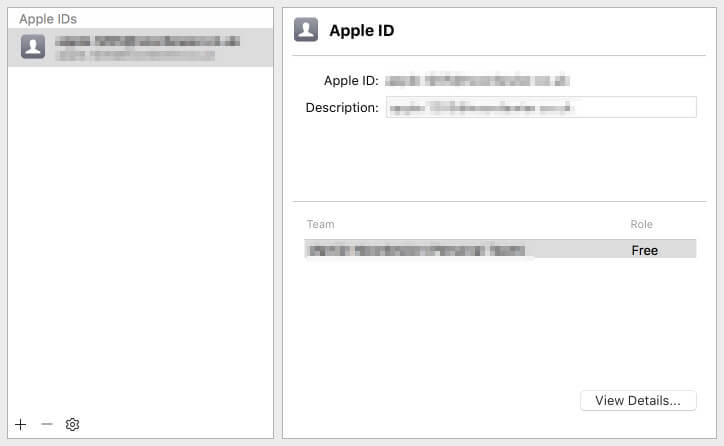
Now close the window and click on the “team” dropdown menu. You may now select the Apple ID that you just created.
Now you can go ahead and click on the “Fix Issue” button.
Now the error will be resolved and you should have a screen that is similar to the image below.
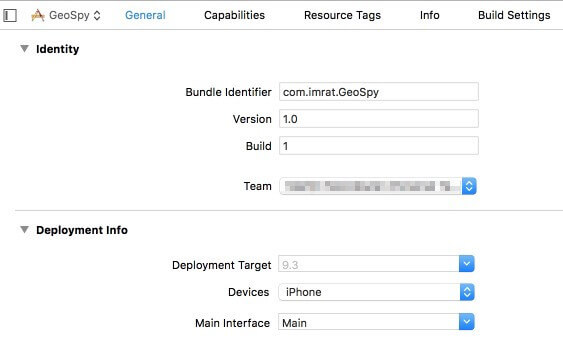
You may now run the app that you created before on your iOS device.
Use an original USB cable to connect the iOS device to your computer.
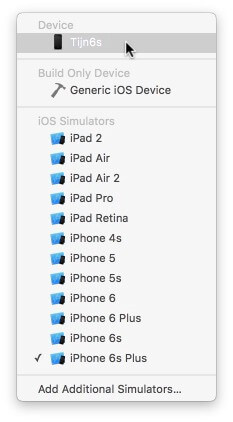
Towards the top right-hand corner of your screen, click on the button that is displaying your project name and then click on the iOS device.

Now your iOS device will be showing at the top. Select it and proceed.
Hit the “Play” icon that is found at the top left side of your screen.
Wait for the process to be complete. You might as well get a cup of coffee as this can take quite a while.

When the process is complete, XCode will install the app on your iOS device. You will get the following error if your device has not been unlocked; unlocking the iOS device will put off the error message.
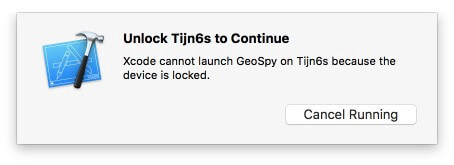
Now you should be viewing a blank screen on your iOS device. Do not worry; your device has not been ruined. This is the app that you have just created and installed. Pressing the “Home” button will dismiss the blank screen.
Step 3: It’s time to spoof your location
Go to Google Maps or iOS maps which will now show your current location.
Go to XCode and then choose “Simulate Location” from the “Debug” menu and then select a different location to test.

If you have done all that you need to do, then the location of your iOS device should instantly jump to the location that you have chosen.
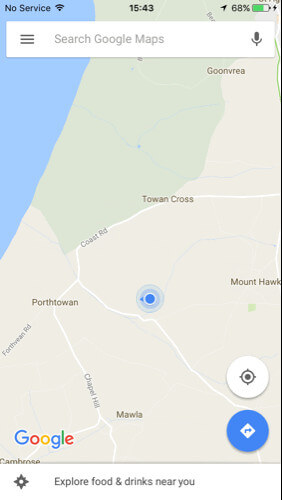
Now you can proceed and see if you have access to Geo-filters in the new location.
Step 4: Spy Geo-Filters on Snapchat
Now you can launch Snapchat and then access the filters in the area that you have teleported to. Remember that you can move from one location to the next on XCode without having to close Snapchat. Just cancel the current snap after changing the location and create a new snap to see the filters in the new location. If this fails to respond, then go back to Google maps or iOS map app and then ensure that you are in the desired location. Once you have done so, close Snapchat and restart it again, and you will be in the new location once more.
Part 3: A paid but easy way to fake Snapchat location without jailbreak
You can also fake your Snapchat GPS location using a premium app such as iTools. This is a popular application, used to spoof many other apps that require geo-location data to work. Another point to note is that the latest iPhone models cannot be jailbroken. The iOS version today is very secure and you cannot tweak it like before.
Thankfully, you can use a premium, not free, iTools to change your virtual location without jailbreaking the Xiaomi Redmi Note 13 5G device. You can get iTools on a trial basis, but after the period expires, you will have to pay $30.95 to continue using it.
Step 1: Download and install iTools on your computer and then launch it. Connect your iOS device to your computer using the original USB cable that came with the Xiaomi Redmi Note 13 5G device.
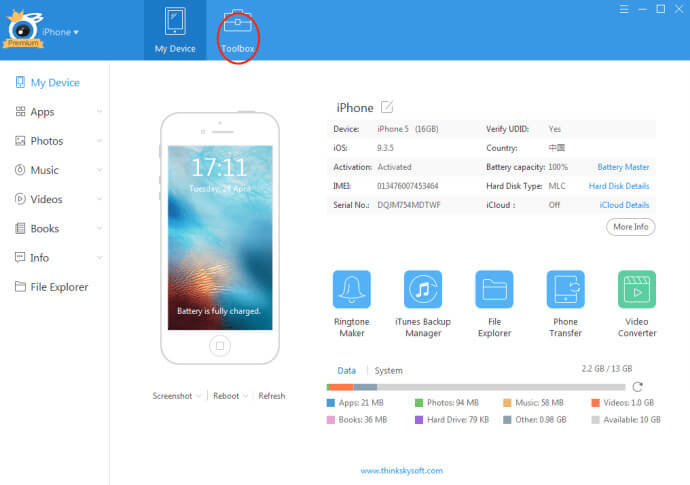
Step 2: Go to the iTools panel and click on “toolbox”.
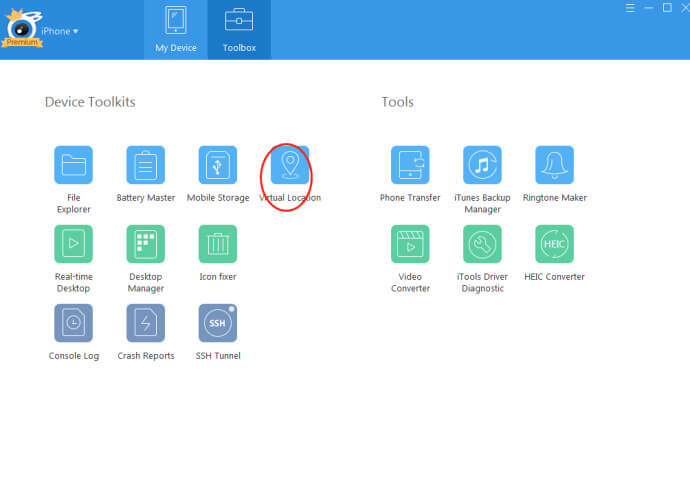
Step 3: Select the Virtual Location button within the Toolbox Panel
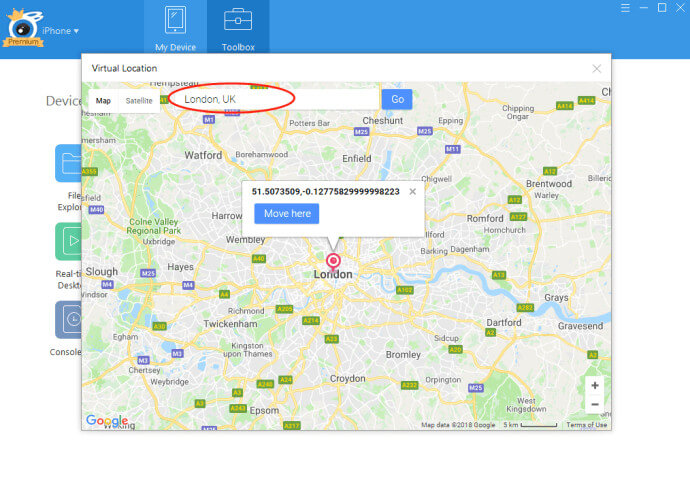
Step 4: Type in the location that you want to teleport to and then click on ‘Move Here”.
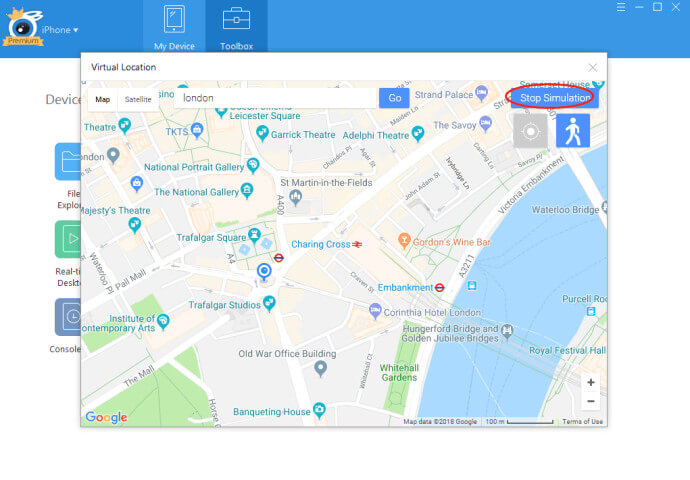
Step 5: Now open your Snapchat and you will be able to access the filters found in the location that you typed in.
Once you are finished with this spoofed location, you can simply select “Stop Simulation” in iTools. This is a premium tool, but very simple to use. It is the best tool to use, especially if you are having a device with the latest iOS version.

Part 4: A brief comparison of XCode vs. iTools to fake Snapchat GPS location
From the steps used in both methods, it is very clear that iTools is the best app to use to fake your Snapchat GPS location for several reasons. Here are some of them:
- Ease of use - Using XCode to fake your Snapchat GPS location is a long and complicated process, whereas using iTools is simple and clean.
- Price – Although XCode is free while iTools is not, the benefits of using iTools surpass the cost. This makes it less-costly when it comes to performance and convenience.
- Security – XCode may not be very secure, especially when it comes to avoiding detection by Snapchat. You may have to keep going back to XCode, and changing the location, switching off Snapchat, and restating it again. However, when using iTools, your location is fixed until you stop the simulation.
- Versatility – XCode cannot be used on the latest iOS devices without posing problems, while iTools is a simple and effective tool for all iOS versions.
In conclusion
When you want to spoof Snapchat to access Geo-Filters in any part of the world, you can use the complicated XCode or pay a fee and use the simpler iTools. There are various benefits that you gain from teleporting using these tools, with Geo-Filters access being the biggest benefit. If you want to use Snapchat all over the world without moving out of your home, then these are the ways that you can go about it.
- Title: Does Xiaomi Redmi Note 13 5G Have Find My Friends? | Dr.fone
- Author: Vivienne
- Created at : 2024-09-02 22:35:17
- Updated at : 2024-09-03 22:35:17
- Link: https://review-topics.techidaily.com/does-xiaomi-redmi-note-13-5g-have-find-my-friends-drfone-by-drfone-virtual-android/
- License: This work is licensed under CC BY-NC-SA 4.0.